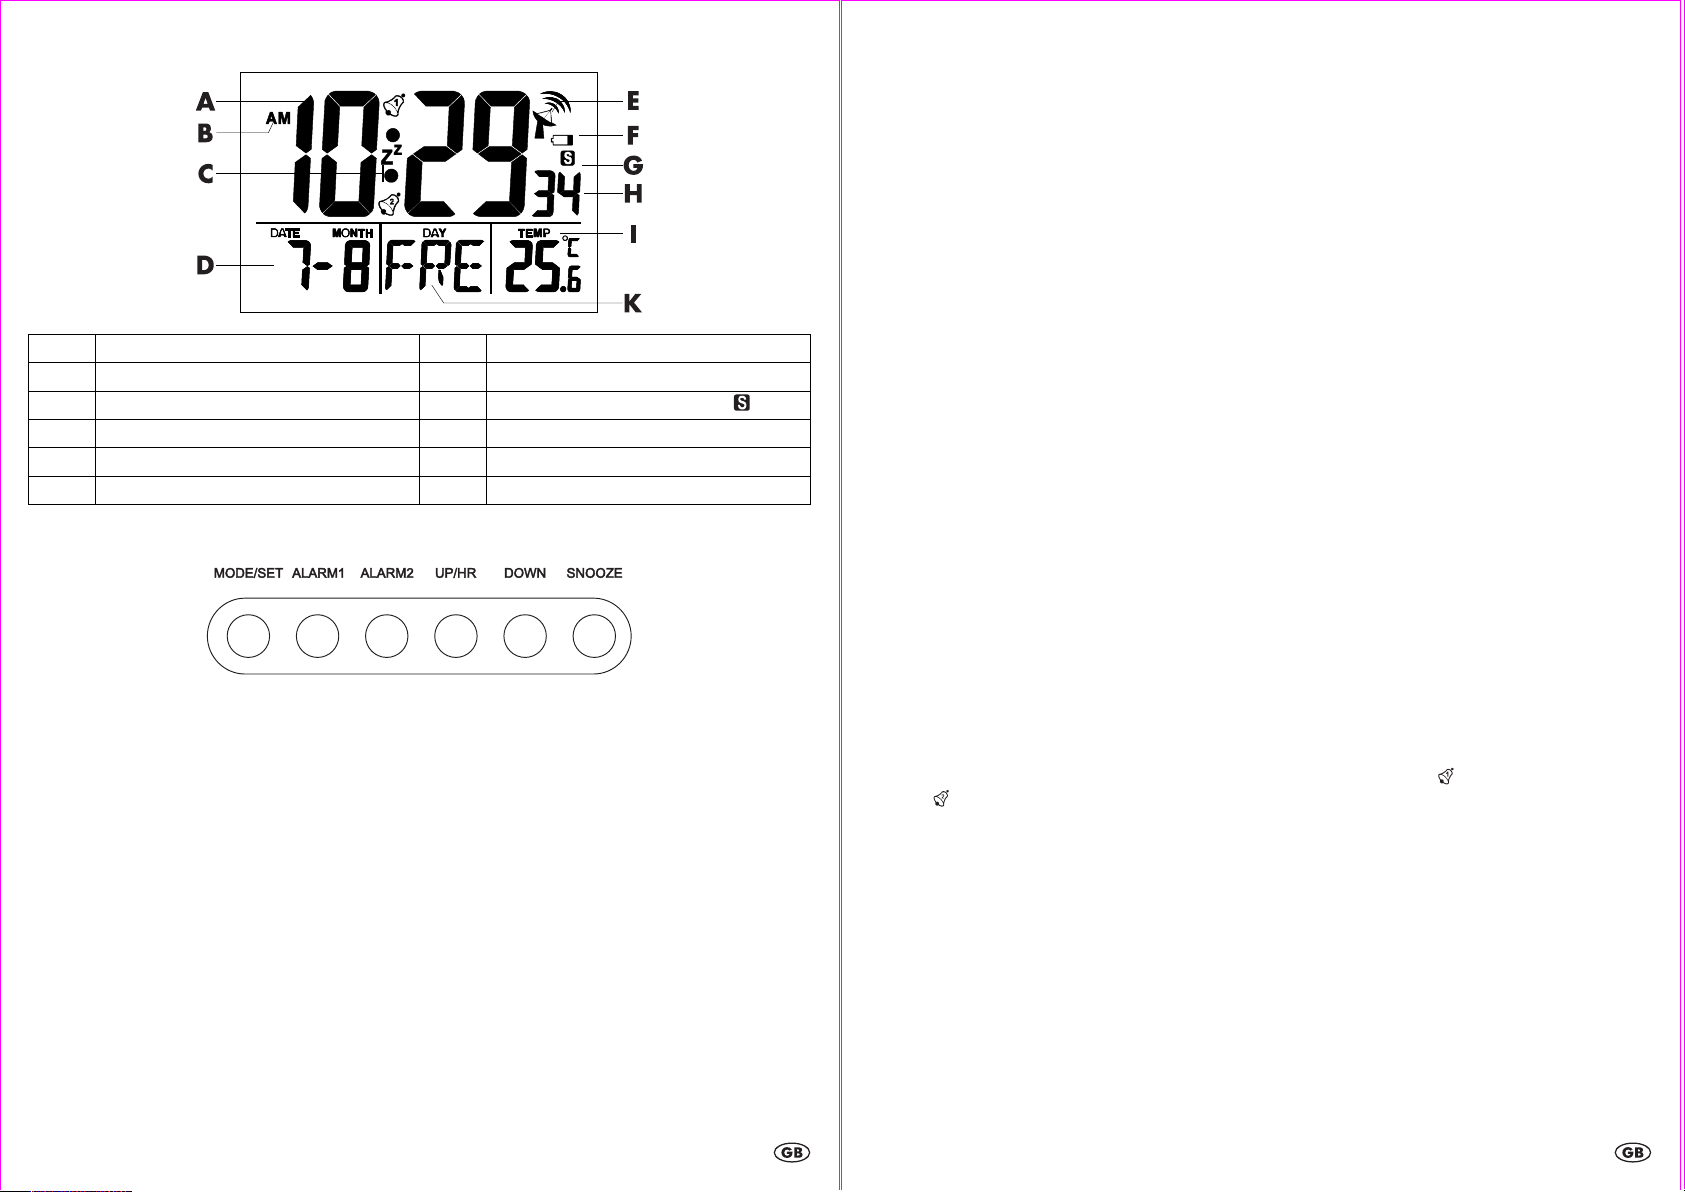
Display
A Time display E Radio signal reception indicator
B
AM/PM display (12-hour time format)
F Battery low indicator
C
Alarm 1, Snooze symbol, Alarm 2
G
Daylight saving time indicator
D
Date
H Seconds
I Temperature
K Day of the week
Control panel on the backside of the clock
Features
• Radio time signal reception DCF77
• Indoor temperature in °C/°F
• 12/24 hour time display
• Date (day/month/year)
• Day of the week in 7 different languages
• Time zone adjustment
• Battery low indicator
• Daylight saving time
• 2 alarms
• Snooze
Setup
Remove the protective film from the display of the wall clock. Remove the battery interrupter.
Your wall clock will now begin to receive the DCF 77 radio time signal and the radio reception indicator will blink on the
display. This process will take from 3 to 10 minutes.
Please note: Do not move your wall clock during the reception process.
Please note: Do not move your wall clock during the reception process.Please note: Do not move your wall clock during the reception process.
Please note: Do not move your wall clock during the reception process.
Upon successful reception of the signal, the clock will automatically set the correct time, date, calendar week, moon phase and
day of the week.
Reception interference
The DCF77 radio signal is transmitted from the vicinity of Frankfurt am Main and can be received within a radius of about
1500 km. However, there are some sources of interference that may greatly hinder reception.
If your wall clock does not correctly receive the radio signal, hang the wall clock in a different location. Please note, that the
electromagnetic waves that may occur near computers, telephones, radios and TVs can interfere with DCF77 radio reception.
Strong building insulation (metal building elements), mountains or atmospheric interference can also hinder reception. Replace
the batteries if necessary.
Restart
Start or stop a restart of the radio time signal reception process by pressing the DOWN button on the backside of the wall
clock for 3 seconds. All other buttons are inactive during the reception process. Your time zone setting stays active.
Speed setting
Press and hold UP/HR or DOWN to use the speed setting when setting numerical values.
Manual time setting, time zone adjustment, day of the week language setting
The time can be set manually if the radio time signal reception is unsuccessful:
Press and hold the MODE/SET button for 3 seconds during normal time display. The time zone adjustment value will blink on
the display and can be set by pressing UP/HR or DOWN. Set the value to the difference in hours between your home time
zone and your current time zone.
Press MODE/SET to confirm your setting.
Set the hours, minutes, year, month and day of the week language (GER=German, FRA=French, ITA=Italian, NET=Dutch,
ESP=Spanish, DAN=Danish, ENG=English) in the same way.
12/24-hour time format
Press UP/HR to select the 12- or 24-hour time format. If the 12-hour time format is selected, AM will appear before noon and
PM will appear after noon.
Temperature
Press DOWN to select the temperature unit Celsius (°C) or Fahrenheit (°F).
Alarm
The wall clock has 2 separate alarms which can be set independently. Press and hold ALARM1 or ALARM2 for 3 seconds to
set one of the alarm times. The hours will blink on the display. Set the hours by pressing UP/HR or DOWN and confirm your
setting by pressing MODE/SET. Set the minutes in the same way.
Press ALARM1 or ALARM2 during normal time display to activate or deactivate the alarms. will appear when alarm 1 is
activated. will appear when alarm 2 is activated.
Snooze
When the alarm sounds, press SNOOZE to deactivate it temporarily. Zz and the bell symbol will blink on the display. After 5
minutes, the alarm will sound again. Press ALARM1 or ALARM2 to stop the alarm.
Battery low indicator
When the battery charge becomes too low to power the clock, the battery low indicator will appear on the display. Replace
the batteries as soon as possible.
Cleaning instructions
Clean the product with a soft, dry and lint-free cloth. A glasses cleaning cloth is ideal.
Declaration of conformity
If used as intended this product conforms to the basic standards of § 3 and the other relevant provisions of the FTEG (Section 3
of the R&TTE directive).
The declaration of conformity can be requested here: conformity@digi-tech-gmbh.com



Zapojte sa do diskusie o tomto výrobku
Tu sa môžete podeliť o to, čo si myslíte o Auriol IAN 114354 Budík. Ak máte otázku, najprv si pozorne prečítajte návod. Vyžiadanie manuálu je možné vykonať pomocou nášho kontaktného formulára.
odpovedať | Bolo to užitočné (0) (Preložené Googlom)