
GB GB
GB GB GB GB GB GB GB GB GB GB
GB GB GB GB GB GB GB GB GB GB
GB GB GB GB SKSKSK
SK
Stlačte tlačidlo SET a podržte ho stlačené, aby
ste prešli zo °C na °F alebo naopak.
Stlačte tlačidlo SET pre zobrazenie doteraz
najvyššej nameranej teploty (HI).
Opätovne stlačte tlačidlo SET pre zobrazenie
doteraz najnižšej nameranej teploty (LO).
Stlačte tlačidlo SET a podržte ho stlačené
počas zobrazovania najvyššej, resp. najnižšej
teploty, aby sa uložené hodnoty vynulovali.
STPWATCH: Stopky
Stlačte tlačidlo SET pre spustenie stopiek.
Opätovne stlačte tlačidlo SET pre zastavenie
stopiek.
Stlačte tlačidlo SET a podržte ho stlačené, aby
ste vynulovali stopky.
CAL RATE: Momentálna spotreba kalórií
CALORIE: Počítadlo kalórií
Stlačte tlačidlo SET a podržte ho stlačené, aby
ste vynulovali počítadlo kalórií.
FAT-BURN: Spaľovanie tuku v gramoch
Ak došlo k prehltnutiu batérie, okamžite vyhľa-
dajte lekársku pomoc.
Batérie z výrobku odstráňte, ak ho nebudete
dlhší čas používať.
POZOR! NEBEZPEČENSTVO
EXPLÓZIE! Batérie nikdy nedobí-
jajte!
POZOR! NEBEZPEČENSTVO
EXPLÓZIE! Vždy vymieňajte
všetky batérie súčasne a používajte
len batérie rovnakého typu.
Vybitú batériu ihneď vyberte z prístroja. Hrozí
zvýšené nebezpečenstvo vytečenia!
Pri vkladaní dbajte na správnu polaritu!
Batériu držte mimo dosahu detí, neodhadzujte
ju do ohňa, neskratujte ju ani ju nerozoberajte.
Ak batéria vytiekla v prístroji, ihneď ju vyberte,
aby ste tak predišli poškodeniu prístroja!
Vyhýbajte sa styku s pokožkou, očami a sliznicami
.
Pri kontakte s kyselinou batérie opláchnite
SKSK
Problem Solution
Empty LC-display or no
response after putting
the battery in again
RESET
Remove battery. In the
area marked RESET of
the battery compartment,
touch the plus and minus
terminals at the same
time using a screwdriver.
Insert a 3V battery into
the battery compartment
in such a way
that the +
terminal points upwards.
Replace the battery cover
on the battery compart-
ment. The microprocessor
is reset and restarted.
reactivate the computer. The function indicator
8
shows the current mode.
Press the MODE button
11
repeatedly to
page through the various modes.
Press the SET button
13
to change into the sec-
ondary function for any function.
Press the SET button and keep it pressed to call
or reset up any saved values.
The bike computer has the following
functions:
Advanced users’ functions:
CLOCK > TOTALODO > TOTAL-TM >
TRIPDIST >
MAXSPEED
> AVGSPEED > TRIPTIME > TEMP >
STPWATCH >
CAL RATE > CALORIE > FAT-BURN >
KM+/- > TIME+/- > SCAN
Beginners’ functions:
TRIPDIST > AVGSPEED > TRIPTIME
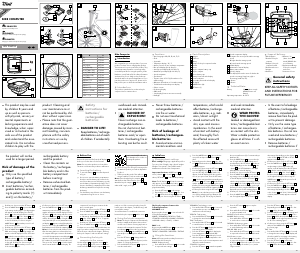
7
LC display
8
Function indicator
9
Secondary function value display
10
Primary function value display
11
MODE button
12
Light button
13
SET button
14
SCAN indicator
15
Servicing interval indicator
16
Speed comparison indicato
r
17
Acceleration / deceleration indicator:
Acceleration – anticlockwise
rotation
Decelerat
ion – clockwise rotation
18
Battery state indicator
Technical data
Battery: 3 V (CR2032 button cell)
GB
SK SK SK SK SK SK SK SK SK
SK
– Odometer (countdown or forwards)
– Total odometer and total cycling time display
– Calories
– Fat-burning
– Scan indicator (functions displayed in
continuous loop)
– Automatic switch to clock mode
– Backlight
Description of parts
1a
Bracket
1b
Bracket cushion plate
2a
Sensor
2b
Sensor battery compartment cover
3
Magnet
4
Cable tie
5
Battery 3 V , type CR2032 button cell
6a
Bike computer
6b
Bike computer’s battery compartment cover
Included items
1 Bike computer
1 Bike computer bracket
1 Magnet
1 Sensor
4 Cable ties
2 Batteries 3 V
, type CR2032 button cell
1 Operating instructions
General safety advice
KEEP ALL THE SAFETY ADVICE AND INSTRUC-
TIONS IN A SAFE PLACE FOR FUTURE REFERENCE!
Children or persons who lack the knowledge or
experience to use the device or whose physical,
sensory or intellectual capacities are limited must
never be allowed to use the device without
supervision or instruction by a person responsible
for their safety. Children must be supervised so
that they do not play with the product.
Please note that the warranty does not cover
damage arising from improper treatment, non-
observance of the operating instructions and
safety advice or unauthorised use.
Safety advice concerning
batteries
RISK OF LOSS OF LIFE!
If batteries are swallowed, it can lead to loss of
life. Seek medical attention if a battery is swal
lowed.
Remove the battery if the product is not to be
used for a long period.
CAUTION! RISK OF EXPLO-
SION! Never recharge single-use
batteries!
CAUTION! DANGER OF EXPLO-
SION! Always replace all batteries
at the same time and only use batte
ries
of the same type.
If the battery is exhausted, remove it from the
device immediately. Otherwise the battery is
more likely to leak.
Make sure you insert the battery the right way
round (polarity).
Keep the battery away from children. Do not
throw the battery into a fire. Never short-circuit
it or take it apart.
If your battery leaks, remove it from the device
immediately to prevent the device from being
damaged.
Do not let the fluid from a leaking battery come
into contact with your skin, eyes or mucous
membranes. In the event of contact with fluid
leaking from a battery, thoroughly flush the
affected area with water and / or seek the
advice of a doctor!
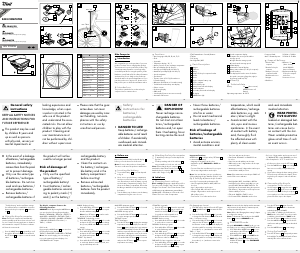
Before use
Remove the protective foil from the LC display
7
before first use.
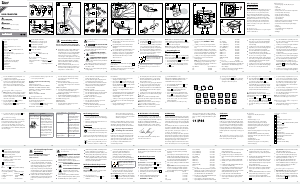
Inserting the battery
To insert the battery
5
, proceed as shown in
Fig. A.
Attaching the bike computer
To attach the device, proceed as shown in
Figs. B to G.
Preparing for use
Basic settings
Note: The LC display
7
comes on automatically
approx. 2 seconds after the battery
5
is inserted.
You are immediately offered a choice of languages.
Press the MODE-button
11
repeatedly until the
desired language appears.
Confirm your choice by pressing the SET but-
ton
13
. You move on automatically to select
the user profile.
Press the MODE button repeatedly until the
desired
user profile (ADVANCE or EASY)
appears.
Confirm your choice by pressing the SET but-
ton. Now you can choose the wheel size (SET
WS).
A four-digit number appears in the LC display.
Now enter the tyre circumference of your wheel
in mm. Press the MODE button repeatedly until
the desired number appears as the first digit.
Confirm your choice by pressing the SET button.
Repeat this process for each of the three
remaining digits.
Note: You can calculate your tyre
circumference
by multiplying your
tyre diameter by 3.1416.
The following list contains the tyre circumfer
ences
of the most common cycle tyres.
Tyre diameter Tyre circumference
20” 1598 mm
22” 1759 mm
24” 1916 mm
26” (650 A) 2073 mm
26.5” (tubular) 2117 mm
26.6” (700x25C) 2124 mm
26.8” (700x28C) 2136 mm
27” (700x32C) 2155 mm
28” (700B) 2237 mm
ATB24”x1.75 1888 mm
ATB26 x1.4 1995 mm
ATB26 x1.5 2030 mm
ATB26 x1.75 2045 mm
ATB26x2 (650B) 2099 mm
27”x1 2138 mm
27”x1 1 / 4 2155 mm
Now select your desired unit of distance. Press
the MODE button repeatedly until SET KM or
SET MILE appears in the LC display.
Confirm your choice by pressing the SET button.
You move on to entering your age.
A two-digit number appears in the LC display.
Now enter your age. Press the MODE button
repeatedly until the desired number appears
as the first digit.
Confirm your choice by pressing the SET butto
n.
Repeat this process for the remaining digit. You
move on to selecting the unit of weight.
Press the MODE button repeatedly until SET
KG or SET LB appears in the LC display.
Confirm your choice by pressing the SET button.
You move on to entering your weight.
A three-digit number appears in the LC display.
Now enter your weight. Press the MODE button
repeatedly until the desired number appears
as the first digit.
Confirm your choice by pressing the SET button.
Repeat this process for all the remaining digits.
You move on to selecting the time format.
Press the MODE button repeatedly until 12 for
the 12-hour format or 24 for the 24-hour format
appears in the LC display.
Confirm your choice by pressing the SET button.
You move on to setting the time.
A four-digit number appears in the LC display.
Enter the current time. Press the MODE button
repeatedly until the desired number appears
as the first digit.
Confirm your choice by pressing the SET button.
Repeat this process for all the remaining digits.
You move on to selecting the servicing interval.
Press the MODE button repeatedly until the
desired
number of units of distance to your next
in
tended bicycle service appears in the LC
display.
Note: You have the choice of 200, 400, 600
or 800 km or miles.
Confirm your choice by pressing the SET button.
You move on to selecting the unit of temperature.
Press the MODE button repeatedly until °C or
°F appears in the LC display.
Confirm your choice by pressing the SET button.
You have now completed the the basic settings.
Using the bike computer
Note: If the bike computer remains unused for
more than 5 minutes, it automatically switches
into the stand-by mode. Press any button to
Using functions
Note: All the functions and secondary functions
are described in the following list.
CLOCK: - Displays the time
Press the SET button
13
and keep it
pressed for
3 seconds to access the time settings.
TOTALODO: - Total odometer
Press the SET button and keep it pressed for
3seconds to access the wheel size settings
and total distance.
TOTAL-TM: Total time cycling
Press the SET button and keep it pressed for
3seconds to make changes to the saved total
time cycling.
TRIPDIST: Trip distance
Press the SET button and keep it pressed for
3seconds to reset the trip distance, the
average speed and the trip time displays to 0.
MAXSPEED: Highest speed
Press the SET button and keep it pressed for
3seconds to reset the maximum speed display
to 0.
AVGSPEED: Average speed
TRIPTIME: Trip time
TEMP: Thermometer
Press the SET button and keep it pressed to
switch between °C and °F.
Press the SET button to display the highest tem-
perature (HI) measured so far.
Press the SET button again to display the low-
est temperature (LO) measured so far.
Press and hold down the SET button while the
highest or lowest temperature is displayed to
switch back to the current temperature to
reset the saved data.
STPWATCH: Stopwatch
Press the SET button to start the stopwatch.
Press the SET button again to stop the stop-
watch.
Press the SET button and keep it pressed to
reset the stopwatch to 0.
CAL RATE: Current calorie consumption
CALORIE: Calorie meter
Press the SET button and keep it pressed to
reset the calorie counter to 0.
FAT-BURN: Fat burning in grams
Press the SET button and keep it pressed to
reset the fat burning value to 0.
KM: Odometer
Press the SET button and keep it pressed to
change the odometer settings.
The LC display
7
shows the symbol for count-
ing forwards or
backwards (+ or - respectively).
Press the MODE button
11
repeatedly until the
desired symbol is shown.
Confirm your choice by pressing the SET button.
You move on to setting the distance on the
odometer.
A 5-digit number appears in the LC display. En
ter
the desired distance. Press the MODE button
repeatedly until the desired number appears
as the first digit.
Confirm your choice by pressing the SET button.
Repeat this process for all the remaining digits.
TIME: Timer
Press the SET button and keep it pressed to
change the timer settings.
The LC display shows the symbol for counting
forwards or backwards (+ or - respectively).
Press the MODE button repeatedly until the
desired symbol is shown.
Confirm your choice by pressing the SET button.
You move on to the time settings of the timer.
A 5-digit number appears in the LC display.
Enter the desired time. Press the MODE button
repeatedly until the desired number appears
as the first digit.
Confirm your choice by pressing the SET button.
Repeat this process for all the remaining digits.
SCAN: Scan
Note: The scan mode automatically switches
between the trip distance, highest speed, average
speed and trip time displays.
Note: Refer to the section on “Basic settings” to
see how you make or change settings.
CUSTOMIZE mode
Apart from the ADVANCE and EASY mode, you
can make your individual adjustments in the
CUSTOMIZE mode (see procedure).
Press and hold the light button
12
to enter the
CUSTOMIZE mode.
Note: By repeatedly pressing the MODE
button
11
, you can toggle between the
ADVANCE and EASY modes.
In the EASY mode, press and hold the SET
button
13
. Press the MODE button to switch
the settings on or off (e.g. time). Choose „On“,
to add the chosen adjustment to the EASY
modes. Choose „Off“, if you do not want to
add the adjustments.
Press the SET button, to confirm your entry.
Using the backlight
Press the light button
12
to switch on the back-
light temporarily. The backlight automatically
extinguishes after a short period.
Resetting the bike computer
Press the MODE button
11
and SET button
13
at the same time and keep them pressed until
{{----}} appears in the LC display
7
.
Now press the MODE button and keep it
pressed. This resets all the settings.
Note: All stored data will be deleted.
Changing the battery
Note: The battery of the bike computer must be
replaced when the battery symbol
18
appears on
the LC display
7
.
Note: The battery of the sensor must be replaced
when the speed symbol
17
of the LC display can
no longer or hardly be seen when riding the bicycle.
Press the MODE key
11
and the SET key
13
at the same time and keep them pressed until
the {{-----}} symbol appears in the LC display
7
.
To replace the battery, proceed as shown in
figure A. Make sure you fit the battery the right
way round (polarity). This is shown inside the
battery compartment.
Press the SET key and keep it pressed to return
to normal operating mode.
Note: Once the batteries are removed, all stored
data will be erased after approx. 20 seconds.
Troubleshooting
Note: This device has delicate electronic compo-
nents. Therefore interference may occur when it is
near devices which transmit radio signals.
- If errors occur in the display, remove any such
devices from the vicinity of the product. In the case
of such malfunctions, remove the battery briefly and
then reinsert again.
Speed or distance are
not displayed.
Adjust magnet and
sensor correctly.
- Check that the battery
is inserted with the
poles arranged the
right way round.
Display is black The ambient temperature
is too high or the bicycle
computer was exposed
to direct sunlight for too
long. Remove appliance
from direct sunlight and
let it cool off for a while.
The LC-display shows
irregular symbols.
Remove battery and
replace it again.
Cleaning and care
Do not use any liquids or cleaning agents for
cleaning. Otherwise there is a risk of damaging
the device.
The device should only be cleaned on the out-
side with a soft dry cloth.
Disposal
The packaging is wholly composed of
environmentally friendly materials that
can
be disposed of at a local recycling centre.
Contact your local refuse disposal authority for more
details of how to dispose of your worn-out product.
In the interest of the environment, do not
throw out your product with your house-
hold refuse. Take it to a suitable centre
where it can be disposed of properly.
Your local council will be able to tell you
where the collection centres are located
and their opening times.
Defective or exhausted batteries mu
st be recycled
in accordance with Directive 2006 / 66 / EC
. Return
the batteries and / or the device through the appro-
priate collection facilities.
Improper disposal of batteries
can damage the environment!
Batteries must not be disposed of with the house-
hold refuse. They may contain toxic heavy metals
and require to be handled as special waste. The
chemical symbols of heavy metals are: Cd = cad-
mium, Hg = mercury, Pb = lead For this reason,
you must dispose of discarded batteries at a com-
munal disposal centre.
EMC
Počítač na bicykel
Použitie v súlade
s určeným účelom
Výrobok je určený na použitie ako cyklistický
počítač. Nevhodné na priemyselné použitie.
Funkcie
– jazyky menu: GB, DE, FR, NL, IT, ES
– hodiny
– stopky
– ukazovateľ teploty °C / °F
– pamäťová funkcia pre min. a max. teplotu
– ukazovateľ rýchlosti jazdy (0–99,9 km / h)
– ukazovateľ priemernej rýchlosti (0–99,9 km / h)
– ukazovateľ maximálnej rýchlosti (0–99,9 km / h)
– porovnanie rýchlosti
– ukazovateľ zrýchlenia a spomalenia
– časovač doby jazdy (max. 9:59:59) (odpočíta-
vanie alebo počítanie smerom nahor)
– počítadlo kilometrov (odpočítavanie alebo
počítanie smerom nahor)
– ukazovateľ celkovo prejdených kilometrov a
celkovej doby jazdy
– počítadlo kalórií
– ukazovateľ spaľovania tuku
– skenovacie zobrazenie (prepínajú sa všetky funkcie)
– vypínacia automatika funkcie hodín
– podsvietenie
Opis dielov
1a
Držiak
1b
Podložka pre držiak
2a
Senzor
2b
Kryt priečinka pre batérie senzora
3
magnet
4
viazač káblov
5
batéria 3 V , typ CR2032 – gombíková
batéria
6a
cyklistický počítač
6b
kryt priečinka na batérie pre cyklistický počítač
7
LC displej
8
zobrazenie funkcií
9
zobrazenie hodnoty druhej funkcie
10
zobrazenie hodnoty hlavnej funkcie
11
tlačidlo MODE
12
tlačidlo osvetlenia
13
tlačidlo SET
14
zobrazenie SCAN
15
zobrazenie intervalu údržby
16
ukazovateľ porovnania rýchlosti
17
ukazovateľ zrýchlenia a spomalenia:
zrýchlenie – otáčanie proti smeru hodinových
ručičiek
spomalenia – otáčanie v smere hodinových
ručičiek
18
ukazovateľ batérie
Technické údaje
Batéria: 3 V (gombíková batéria CR2032)
Rozsah dodávky
1 cyklistický počítač
1 držiak cyklistického počítača
1 magnet
1 snímač
4 viazače káblov
2 batérie 3 V
, typ CR2032 gombíkové
1 návod na obsluhu
Všeobecné bezpečnostné
upozornenia
VŠETKY BEZPEČNOSTNÉ UPOZORNENIA
APOKYNY SI USCHOVAJTE PRE PRÍPAD
POTREBY VBUDÚCNOSTI!
Deti alebo osoby s nedostatočnými vedomos-
ťami alebo skúsenosťami v oblasti manipulácie
s výrobkom alebo obmedzenými telesnými,
zmyslovými alebo duševnými schopnosťami
nesmú výrobok používať bez dozoru alebo
vedenia osoby zodpovednej za ich bezpečnosť.
Deti musia byť pod dohľadom, aby sa s výrob-
kom nehrali.
Prihliadajte prosím na to, že záruka nekryje
škody, ktoré vznikli neodbornou manipuláciou,
nedodržaním prevádzkových a bezpečnostných
upozornení alebo použitím nepovolanými
osobami.
Bezpečnostné
upozornenia k batériám
NEBEZPEČENSTVO
OHROZENIA ŽIVOTA! Môže dôjsť k pre-
hltnutiu batérií, čo môže byť životu nebezpečné.
zasiahnuté miesto veľkým množstvom vody
a / alebo vyhľadajte lekára!
Pred uvedením do prevádzky
Pred prvým použitím odstráňte ochrannú fóliu z
LCdispleja
7
.
Vloženie batérie
Pre vloženie batérie
5
postupujte podľa
vyobrazenia na obr. A.
Montáž cyklistického
počítača
Pri montáži prístroja postupujte podľa obrázkov
B až G.
Uvedenie do prevádzky
Vykonanie základných
nastavení
Upozornenie: po vložení batérie
5
sa LCdis-
plej
7
automaticky zapne po cca 2sekundách.
Dostanete sa priamo na výber jazyka.
Tlačidlo MODE
11
stláčajte dovtedy, kým sa
neobjaví požadovaný jazyk.
Svoj výber potvrďte stlačením tlačidla SET
13
.
Automaticky sa dostanete k výberu užívateľ-
ského profilu.
Tlačidlo MODE stláčajte dovtedy, kým sa
neobjaví požadovaný užívateľský profil
(ADVANCE (pokročilý) alebo EASY
(začiatočník)).
Svoj výber potvrďte stlačením tlačidla SET.
Teraz sa dostanete do výberu veľkosti pneu-
matík (SET WS).
Na LC displeji sa objaví štvormiestne číslo.
Teraz zadajte obvod pneumatiky vášho kolesa
vmm. Tlačidlo MODE stláčajte dovtedy, kým
sa neobjaví požadované číslo ako prvá číslica.
Svoj výber potvrďte stlačením tlačidla SET.
Tento postup opakujte pre každé z troch nasle-
dujúcich čísel.
Upozornenie: obvod vašej pneumatiky
môžete zistiť tým, že priemer pneumatiky
vynásobíte číslom 3,1416. V nasledujúcom
zozname si môžete vyhľadať obvody pneuma-
tík najbežnejších pneumatík bicyklov.
Priemer pneumatiky Obvod pneumatiky
20” 1598 mm
22” 1759 mm
24” 1916 mm
26” (650 A) 2073 mm
26,5” (tubulár.) 2117 mm
26,6” (700x25C) 2124 mm
26,8” (700x28C) 2136 mm
27” (700x32C) 2155 mm
28” (700B) 2237 mm
ATB24”x1,75 1888 mm
ATB26 x1,4 1995 mm
ATB26 x1,5 2030 mm
ATB26 x1,75 2045 mm
ATB26x2 (650B) 2099 mm
27”x1 2138 mm
27”x1 1 / 4 2155 mm
Následne zvoľte vami požadovanú jednotku
dĺžky. Tlačidlo MODE stláčajte dovtedy, kým
sa na LCdispleji neobjaví SET KM alebo
SET MILE.
Svoj výber potvrďte stlačením tlačidla SET.
Teraz sa dostanete k zadaniu veku.
Na LC displeji sa objaví dvojmiestne číslo.
Teraz zadajte svoj vek. Tlačidlo MODE stlá-
čajte dovtedy, kým sa neobjaví požadované
číslo ako prvá číslica.
Svoj výber potvrďte stlačením tlačidla SET.
Tento postup zopakujte pre nasledujúce číslo.
Teraz sa dostanete do výberu jednotiek hmot-
nosti.
Tlačidlo MODE teraz stláčajte dovtedy, kým
sa na LCdispleji neobjaví SET KG alebo
SET LB.
Svoj výber potvrďte stlačením tlačidla SET.
Teraz sa dostanete k zadaniu hmotnosti.
Na LC displeji sa objaví trojmiestne číslo. Teraz
zadajte svoju hmotnosť. Tlačidlo MODE stlá-
čajte dovtedy, kým sa neobjaví požadované
číslo ako prvá číslica.
Svoj výber potvrďte stlačením tlačidla SET.
Tento postup opakujte pre všetky nasledujúce
čísla. Teraz sa dostanete do výberu časového
systému.
Tlačidlo MODE stláčajte dovtedy, kým sa na
LCdispleji neobjaví 12 pre 12-hodinový formát
alebo 24 pre 24-hodinový formát.
Svoj výber potvrďte stlačením tlačidla SET.
Teraz sa dostanete k nastaveniu času.
Na LC displeji sa objaví štvormiestne číslo.
Teraz zadajte aktuálny čas. Tlačidlo MODE
stláčajte dovtedy, kým sa neobjaví požado-
vané číslo ako prvá číslica.
Svoj výber potvrďte stlačením tlačidla SET.
Tento postup opakujte pre všetky nasledujúce
čísla. Teraz sa dostanete do výberu intervalu
údržby.
Tlačidlo MODE stláčajte dovtedy, kým sa
nezobrazí vami požadovaný počet kilometrov,
po prejdení ktorých chcete vykonať nasledujúcu
údržbu vášho bicykla.
Upozornenie: na výber sú k dispozícii 200,
400, 600 a 800 km, resp. míľ.
Svoj výber potvrďte stlačením tlačidla SET.
Teraz sa dostanete k výberu jednotky teploty.
Tlačidlo MODE teraz stláčajte dovtedy, kým
sa na LCdispleji neobjaví °C alebo °F.
Svoj výber potvrďte stlačením tlačidla SET.
Základné nastavenie je týmto ukončené.
Použitie cyklistického
počítača
Upozornenie: ak sa cyklistický počítač
nepoužíva dlhšie ako 5minúty, prepne sa
automaticky do pohotovostného režimu (Stand-
-By). Pre aktiváciu cyklistického počítača stlačte
ľubovoľné tlačidlo. Zobrazenie funkcie
8
zobrazuje, v ktorom režime sa práve nachádzate.
Opakovane stláčajte tlačidlo MODE
11
, pre
prepínanie medzi rôznymi režimami.
Stlačte tlačidlo SET
13
pre prechod na druhú
funkciu každej funkcie.
Stlačte tlačidlo SET a podržte ho stlačené pre
prezeranie alebo vynulovanie uložených hodnôt.
Cyklistický počítač disponuje nasledujú-
cimi funkciami:
Funkcie pre pokročilých:
CLOCK > TOTALODO > TOTAL-TM > TRIPDIST >
MAXSPEED > AVGSPEED > TRIPTIME > TEMP >
STPWATCH > CAL RATE > CALORIE > FAT-BURN >
KM+/- > TIME+/- > SCAN
Funkcie pre začiatočníkov:
TRIPDIST > AVGSPEED > TRIPTIME
Použitie funkcií
Upozornenie: nasledujúci zoznam opisuje všetky
funkcie a podfunkcie.
CLOCK: - Zobrazenie času
Stlačte tlačidlo SET
13
a podržte ho stlačené
na 3sekundy, aby ste sa dostali k nastaveniu
času.
TOTALODO: - Celkový počet absolvovaných
kilometrov
Stlačte tlačidlo SET a podržte ho stlačené na
3sekundy, aby ste sa dostali k nastaveniu
veľkosti pneumatík a k celkovému počtu absol-
vovaných kilometrov.
TOTAL-TM: Celková doba jazdy
Stlačte tlačidlo SET a podržte ho stlačené na
cca 3sekundy, aby ste vykonali zmeny uloženej
celkovej doby jazdy.
TRIPDIST: Počet absolvovaných kilometrov za deň
Stlačte tlačidlo SET a podržte ho stlačené na
cca 3 sekundy, aby ste vynulovali zobrazenie
absolvovaných kilometrov za deň, priemernej
rýchlosti a doby jazdy.
MAXSPEED: Maximálna rýchlosť
Stlačte tlačidlo SET a podržte ho stlačené na
cca 3 sekundy, aby ste vynulovali zobrazenie
maximálnej rýchlosti.
AVGSPEED: Priemerná rýchlosť
TRIPTIME: Doba jazdy
TEMP: teplomer
Z31433
C D
E
F
G
ca. 70 cm
Fig. C
Fig. D
Fig. E
B
A
H
6b
5
6a
4
32a1a
1b
5
2b
5
2a
6a
2a
3
1a 4
1b
2a
4
3
3
2a3
2a
8
7
14
9
10
11
12
13
15
16
17
18
Bike Computer
Proper use
The product is intended for use as a cycle computer.
Not for commercial use.
Functions
– Menu languages: GB, DE, FR, NL, IT, ES
– Clock
– Stopwatch
– Temperature °C / °F
– Memory function for min. and max. temperature
– Current speed (0–99.9 km / h)
– Mean speed (0–99.9 km / h)
– Highest speed (0–99.9 km / h)
– Speed comparison
– Acceleration and deceleration
– Trip timer (max. 9:59:59) (countdown or forwards)
POČÍTAČ NA BICYKEL
Pokyny pre obsluhu a bezpečnostné pokyny
BIKE COMPUTER
Operation and Safety Notes
КОМПЮТЪР ЗА ВЕЛОСИПЕД
Инструкции за обслужване и безопасност
approx. 70 cm
87309_cri_Fahrradcomputer_SK-BG.indd 1 04.02.13 09:49

Zapojte sa do diskusie o tomto výrobku
Tu sa môžete podeliť o to, čo si myslíte o Crivit IAN 87309 Cyklopočítač. Ak máte otázku, najprv si pozorne prečítajte návod. Vyžiadanie manuálu je možné vykonať pomocou nášho kontaktného formulára.