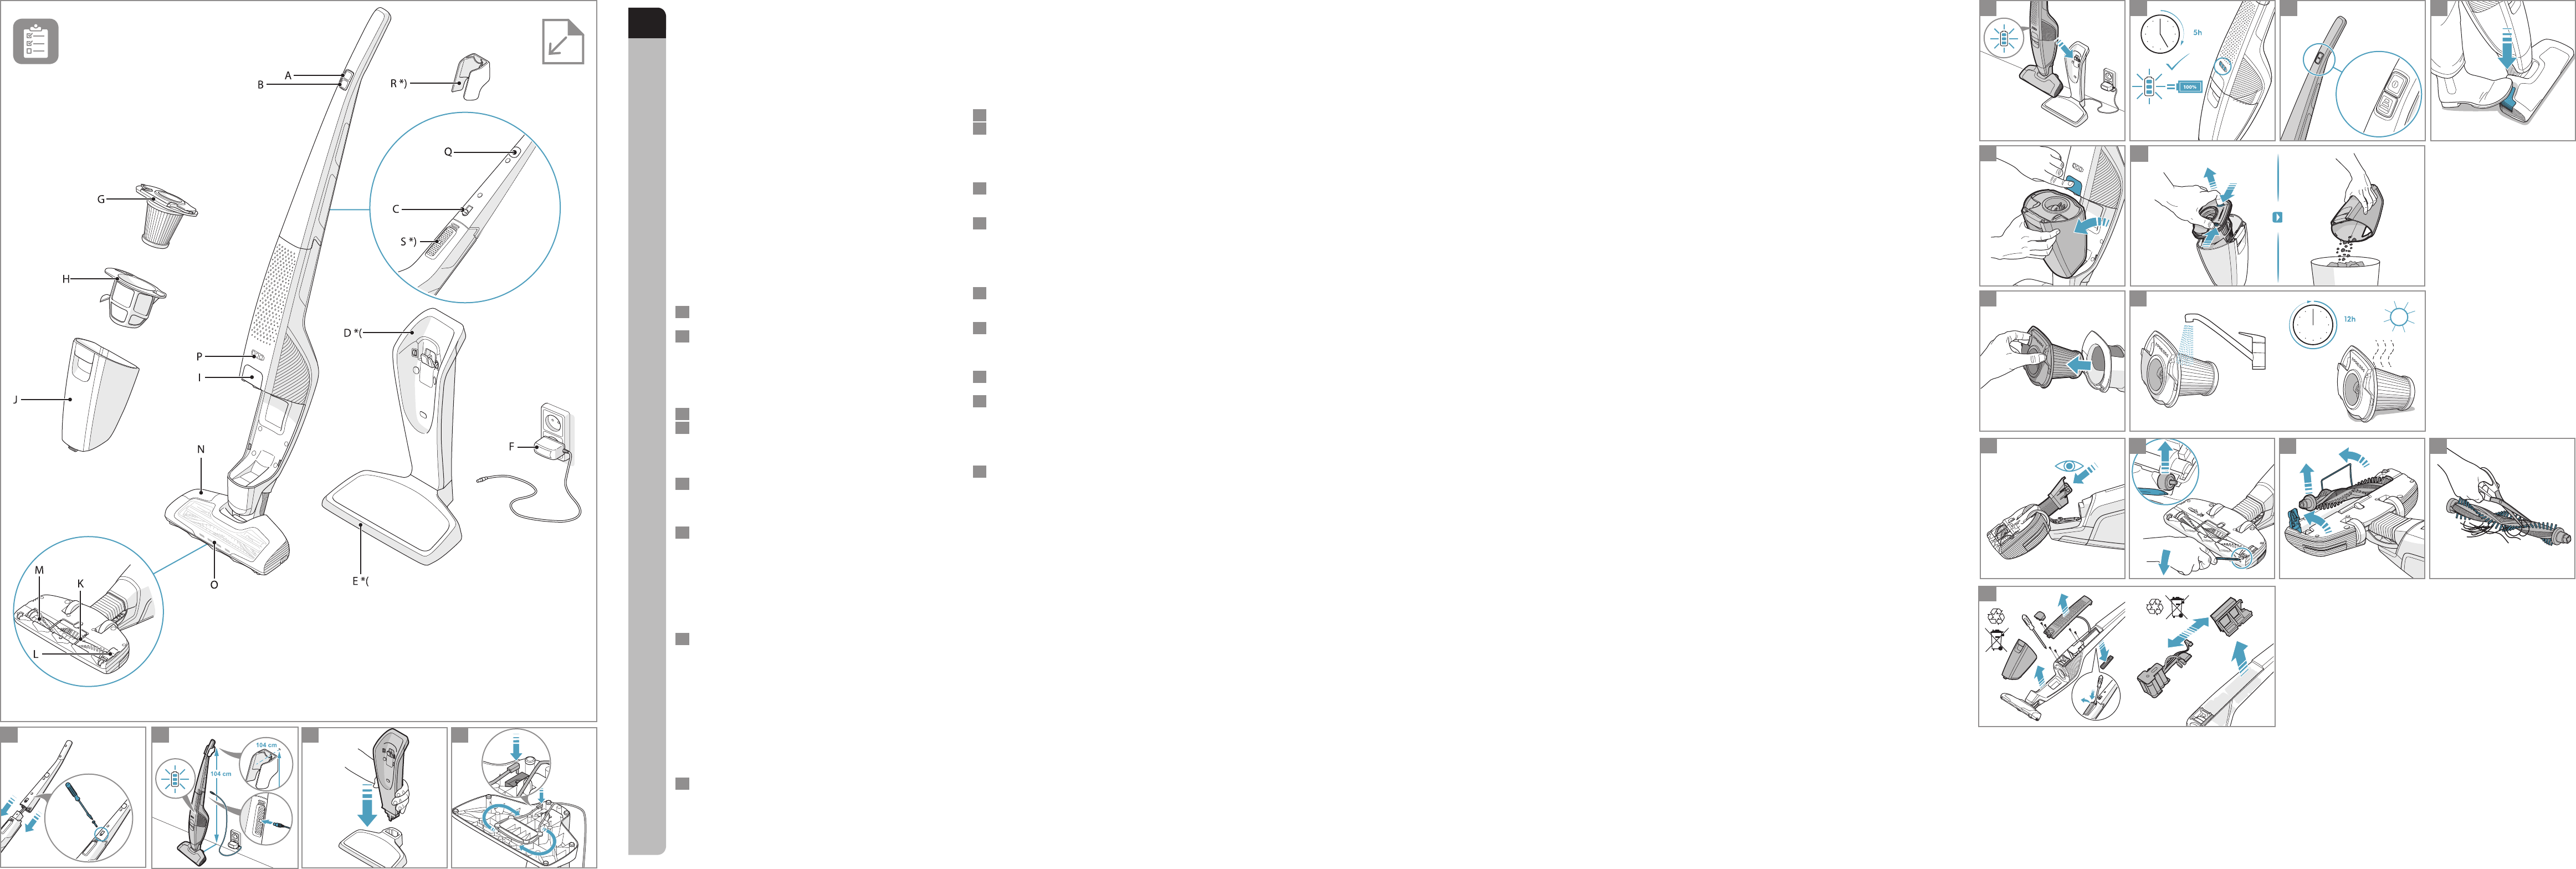
Návod Electrolux EUP84IGM Vysávač
Potrebujete príručku pre svoj Electrolux EUP84IGM Vysávač? Nižšie si môžete bezplatne prezrieť a stiahnuť príručku vo formáte PDF v slovenskom jazyku. Tento produkt má momentálne 10 často kladené otázky, 0 komentárov a má 0 hlasov. Ak toto nie je manuál, ktorý chcete, kontaktujte nás.
Je váš výrobok pokazený a nepodarilo sa vám problém odstrániť pomocou pokynov v návode? Prejdite na portál Repair Café, kde nájdete bezplatné servisné služby.
Návod
Loading…

Loading…
Hodnotenie
Dajte nám vedieť svoj názor na Electrolux EUP84IGM Vysávač a ohodnoťte výrobok. Chcete sa podeliť o svoje skúsenosti s týmto výrobkom alebo sa niečo spýtať? Napíšte komentár v spodnej časti stránky.Viac o tomto návode
Chápeme, že je pekné mať k svojmu Electrolux EUP84IGM Vysávač papierovú príručku. Návod si môžete kedykoľvek stiahnuť z našej webovej stránky a vytlačiť si ho sami. Ak chcete mať originálnu príručku, odporúčame vám kontaktovať Electrolux. Mohli by byť schopní poskytnúť originálny návod. Hľadáte príručku k svojmu Electrolux EUP84IGM Vysávač v inom jazyku? Vyberte si preferovaný jazyk na našej domovskej stránke a vyhľadajte číslo modelu, aby ste zistili, či ho máme k dispozícii.
Technické údaje
| Značka | Electrolux |
| Model | EUP84IGM |
| Kategória | Vysávače |
| Typ súboru | |
| Veľkosť súboru | 2.72 MB |
Všetky príručky pre Electrolux Vysávače
Ďalšie príručky od Vysávače
Často kladené otázky o Electrolux EUP84IGM Vysávač
Náš tím podpory vyhľadáva užitočné informácie o výrobkoch a odpovede na často kladené otázky. Ak nájdete v našich často kladených otázkach nejakú nezrovnalosť, dajte nám o tom vedieť pomocou nášho kontaktného formulára.
Hadica môjho vysávača je upchatá, čo mám robiť? Overená
Odpojte hadicu a prezrite ju, aby ste zistili, či je skutočne upchatá. V takom prípade môžete vziať dlhý predmet, napríklad metlu, a opatrne ho pretlačiť cez hadicu. Týmto sa spravidla odstránia všetky predmety, ktoré upchávajú hadicu. Ak to nepomohlo, obráťte sa na výrobcu.
Bolo to užitočné (1464) Čítaj viacAké veľkosti vrecka na prach existujú? Overená
Je potrebné vziať do úvahy dve veľkosti. Prvý je veľkosť taniera so vstupom do tašky. To určuje, či sa na vrecko na prach zmestí určitý vysávač. Potom je tu veľkosť vaku. Toto je väčšinou uvedené v litroch a určuje, koľko prachu sa do vrecka zmestí.
Bolo to užitočné (941) Čítaj viacChcem vedieť vek môjho prístroja Electrolux. Ako to urobím? Overená
Vek vášho produktu môžete určiť pomocou sériového čísla. Toto nájdete vo svojom prístroji. Prvý znak sériového čísla označuje rok (tj: 1 = 2001) a dva znaky po ňom označujú týždeň výroby (tj: 35 = 35. týždeň daného roku). Takže sériové číslo 13500016 naznačuje, že stroj je od 35. týždňa roku 2001.
Bolo to užitočné (835) Čítaj viacSieťový kábel môjho vysávača sa nevinie späť do prístroja, čo môžem robiť? Overená
Je možné, že kábel je skrútený alebo prehnutý. Kábel niekoľkokrát úplne vyviňte a pod vedením vašich rúk ho pretočte späť do prístroja. Ak sa tým problém nevyrieši, je možné, že je pretočený kábel pretrhnutý. V takom prípade kontaktujte výrobcu alebo opravovňu.
Bolo to užitočné (657) Čítaj viacMôj vysávač vydáva pískavý zvuk, čo mám robiť? Overená
Tento problém je často spôsobený naplneným vreckom na prach alebo filtrom alebo otvorom, ktorý umožňuje prúdenie vzduchu do hadice. Skontrolujte vrecko na prach a filter a v prípade potreby ich vymeňte. Skontrolujte, či na hadici nie sú nejaké otvory alebo či nie sú zle pripojené. Ak sa tým problém nevyrieši, obráťte sa na výrobcu.
Bolo to užitočné (551) Čítaj viacAko odstránim prach a vlasy z hlavy kefy vysávača? Overená
Odstránenie prachu a vlasov z hlavy kefy vysávača sa vykonáva ručne. Ak to nepôjde podľa želania, je možné pomocou zvyškov špiny odstrániť zvyšné nečistoty.
Bolo to užitočné (536) Čítaj viacAké nastavenie na hlave kefy vysávača mám použiť? Overená
Takmer všetky vysávače majú hlavu s nastaviteľnou kefou. Kefu používajte na tvrdé povrchy, aby ste predišli poškriabaniu a poškodeniu. Kefku na koberce a koberčeky vypnite.
Bolo to užitočné (419) Čítaj viacMôžem papierové vrecko na prach použiť viackrát? Overená
To sa neodporúča. Póry vaku vrecka sa nasýtia, čo spôsobí stratu nasávania a pravdepodobne poškodí motor.
Bolo to užitočné (286) Čítaj viacČo je to HEPA? Overená
HEPA je skratka pre vysokoúčinný časticový vzduch. Mnoho vysávačov má HEPA filter. HEPA filter zastaví najmenej 85% a najviac 99 999 999% všetkých častíc s veľkosťou najmenej 0,3 mikrometra (µm).
Bolo to užitočné (259) Čítaj viacMôžem na vysávanie popola použiť bežný vysávač? Overená
Nie, to nie je absolútne možné. Popol, ktorý sa zdá byť ochladený, môže byť vo vnútri stále teplý alebo dokonca horúci. Bežný vysávač na to nie je určený a môže spôsobiť požiar. Filtre bežných vysávačov tiež nie sú vždy vhodné na zachytávanie extrémne malých častíc, ako je popol. Potom sa môže dostať k motoru vysávača a spôsobiť poškodenie.
Bolo to užitočné (251) Čítaj viac
Zapojte sa do diskusie o tomto výrobku
Tu sa môžete podeliť o to, čo si myslíte o Electrolux EUP84IGM Vysávač. Ak máte otázku, najprv si pozorne prečítajte návod. Vyžiadanie manuálu je možné vykonať pomocou nášho kontaktného formulára.