
3
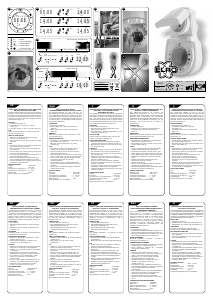
4.1 MO TU WE TH FR SA SU
4.2 MO TU WE TH FR SA SU
4.3 MO WE FR
4.4 TU TH SA
4.5 SA SU
4.6 MO TU WE
4.7 TH FR SA
4.8 MO TU WE TH FR and
4.9 MO TU WE TH FR SA
5. By pressing the – Button, the week display will be shown in the opposite direction as
above sequence.
6. Press +/ – Button once will increase or reduce the week display slowly. To press and
hold the button, the display moves quickly. Release the button until your desired week
pattern shown on the display. Press SET Button to con rm, week display stops ashing.
7. After set the day of the week, the hour display ashes, repeat procedures mentioned in
Part E 2 – Time Setting to set time.
8. To set other program group’s on/o time, repeat procedures mentioned from #2 to #7.
Noted:
(a). To change a preset program, repeat procedures #2 to #7 as mentioned in Part F and input the
new data to replace the old setting
(b). After program setting, press CLOCK Button to return to clock display at once, or it will be
returned automatically after 15 seconds without pressing any other buttons.
G. Countdown Setting
1. When the LCD is in real time display, press – Button once to change to countdown
setting display, “d ON (or OFF)” will be shown on the lower left corner of the LCD
1.1 “d”: indicates the program is in countdown mode
1.2 “ON”: counting down the power on time
1.3 “OFF”: counting down the power o time
2. Press SET Button until the on/o display ashes, setting the countdown power on/o
status is ready.
3. Press +/ – Button to chose countdown on/o program and press SET Button to con rm
4. Hour display ashes after setting the on/o status, then press +/ – Button to increase
or reduce hour and press SET Button to con rm.
5. Minute display then ashes, press +/ – Button to increase or reduce minute and press
SET Button to con rm
6. Second display ashes, press
+/ – Button to increase or reduce the hour display and
press SET Button to con rm. Setting interval is from 99:59:59 to 1 second.
7. Connect the Timer to the AC socket and set the Timer to AUTO status in order to start /
stop the countdown functions.
8. Press CD Button once to start the countdown function, “d ON (or OFF)” ashes in the
lower corner of the LCD to indicate countdown is in progress. Press CD Button again to
stop the countdown function.
Noted:
(a). When countdown is in progress, LCD is in real time display, press – Button once to view
the countdown details.
(b) To change a preset program, repeat the above procedures #2 to #6 in Part G - Countdown
Setting and input the new data to replace the old setting
(b). After program setting, press CLOCK Button to return to clock display at once, or it will be
returned automatically after 15 seconds without pressing any other buttons.
H. Random Setting
1. Random function turns on and o the appliance irregularly:
1.1 Minimum time for power o : 26 minutes
1.2 Maximum time for power o : 42 minutes
1.3 Minimum time for power on: 10 minutes
1.4 Maximum time for power on: 26 minutes
2. Connect the Timer to the AC socket and set the program to AUTO status in order to start/
stop the random function.
3. Press RND Button once, “r OFF” is ashing in the lower corner of the LCD, random function
is activated. Power is o for 26 to 42 minutes. The mode will change to “r ON”, where
power turns on from 10 to 26 minutes. Then back to “r OFF” again.
4. Press RND Button again can stop the random function, “r OFF”or “r ON” disappears from
the LCD.
I. Override/Resume Preset Program
Press ON/OFF Button each time can override/resume the preset program, LCD changes the
display in the following sequence:
1. ON: override the preset program and appliance remains on at all time
2. AUTO: resume the preset program, appliance will be turned on and o
automatically according to the preset time
3. OFF: override the preset program and appliance remains o at all time
Noted:
(a). The preset countdown or random functions only activates when the Timer is in AUTO status.
(b). When countdown function is activated, random and auto on/o program setting will
not active.
(c). When random function is activated, countdown and auto on/off program setting will
not active.
J. Connections
1. Preset your desired On/o programs on the Timer as mentioned above.
2. Switch o your electrical appliance
3. Connect your appliance’s power cord to the Timer’s socket, then connect the Timer to
the AC socket to get power
4. Switch on your appliance.
5. Appliance will then be turned on/o according to your preset programs unless manual
override pressed.
K. Safety Precaution
• The appliance is designed only for use in a dry interior environment. Protect it from rain,
snow and other extreme conditions. Using of the appliance in the outdoors is forbidden!
• Do not overload the appliance to avoid damage.
• The appliance may be connected and used only in the electricity network 230 V AC (~)/
50 Hz, with grounding according to the valid electricity regulations.
• The extension line may connect only to electrical appliances, which are powered and
connected to the voltage of 230 V AC (~)/ 50 Hz.
• Pay attention to the data on the type label of the electrical appliances connected to the
equipment. The maximum power input of all the connected appliances must not exceed
2000 W (max. current 8,7 A). Maximum induction load is 1A.
• Any other use of this appliance, than the one de ned above, can damage the product
and is connected with the risk of short–circuit, electric shock etc. The appliance must
not be modi ed or tampered with! Follow the safety warnings.
• We do not provide any warranty for damages or injuries caused by improper handling of
the appliance or by negligence to the safety warnings in the manual. In such situations,
the warranty is invalidated.
• The grounding safety conduit the appliance must not be broken – otherwise people
may be in the risk of death.
• The recommended operating temperatures are –10°C to + 40 °C.
• The appliance must not be operated in hazardous environment such as ammable gases,
vapours and dust.
• Do not tamper with the appliance installation and do not take it apart! In case of damage
or malfunction of the appliance, contact the seller.
• When cleaning the appliance and its LCD, use only a soft dry cloth. Do not use any
detergents and do not dip the appliance into water!
• The appliance must not be operated by children and by persons, whose physical,
sensory or mental incapability or lack of experience prevents them from safe use of the
appliance, unless they are under a supervision of a person overseeing their safety. The
charger must be kept out of the reach of children. Children must be watched not to play
with this equipment.
Do not throw electrical appliances into unsorted communal waste. Use sorted
waste collection points instead.
For the latest info about waste collecting points, contact your local authorities.
If there are any electrical
appliances on waste dumps, the hazardous substances may leak into underground
water and may get into
the food chain and harm your health.


Zapojte sa do diskusie o tomto výrobku
Tu sa môžete podeliť o to, čo si myslíte o EMOS EMT757-F Časový spínač. Ak máte otázku, najprv si pozorne prečítajte návod. Vyžiadanie manuálu je možné vykonať pomocou nášho kontaktného formulára.
odpovedať | Bolo to užitočné (29)
odpovedať | Bolo to užitočné (26) Čítaj viac
Bolo to užitočné (11)
odpovedať | Bolo to užitočné (10) (Preložené Googlom)
odpovedať | Bolo to užitočné (2)
odpovedať | Bolo to užitočné (1) (Preložené Googlom)
Loading…
odpovedať | Bolo to užitočné (0) (Preložené Googlom)
odpovedať | Bolo to užitočné (0) (Preložené Googlom)
odpovedať | Bolo to užitočné (0)
odpovedať | Bolo to užitočné (0) (Preložené Googlom)
odpovedať | Bolo to užitočné (0) (Preložené Googlom)