
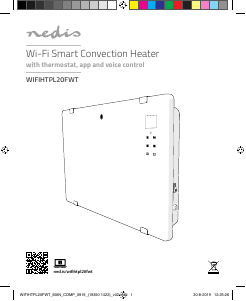
Lista de peças [Imagem A]
1
Painel aquecedor
por convecção
2
Controlo remoto
3
Ficha
4
Interruptor de
alimentação
5
Parafuso para
montagem na parede
6
Bucha
7
Pé com rodas
8
Parafuso para
montagem da roda
9
Visor
q
Botão ligar/desligar
w
Botão de modo
e
Botão +
r
Botão de programa
t
Botão do
temporizador
y
Botão -
u
Botão ligar/desligar
i
Botão de modo
o
Botão de janela aberta
p
Botão do
temporizador
a
Botão +
s
Botão -
d
Dia da semana
f
Temporizador
g
Indicação do intervalo
de aquecimento
h
Bloqueio para crianças
j
Temperatura
k
Hora
l
Indicação de
aquecimento ligado/
desligado
z
Modo de programação
x
Modo confortável
c
Modo ECO
v
Modo anti-congelação
b
Modo de janela aberta
n
Indicação do
aquecimento
Instruções de segurança
- AVISO
• Utilize o produto apenas conforme descrito
neste manual.
• Não utilize o produto caso uma peça esteja
danicada ou defeituosa. Substitua
imediatamente um dispositivo danicado ou
defeituoso.
• Este produto pode ser reparado apenas por
um técnico qualicado para manutenção a m
de reduzir o risco de choque elétrico.
• Em caso de problema, desligue o produto da
tomada elétrica bem como outros
equipamentos.
• Não deixe cair o produto e evite impactos.
• Não utilize o produto em salas onde sejam
utilizados ou armazenados líquidos ou gases
inamáveis.
• Evite a luz solar direta.
• Não coloque perto de outras fontes de calor.
• Ligue apenas a uma tomada com ligação à
terra.
• Não coloque o aquecedor diretamente sob
uma tomada de parede.
• Não coloque o produto imediatamente
debaixo de uma tomada elétrica.
• Não mergulhe o produto em água.
• Não exponha o produto a jatos de água.
• Não cubra o produto quando está a ser
utilizado.
• Não insira quaisquer objetos no produto.
• Não utilize solventes para limpar o produto.
• Não estique o cabo de alimentação.
• Não utilize o produto numa tomada móvel.
• Não puxe o cabo de alimentação para desligar
o aquecedor, use sempre o interruptor de
ligar/desligar.
• Em caso de falha, desligue o aquecedor,
desligue o cabo de alimentação e peça a um
técnico qualicado que efetue a manutenção.
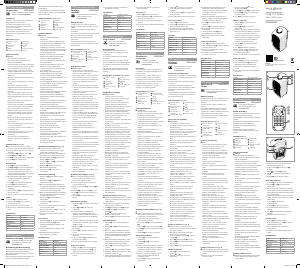
Móvel com rodas [Imagem B]
1. Vire o aquecedor de cabeça para baixo.
2. Pegue num pé A
7
e em 2 parafusos A
8
.
3. Utilize uma chave de fendas para montar o pé
no aquecedor.
4. Repita com o outro pé.
5. Coloque o aquecedor na vertical e ligue o
cabo de alimentação a uma tomada de parede
com ligação à terra.
Aquecedor de parede [Imagem C]
- AVISO
• Monte o produto a pelo menos 150 mm do
chão e a pelo menos 500 mm do teto.
• Não monte o produto diretamente sob uma
tomada de parede.
• Verique se a parede pode suportar o peso do
produto.
• Utilize buchas adequadas ao seu tipo de
parede.
1. Faça os furos 3, conforme indicado.
4
A medição vertical de 275 mm pode diferir
consoante o produto. Verique sempre as
medições antes de furar.
2. Insira as buchas A
6
.
3. Insira os parafusos A
5
, deixe-os sair 6mm
da parede.
4. Pendure o aquecedor na parede.
5. Ligue o cabo de alimentação a uma tomada
de parede.
Utilização
4
O produto desliga-se automaticamente
quando sobreaquece.
Denir a data e hora
1. Ligue o interruptor de alimentação A
4
.
2. Prima A
q
para ligar o aquecedor.
3. Prima A
w
para ligar o visor.
4. Prima A
t
para abrir a denição de data e
hora.
5. Prima A
t
durante 3 segundos para alterar
a hora.
6. Prima A
e
ou A
y
para alterar a hora.
7. Prima A
t
durante 3 segundos.
8. Prima A
e
ou A
y
para alterar os minutos.
9. Prima A
w
para conrmar a hora e sair ou
aguardar durante 5 segundos.
Denir a temperatura manualmente
Prima A
e
ou A
y
para alterar a temperatura.
Utilização do bloqueio para crianças
Quando ativado, o bloqueio para crianças impede
quaisquer operações no painel de controlo.
Para ativar o bloqueio para crianças, prima A
e
e A
y
simultaneamente durante 3 segundos. O
símbolo do bloqueio para crianças no visor A
h
acende.
Para desativar o bloqueio para crianças, prima
novamente A
e
e A
y
simultaneamente
durante 3 segundos. O símbolo do bloqueio para
crianças no visor desaparece.
Utilização do controlo remoto
4
O controlo remoto só pode ser utilizado
quando o aquecedor não está a funcionar no
modo programado.
1. Abra a tampa na parte de trás do controlo
remoto e instale as pilhas .
A
u
Ligar e desligar o aquecedor
A
t
Denir Modo Eco, Modo Confortável ou Modo
Anti-congelação
A
o
Denir o Modo de janela aberta
A
p
Denir a hora (igual a A
t
no painel de
controlo)
A
a
+ (igual a A
e
no painel de controlo)
A
s
- (igual a A
v
no painel de controlo)
Especicações
Produto Painel aquecedor por
convecção
Número de artigo HTPL20FWT / HTPL20FBK
Dimensões (c x l x a) 830 x 260 x 520 mm (com
as rodas)
830 x 90 x 465 mm
(montado na parede)
Peso 7,9 kg
Tensão de entrada AC 220 - 240 V ~ 50 / 60 Hz
Potência de entrada
nominal
1800 - 2000 W
Denições 1000 W / 2000 W
Temperatura de proteção
contra sobreaquecimento
105 °C
Classicação IP IP24
e
Snabbstartsguide
Konvektionselement HTPL20FWT /
HTPL20FBK
För ytterligare information, se den
utökade manualen online:
ned.is/htpl20fwt | ned.is/htpl20fbk
Avsedd användning
Produkten är endast avsedd för användning
inomhus.
Denna produkt är endast lämpad för välisolerade
utrymmen eller sporadisk användning.
Den kan användas i våta och fuktiga miljöer.
Modiering av produkten kan medföra
konsekvenser för säkerhet, garanti och korrekt
funktion.
Dellista [Bild A]
1
Konvektionselement
2
Fjärrkontroll
3
Kontakt
4
Strömbrytare
5
Skruv för
väggmontering
6
Plugg
7
Fot med hjul
8
Skruv för
hjulmontering
9
Display
q
På/av-knapp
w
Lägesknapp
e
(+)-knapp
r
Programknapp
t
Tidsknapp
y
(−)-knapp
u
På/av-knapp
i
Lägesknapp
o
Öppet fönster-knapp
p
Tidsknapp
a
(+)-knapp
s
(−)-knapp
d
Veckodag
f
Timer
g
Indikering av
uppvärmningsområde
h
Barnlås
j
Temperatur
k
Tid
l
Indikering
uppvärmning på/av
z
Programmeringsläge
x
Komfortläge
c
ECO-läge
v
Anti-frost-läge
b
Öppet fönster-läge
n
Uppvärmningsindikering
Säkerhetsanvisningar
- VARNING
• Använd produkten endast enligt
anvisningarna i denna bruksanvisning.
• Använd inte produkten om en del är skadad
eller defekt. Byt en omedelbart en skadad eller
defekt enhet.
• Denna produkt får, för att minska risken för
elchock, endast servas av en kvalicerad
underhållstekniker.
• Koppla bort produkten från eluttaget och
annan utrustning i händelse av problem.
• Tappa inte produkten och skydda den mot
slag.
• Använd inte produkten i utrymmen där
lättantändliga vätskor eller gaser hanteras eller
förvaras.
• Undvik direkt solljus.
• Stellen Sie die Heizung nicht direkt unter eine
Wandsteckdose.
• Stellen Sie das Produkt nicht unmittelbar unter
eine Steckdose.
• Tauchen Sie das Produkt nicht in Wasser.
• Setzen Sie das Produkt keinem Wasserstrahl
aus.
• Decken Sie das Produkt nicht ab, während es
in Verwendung ist.
• Führen Sie keine Objekte in das Produkt ein.
• Verwenden Sie keine Lösungsmittel zur
Reinigung des Produkts.
• Verlängern Sie das Stromkabel nicht.
• Verwenden Sie das Produkt nicht an einer
mobilen Steckdose.
• Ziehen Sie nicht am Netzkabel, um die
Heizung auszuschalten; verwenden Sie dazu
stets den Ein/Aus-Schalter.
• Bei einem Fehler schalten Sie die Heizung aus,
ziehen Sie das Netzkabel aus der Steckdose
und lassen Sie das Produkt von einem
geschulten Techniker untersuchen.
Beweglich mit Rädern [Abbildung B]
2. Drehen Sie die Heizung auf den Kopf.
3. Nehmen Sie einen Standfuß A
7
und 2
Schrauben A
8
.
4. Verwenden Sie einen Schraubendreher, um
den Standfuß an der Heizung zu befestigen.
5. Wiederholen Sie den Vorgang mit dem
anderen Standfuß.
6. Stellen Sie die Heizung wieder richtig herum
hin und stecken Sie den Netzstecker in eine
geerdete Wandsteckdose.
An der Wand montierte Heizung [Abbildung C]
- WARNUNG
• Montieren Sie das Produkt mit mindestens 150
mm Abstand zum Boden und mindestens 500
mm Abstand zur Decke.
• Montieren Sie das Produkt nicht direkt unter
eine Wandsteckdose.
• Überprüfen Sie, ob die Wand das Gewicht des
Produkts tragen kann.
• Verwenden Sie nur Dübel, die für die Art Ihrer
Wand geeignet sind.
1. Bohren Sie 3 Löcher wie angegeben.
4
Das vertikale Maß von 275 mm kann abhängig
vom Produkt abweichen. Überprüfen Sie vor
dem Bohren stets die Maße.
2. Setzen Sie die Dübel A
6
ein.
3. Setzen Sie die Schrauben A
5
ein, lassen Sie
sie 6mm aus der Wand herausstehen.
4. Hängen Sie die Heizung an die Wand.
5. Stecken Sie den Netzstecker in eine
Wandsteckdose.
Verwendung
4
Das Produkt schaltet sich bei Überhitzen
automatisch ab.
Einstellen von Datum und Uhrzeit
1. Schalten Sie den Ein/Aus-Schalter A
4
ein.
2. Drücken Sie A
q
, um die Heizung
einzuschalten.
3. Drücken Sie A
w
, um das Display
einzuschalten.
4. Drücken Sie A
t
, um die Einstellung von
Datum und Uhrzeit zu önen.
5. Drücken Sie A
t
3 Sekunden lang, um die
Uhrzeit zu ändern.
6. Drücken Sie A
e
oder A
y
, um die Stunden
zu ändern.
7. Drücken Sie A
t
3 Sekunden lang.
8. Drücken Sie A
e
oder A
y
, um die Minuten
zu ändern.
9. Drücken Sie A
w
um die Uhrzeit zu bestätigen
und zu beenden oder warten Sie 5 Sekunden.
Manuelles Einstellen der Temperatur
Drücken Sie A
e
oder A
y
, um die Temperatur
zu ändern.
Verwenden der Kindersicherung
Bei Aktivierung verhindert die Kindersicherung,
dass eine Steuerung über das Bedienfeld erfolgt.
Zum Aktivieren der Kindersicherung drücken Sie
A
e
und A
y
gleichzeitig 3 Sekunden lang. Das
Kindersicherungssymbol wird auf dem Display A
h
leuchtet auf.
Zum Deaktivieren der Kindersicherung drücken
Sie erneut A
e
und A
y
gleichzeitig 3 Sekunden
lang. Das Kindersicherungssymbol verschwindet
vom Display.
Verwenden der Fernbedienung
4
Die Fernbedienung kann nur verwendet
werden, wenn die Heizung nicht im
programmierten Modus läuft.
1. Önen Sie den Deckel auf der Rückseite der
Fernbedienung und setzen Sie Batterien ein.
A
u
Ein-/Ausschalten der Heizung
A
t
Einstellen von Eco-Modus, Komfortmodus oder
Frostwächtermodus
A
o
Einstellen des Fenster geönet Modus
A
p
Einstellen der Uhrzeit (wie bei A
t
auf dem
Bedienfeld)
A
a
+ (wie bei A
e
auf dem Bedienfeld)
A
s
- (wie bei A
v
auf dem Bedienfeld)
Spezikationen
Produkt Flächenkonvektionsheizung
Artikelnummer HTPL20FWT / HTPL20FBK
Größe (L x B x H) 830 x 260 x 520 mm (mit
Rädern)
830 x 90 x 465 mm
(Wandmontage)
Gewicht 7,9 kg
Eingangsspannung AC 220 - 240 V ~ 50 / 60 Hz
Nenneingangsleistung 1800 - 2000 W
Einstellung 1000 W / 2000 W
Überhitzungs-
schutztemperatur
105 °C
Gehäuseschutzklasse IP24
b
Guide de démarrage rapide
Panneau de chauffage
à convection
HTPL20FWT /
HTPL20FBK
Pour plus d'informations, consultez le
manuel détaillé en ligne :
ned.is/htpl20fwt | ned.is/htpl20fbk
Utilisation prévue
Le produit est prévu pour un usage intérieur
uniquement.
Ce produit ne peut être utilisé que dans des
locaux bien isolés ou de manière occasionnelle.
Il peut être utilisé dans des environnements
humides et mouillés.
Toute modication du produit peut avoir des
conséquences sur la sécurité, la garantie et le bon
fonctionnement.
Liste des pièces [Image A]
1
Panneau de
chauage à convection
2
Télécommande
3
Fiche
4
Interrupteur
5
Vis pour montage
mural
6
Cheville
7
Pied avec roues
8
Vis pour montage
sur roue
9
Achage
q
Bouton Marche/
Arrêt
w
Bouton mode
e
Bouton +
r
Bouton programme
t
Bouton heure
y
Bouton -
u
Bouton Marche/
Arrêt
i
Bouton mode
o
Bouton fenêtre
ouverte
p
Bouton heure
a
Bouton +
s
Bouton -
d
Jour de la semaine
f
Minuteur
g
Achage de
l’intervalle de chauage
h
Verrouillage enfant
j
Température
k
Heure
l
Indication marche/
arrêt du chauage
z
Mode de
programmation
x
Mode confortable
c
Mode ÉCO
v
Mode antigel
b
Mode fenêtre ouverte
n
Achage du
chauage
Consignes de sécurité
- AVERTISSEMENT
• Utilisez le produit uniquement comme décrit
dans le présent manuel.
• Ne pas utiliser le produit si une pièce est
endommagée ou défectueuse. Remplacer
immédiatement un appareil endommagé ou
défectueux.
• Ce produit ne peut être réparé que par un
technicien qualié an de réduire les risques
d'électrocution.
• Débrancher le produit de la prise secteur et de
tout autre équipement en cas de problème.
• Ne pas laisser tomber le produit et éviter de le
cogner.
• Ne pas utiliser le produit dans des pièces où
des liquides ou des gaz inammables sont
utilisés ou stockés.
• Évitez la lumière directe du soleil.
• Ne pas le placer à proximité d’autres sources
de chaleur.
• Ne le brancher que sur une prise mise à la
terre.
• Ne pas placer le radiateur directement sous
une prise murale.
• Ne pas placer le produit directement sous une
prise de courant.
• Ne pas immerger le produit dans l’eau.
• Ne pas soumettre le produit à des jets d’eau.
• Ne pas couvrir le produit lorsqu’il est en cours
d’utilisation.
• Ne pas insérer d’objets dans le produit.
• Ne pas utiliser de solvants pour nettoyer le
produit.
• Ne pas rallonger le cordon d’alimentation.
• Ne pas utiliser le produit dans une prise
mobile.
• Ne pas tirer sur le cordon d’alimentation pour
arrêter le chauage. Toujours utiliser
l’interrupteur marche/arrêt.
• En cas de panne, mettre l’appareil de
chauage hors tension, débrancher le cordon
d’alimentation et le faire réparer par un
technicien qualié.
Mobile avec roues [Image B]
1. Retournez l’appareil de chauage.
2. Prenez un pied A
7
et 2 des vis A
8
.
3. Utilisez un tournevis pour monter le pied sur
le radiateur.
4. Répétez l’opération pour l’autre pied.
5. Redressez l’appareil et branchez le cordon
• Får ej placeras i närheten av andra värmekällor.
• Anslut endast till jordat uttag.
• Placera inte värmeelementet direkt under ett
vägguttag.
• Placera inte produkten omedelbart under ett
eluttag.
• Sänk inte ned produkten i vatten.
• Utsätt inte produkten för vattenstrålar.
• Täck inte över produkten när den används.
• För inte in några föremål i produkten.
• Använd inte lösningsmedel för att rengöra
produkten.
• Förläng inte nätsladden.
• Använd inte produkten med ett portabelt
uttag.
• Dra inte ut nätsladden för att stänga av
värmeelementet, använd alltid på/av-brytaren.
• I händelse av fel: stäng av värmeelementet, dra
ut nätsladden och låt det servas av en
kvalicerad tekniker.
Flyttbart på hjul [Bild B]
1. Vänd värmeelementet upp och ner.
2. Ta fram en fot A
7
och 2 skruvar A
8
.
3. Använd en skruvmejsel för att montera foten
på värmeelementet.
4. Upprepa förfarandet med den andra foten.
5. Ställ värmeelementet upprätt och anslut
nätsladden till ett jordat vägguttag.
Väggmonterat värmeelement [Bild C]
- VARNING
• Montera produkten minst 150 mm från golvet
och minst 500 mm från taket.
• Montera inte produkten direkt under ett
vägguttag.
• Kontrollera att väggen kan bära upp
produktens vikt.
• Använd endast pluggar som är lämpliga för
väggtypen.
1. Borra 3 hål såsom visas på bilden.
4
Det vertikala måttet på 275 mm kan variera
beroende på produkt. Kontrollera alltid måtten
före borrning.
2. Sätt i pluggarna A
6
.
3. Sätt i skruvarna A
5
, låt dem sticka ut 6mm
från väggen.
4. Häng upp värmeelementet på väggen.
5. Anslut nätsladden till ett vägguttag.
Handhavande
4
Produkten stängs av automatiskt vid
överhettning.
Ställa in datum och tid
1. Slå på strömbrytaren A
4
.
2. Tryck på A
q
för att slå på värmeelementet.
3. Tryck på A
w
för att slå på displayen.
4. Tryck på A
t
för att öppna datum- och
tidsinställningen.
5. Tryck på A
t
i 3 sekunder för att ändra tiden.
6. Tryck på A
e
eller A
y
för att ändra timme.
7. Tryck på A
t
i 3 sekunder.
8. Tryck på A
e
eller A
y
för att ändra minuter.
9. Tryck på A
w
för att bekräfta tiden och avsluta
eller vänta i 5 sekunder.
Ställa in temperaturen manuellt
Tryck på A
e
eller A
y
för att ändra
temperaturen.
Använda barnlåset
När barnlåset är aktiverat spärras styrpanelen.
För att aktivera barnlåset: tryck på A
e
och A
y
samtidigt i 3 sekunder. Barnlåssymbolen på
displayen A
h
tänds.
För att inaktivera barnlåset: tryck igen på A
e
och A
y
samtidigt i 3 sekunder. Barnlåssymbolen
på displayen släcks.
Använda ärrkontrollen
4
Fjärrkontrollen kan endast användas när
värmeelementet inte används i programmerat
läge.
1. Öppna luckan på baksidan av ärrkontrollen
och sätt i batterier.
A
u
Slå på och stänga av värmeelementet
A
t
Ställa in Eco-läge, komfortläge och
anti-frost-läge
A
o
Ställa in öppet fönster-läge
A
p
Ställa in tid (samma som A
t
på styrpanelen)
A
a
+ (samma som A
e
på styrpanelen)
A
s
- (samma som A
v
på styrpanelen)
Specikationer
Produkt Konvektionselement
Artikelnummer HTPL20FWT / HTPL20FBK
Dimensioner (l x b x h) 830 x 260 x 520 mm (med hjul)
830 x 90 x 465 mm
(väggmonterat)
Vikt 7,9 kg
Inspänning AC 220 - 240 V ~ 50 / 60 Hz
Nominell ineekt 1800 - 2000 W
Inställning 1000 W / 2000 W
Temperatur
överhettningsskydd
105 °C
IP-klassning IP24
g
Pika-aloitusopas
Paneelikonvek-
torilämmitin
HTPL20FWT /
HTPL20FBK
Katso tarkemmat tiedot käyttöoppaan
laajemmasta verkkoversiosta:
ned.is/htpl20fwt | ned.is/htpl20fbk
Käyttötarkoitus
Tuote on tarkoitettu vain sisäkäyttöön.
Tämä tuote soveltuu ainoastaan hyvin
eristettyihin tiloihin tai satunnaiseen käyttöön.
Sitä voi käyttää märissä ja kosteissa ympäristöissä.
Tuotteen muutokset voivat vaikuttaa
turvallisuuteen, takuuseen ja asianmukaiseen
toimintaan.
Osaluettelo [Kuva A]
1
Paneelikonvektor-
ilämmitin
2
Kaukosäädin
3
Tulppa
4
Virtakytkin
5
Seinäkiinnitysruuvit
6
Proput
7
Jalat ja pyörät
8
Ruuvit pyörään
kiinnitystä varten
9
Näyttö
q
Virtapainike
w
Tilapainike
e
Painike +
r
Ohjelmapainike
t
Aikapainike
y
Painike –
u
Virtapainike
i
Tilapainike
o
Ikkuna auki -painike
p
Aikapainike
a
Painike +
s
Painike –
d
Viikonpäivä
f
Ajastin
g
Lämmityksen
aikajaksonäyttö
h
Lapsilukko
j
Lämpötila
k
Aika
l
Lämmitys päällä/pois
-ilmaisin
z
Ohjelmointitila
x
Mukavuustila
c
Taloudellinen tila
v
Jäätymisenestotila
b
Ikkuna auki -tila
n
Lämmitysnäyttö
Turvallisuusohjeet
- VAROITUS
• Käytä tuotetta vain tässä oppaassa kuvatun
mukaisesti.
• Älä käytä tuotetta, jos jokin sen osa on
vaurioitunut tai viallinen. Vaihda
vahingoittunut tai viallinen laite välittömästi.
• Tämän tuotteen saa huoltaa vain pätevä
teknikko sähköiskun vaaran vähentämiseksi.
• Irrota tuote sähköpistorasiasta ja muista
laitteista, jos ongelmia ilmenee.
• Varo pudottamasta ja tönäisemästä tuotetta.
• Älä käytä tuotetta tiloissa, joissa käsitellään tai
varastoidaan syttyviä nesteitä tai kaasuja.
• Vältä suoraa auringonvaloa.
• Älä aseta lähelle muita lämmönlähteitä.
• Kytke vain maadoitettuun pistorasiaan.
• Älä sijoita lämmitintä suoraan pistorasian
alapuolelle.
• Älä sijoita tuotetta aivan pistorasian
alapuolelle.
• Älä upota tuotetta veteen.
• Älä altista tuotetta vesisuihkuille.
• Älä peitä tuotetta sen ollessa käytössä.
• Älä työnnä mitään esineitä tuotteeseen.
• Älä puhdista tuotetta liuottimilla.
• Älä käytä jatkojohtoja.
• Älä käytä tuotetta kannettavassa pistorasiassa.
• Älä sammuta lämmitintä vetämällä
virtajohdosta, käytä aina virtakytkintä.
• Toimintahäiriön sattuessa sammuta lämmitin,
irrota vihtajohto pistorasiasta ja toimita
lämmitin pätevän asentajan huollettavaksi.
Pyörillä liikuteltava [Kuva B]
1. Käännä lämmitin ylösalaisin.
2. Ota esiin jalka A
7
ja 2 ruuvit A
8
.
3. Kiinnitä jalka lämmittimeen ruuvimeisselillä.
4. Kiinnitä samalla tavoin myös toinen jalka.
5. Käännä lämmitin takaisin pystyasentoon ja
kytke virtajohto maadoitettuun pistorasiaan.
Lämmitin seinään kiinnitettynä [Kuva C]
- VAROITUS
• Kiinnitä lämmitin vähintään 150 mm:n päähän
lattiasta ja vähintään 500 mm:n päähän
katosta.
• Älä kiinnitä lämmitintä suoraan pistorasian
alapuolelle.
• Tarkista, että seinä kestää tuotteen painon.
• Käytä vain seinälle sopivia proppuja.
1. Poraa 3 reikää kuvan mukaisesti.
4
Pystymitta 275 mm voi vaihdella
tuotekohtaisesti. Tarkista mitat aina ennen
poraamista.
2. Aseta paikoilleen proput A
6
.
3. Aseta paikoilleen ruuvit A
5
siten, että ne
jäävät 6 mm seinän ulkopuolelle.
4. Ripusta lämmitin seinälle.
5. Kytke virtajohto pistorasiaan.
Käyttö
4
Tuote sammuu automaattisesti, jos se
ylikuumenee.
Päivämäärän ja kellonajan asettaminen
1. Kytke päälle virtakytkin A
4
.
2. Kytke lämmitin päälle painamalla A
q
.
3. Kytke näyttö päälle painamalla A
w
.
4. Avaa päivämäärän ja kellonajan asetus
painamalla A
t
.
5. Muuta aikaa painamalla A
t
3 sekuntia.
6. Muuta tuntia painamalla A
e
tai A
y
.
Speciche
Prodotto Pannello riscaldatore a
convezione
Numero articolo HTPL20FWT / HTPL20FBK
Dimensioni (p x l x a) 830 x 260 x 520 mm (con ruote)
830 x 90 x 465 mm (montaggio
a parete)
Peso 7,9 kg
Tensione in ingresso AC 220 - 240 V ~ 50 / 60 Hz
Potenza nominale in
ingresso
1800 - 2000 W
Impostazione 1000 W / 2000 W
Temperatura di
protezione dal
surriscaldamento
105 °C
Grado di protezione IP IP24
h
Guía de inicio rápido
Panel convector HTPL20FWT /
HTPL20FBK
Para más información, consulte el
manual ampliado en línea:
ned.is/htpl20fwt | ned.is/htpl20fbk
Uso previsto por el fabricante
El producto está diseñado para su uso en
interiores exclusivamente.
Este producto está indicado únicamente en
lugares abrigados o para una utilización puntual.
Se puede emplear en entornos húmedos o
mojados.
Cualquier modicación del producto puede tener
consecuencias para la seguridad, la garantía y el
funcionamiento adecuado.
Lista de piezas [Imagen A]
1
Panel convector
2
Mando a distancia
3
Taco
4
Interruptor de
alimentación
5
Tornillos para
montaje en pared
6
Anclaje
7
Pie con ruedas
8
Tornillo para
montar ruedas
9
Pantalla
q
Botón ON/OFF
w
Botón de modo
e
Botón +
r
Botón de programa
t
Botón de tiempo
y
Botón -
u
Botón ON/OFF
i
Botón de modo
o
Botón de ventana
abierta
p
Botón de tiempo
a
Botón +
s
Botón -
d
Día de la semana
f
Temporizador
g
Indicador de intervalo
de calefacción
h
Seguro para niños
j
Temperatura
k
Hora
l
Indicación de
calefacción ON/OFF
z
Modo de programación
x
Modo cómodo
c
Modo ECO
v
Modo antiescarcha
b
Modo ventana abierta
n
Pantalla de calefacción
Instrucciones de seguridad
- ADVERTENCIA
• Utilice el producto únicamente tal como se
describe en este manual.
• No use el producto si alguna pieza está
dañada o presenta defectos. Sustituya
inmediatamente el aparato si presenta daños
o está defectuoso.
• Este producto solo puede recibir servicio de
un técnico cualicado para su mantenimiento
para así reducir el riesgo de descargas
eléctricas.
• Desconecte el producto de la toma de
corriente y de otros equipos si surgen
problemas.
• No deje caer el producto y evite que sufra
golpes.
• No utilice el producto en estancias donde
hayan o se almacenen líquidos o gases
inamables.
• Manténgalo alejado de la luz solar directa.
• No lo coloque cerca de otras fuentes de calor.
• Enchúfelo únicamente a una toma de
corriente con toma a tierra.
• No coloque el calefactor directamente debajo
de un enchufe de pared.
• No sitúe el producto justo debajo de una toma
de corriente.
• No sumerja el producto en agua.
• No exponga el producto a chorros de agua.
• No tape el producto mientras se esté usando.
• No introduzca objetos en el producto.
• No utilice disolventes para limpiar el producto.
• No alargue el cable de alimentación.
• No enchufe el producto a una toma de
corriente móvil.
• No desenchufe el cable de alimentación para
apagar el calefactor. Utilice siempre el
interruptor ON/OFF.
• En caso de avería, apague el calefactor,
desenchufe el cable de alimentación y
encargue su reparación a un técnico
cualicado.
Móvil con ruedas [Imagen B]
1. De la vuelta al calefactor.
2. Tome un pie A
7
y 2 tornillos A
8
.
3. Use un destornillador para montar el pie del
calefactor.
4. Haga lo mismo con el otro pie.
5. Vuelva a poner del derecho el calefactor y
enchufe el cable de alimentación a una toma
de corriente con toma a tierra.
Calefactor montado en pared [Imagen C]
- ADVERTENCIA
• Monte el producto al menos a 150 mm del
suelo y al menos a 500 mm del techo.
• No monte el producto directamente bajo un
enchufe de pared.
• Asegúrese de que la pared puede soportar el
peso del producto.
• Use únicamente anclajes adecuados para su
tipo de pared.
1. Haga 3 agujeros como se indica.
4
La medida vertical de 275 mm puede
desviarse según el producto. Por eso, antes de
taladrar, compruebe siempre las medidas.
2. Inserte los anclajes A
6
.
3. Inserte los tornillos A
5
y deje que salgan
6mm de la pared.
4. Cuelgue el calefactor en la pared.
5. Enchufe el cable de alimentación en una toma
de pared.
Uso
4
El producto se apagará automáticamente si se
sobrecalienta.
Fijar fecha y hora
1. Encienda el interruptor de alimentación A
4
.
2. Pulse A
q
para encender el calefactor.
3. Pulse A
w
para encender la pantalla.
4. Pulse A
t
para abrir el ajuste de fecha y hora.
5. Pulse A
t
durante 3 para cambiar la hora.
6. Pulse A
e
o A
y
para las horas.
7. Pulse A
t
durante 3 segundos.
8. Pulse A
e
o A
y
para los minutos.
9. Pulse A
w
para conrmar la hora y salga o
espere 5 segundos.
Fijar la temperatura manualmente
Pulse A
e
o A
y
para cambiar la temperatura.
Usar el seguro de niños
Si está activado, el seguro de niños evita que se
pueda manejar el panel de control.
Para activar el seguro de niños, pulse A
e
y A
y
simultáneamente durante 3 segundos. El símbolo
de seguro de niños de pantalla A
h
se ilumina.
Para desactivar el seguro de niños, pulse A
e
y
A
y
simultáneamente durante 3 segundos. El
símbolo de seguro de niños desaparece de la
pantalla.
Usar el mando a distancia
4
El mando a distancia sólo puede utilizarse si el
calefactor no está en modo programado.
1. Abra la tapa de la parte trasera del mando y
ponga pilas .
A
u
Encender o apagar el calefactor
A
t
Fijar el modo Eco, modo cómodo o modo
antiescarcha
A
o
Fijar el modo ventana abierta
A
p
Fijar la hora (igual que A
t
en el panel de
control)
A
a
+ (igual que A
e
en el panel de control)
A
s
- (igual que A
v
en el panel de control)
Especicaciones
Producto Panel convector
Número de artículo HTPL20FWT / HTPL20FBK
Dimensiones (L x An x Al) 830 x 260 x 520 mm (con
ruedas)
830 x 90 x 465 mm
(montaje en pared)
Peso 7,9 kg
Tensión de entrada AC 220 - 240 V ~ 50 / 60 Hz
Potencia nominal de entrada 1800 - 2000 W
Ajuste 1000 W / 2000 W
Temperatura de
protección contra
sobrecalentamiento
105 °C
Clasicación IP IP24
i
Guia de iniciação rápida
Painel aquecedor
por convecção
HTPL20FWT /
HTPL20FBK
Para mais informações, consulte a
versão alargada do manual on-line:
ned.is/htpl20fwt | ned.is/htpl20fbk
Utilização prevista
Este produto destina-se apenas à utilização em
interior.
Este produto é adequado apenas para espaços
bem isolados espaços ou utilização ocasional.
Pode ser utilizado em ambientes húmidos.
Qualquer alteração do produto pode ter
consequências em termos de segurança, garantia
e funcionamento adequado.
6. Druk op A
e
of A
y
om de uren in te stellen.
7. Druk 3 seconden op A
t
.
8. Druk op A
e
of A
y
om de minuten in te
stellen.
9. Druk op A
w
om de tijd te bevestigen en de
modus te verlaten of wacht 5 seconden.
De temperatuur handmatig instellen
Druk op A
e
of A
y
om de temperatuur in te
stellen.
Gebruik van de kindervergrendeling
Wanneer het kinderslot geactiveerd is, verhindert
het de bediening van het bedieningspaneel.
Om de kindervergrendeling te activeren, druk
3 seconden tegelijkertijd op A
e
en A
y
. Het
kindervergrendelingssymbool op het display A
h
gaat branden.
Om de kindervergrendeling te deactiveren, druk
3 seconden tegelijkertijd op A
e
en A
y
. Het
kindervergrendelingssymbool op het display
verdwijnt.
De afstandsbediening gebruiken
4
De afstandsbediening kan alleen worden
gebruikt wanneer de kachel niet in de
geprogrammeerde modus staat.
1. Open het deksel op de achterkant van de
afstandsbediening en plaats de batterijen.
A
u
De kachel in- en uitschakelen
A
t
De Eco-modus, de Comfortmodus of de
Antivriesmodus instellen
A
o
Venster Open Modus instellen
A
p
Stel de tijd in (hetzelfde als A
t
op het
bedieningspaneel)
A
a
+ (hetzelfde als A
e
op het bedieningspaneel)
A
s
- (hetzelfde als A
v
op het bedieningspaneel)
Specicaties
Product Paneel convectorkachel
Artikelnummer HTPL20FWT / HTPL20FBK
Afmetingen (l x b x h) 830 x 260 x 520 mm (met
wieltjes)
830 x 90 x 465 mm
(wandmontage)
Gewicht 7,9 kg
Ingangsspanning AC 220 - 240 V ~ 50 / 60 Hz
Nominaal
ingangsvermogen
1800 - 2000 W
Instelling 1000 W / 2000 W
De temperatuur van de
oververhittingsbescherming
105 °C
IP waarde IP24
j
Guida rapida all’avvio
Pannello riscaldatore
a convezione
HTPL20FWT /
HTPL20FBK
Per maggiori informazioni vedere il
manuale esteso online:
ned.is/htpl20fwt | ned.is/htpl20fbk
Uso previsto
Il prodotto è inteso solo per utilizzo in interni.
Il presente prodotto è adatto solo a ambienti
correttamente isolati o ad un uso occasionale.
Può essere utilizzato in ambienti umidi e bagnati.
Eventuali modiche al prodotto possono
comportare conseguenze per la sicurezza, la
garanzia e il corretto funzionamento.
Elenco parti [Immagine A]
1
Pannello riscaldatore
a convezione
2
Telecomando
3
Tassello
4
Interruttore di
alimentazione
5
Vite per montaggio
a parete
6
Tassello
7
Piede con ruote
8
Vite per montaggio
su ruote
9
Display
q
Pulsante di
accensione/
spegnimento
w
Pulsante Modalità
e
Pulsante +
r
Pulsante Programma
t
Pulsante Tempo
y
Pulsante -
u
Pulsante di
accensione/
spegnimento
i
Pulsante Modalità
o
Pulsante apertura
nestra
p
Pulsante Tempo
a
Pulsante +
s
Pulsante -
d
Giorno della
settimana
f
Timer
g
Display intervallo di
riscaldamento
h
Blocco per bambini
j
Temperatura
k
Ora
l
Indicazione
riscaldamento acceso/
spento
z
Modalità
Programmazione
x
Modalità Piacevole
c
Modalità ECO
v
Modalità Antigelo
b
Modalità apertura
nestra
n
Display
riscaldamento
Istruzioni di sicurezza
- ATTENZIONE
• Utilizzare il prodotto solo come descritto nel
presente manuale.
• Non utilizzare il prodotto se una parte è
danneggiata o difettosa. Sostituire
immediatamente un dispositivo danneggiato
o difettoso.
• Il prodotto può essere riparato e sottoposto a
manutenzione esclusivamente da un tecnico
qualicato per ridurre il rischio di scosse
elettriche.
• Scollegare il prodotto dalla presa elettrica e da
altre apparecchiature se si vericano problemi.
• Non far cadere il prodotto ed evitare impatti.
• Non utilizzare il prodotto in ambienti in cui
sono utilizzati o conservati liquidi o gas
inammabili.
• Evitare la luce solare diretta.
• Non disporre accanto ad altre fonti di calore.
• Collegare solo a una presa dotata di messa a
terra.
• Non disporre il riscaldatore direttamente al di
sotto di una presa a parete.
• Non posizionare il prodotto direttamente
sotto a una presa di corrente.
• Non immergere il prodotto in acqua.
• Non esporre il prodotto a getti d’acqua.
• Non coprire il prodotto durante l’uso.
• Non inserire alcun oggetto nel prodotto.
• Non utilizzare solventi per la pulizia del
prodotto.
• Non prolungare il cavo di alimentazione.
• Non utilizzare il prodotto con una presa
mobile.
• Non tirare il cavo di alimentazione per
spegnere il riscaldatore, utilizzare sempre
l’interruttore di accensione/spegnimento.
• In caso di guasto, spegnere il riscaldatore,
scollegare il cavo di alimentazione e farlo
riparare da un tecnico qualicato.
Mobile su ruote [Immagine B]
1. Ribaltare il riscaldatore.
2. Prendere un piede A
7
e le viti 2 A
8
.
3. Utilizzare un cacciavite per montare il piede
sul riscaldatore.
4. Ripetere con l’altro piede.
5. Ribaltare il riscaldatore e collegare il cavo di
alimentazione in una presa a parete dotata di
messa a terra.
Riscaldatore montato a parete [Immagine C]
- ATTENZIONE
• Montare il prodotto almeno 150 mm dal
pavimento e almeno 500 mm dal sotto.
• Non montare il prodotto direttamente al di
sotto di una presa a parete.
• Controllare che la parete possa sopportare il
peso del prodotto.
• Utilizzare esclusivamente tasselli idonei al
proprio tipo di parete.
1. Praticare 3 fori, come indicato.
4
La misurazione verticale di 275 mm può
deviare a seconda del prodotto. Controllare
sempre le misurazioni prima di praticare i fori.
2. Inserire i tasselli A
6
.
3. Inserire le viti A
5
, facendole sporgere di 6
mm dalla parete.
4. Appendere il riscaldatore alla parete.
5. Inserire il cavo di alimentazione in una presa
a parete.
Uso
4
Il prodotto si spegne automaticamente in caso
di surriscaldamento.
Impostazione di data e ora
1. Accendere l’interruttore di alimentazione A
4
.
2. Premere A
q
per accendere il riscaldatore.
3. Premere A
w
per accendere il display.
4. Premere A
t
per aprire l’impostazione di data
e ora.
5. Premere A
t
per 3 secondi per cambiare l’ora.
6. Premere A
e
o A
y
per cambiare l’ora.
7. Premere A
t
per 3 secondi.
8. Premere A
e
o A
y
per cambiare i minuti.
9. Premere A
w
per confermare l’ora e uscire o
attendere 5 secondi.
Impostazione manuale della temperatura
Premere A
e
o A
y
per modicare la
temperatura.
Utilizzo del blocco per bambini
Quando è attivato, il blocco per bambini
impedisce l’utilizzo del pannello di controllo.
Per attivare il blocco per bambini, premere A
e
e A
y
contemporaneamente per 3 secondi. Il
simbolo del blocco per bambini A
h
si accende
sul display.
Per disattivare il blocco per bambini, premere
di nuovo A
e
e A
y
contemporaneamente per
3 secondi. Il simbolo del blocco per bambini si
spegne sul display.
Utilizzo del telecomando
4
Il telecomando può essere utilizzato solo
quando il riscaldatore non è in funzione in
modalità programmata.
1. Aprire il coperchio sul retro del telecomando e
installare batterie .
A
u
Accensione e spegnimento del riscaldatore
A
t
Impostazione della modalità Eco, Piacevole o
Antigelo.
A
o
Impostazione della Modalità apertura nestra
A
p
Impostazione dell’ora (lo stesso di A
t
sul
pannello di controllo)
A
a
+ (lo stesso di A
e
sul pannello di controllo)
A
s
- (lo stesso di A
v
sul pannello di controllo)
d’alimentation dans une prise murale mise à
la terre.
Chauage mural [Image C]
- AVERTISSEMENT
• Montez le produit à au moins 150 mm du sol
et au moins 500 mm du plafond.
• Ne montez pas le produit directement sous
une prise murale.
• Vériez si le mur peut supporter le poids du
produit.
• Utilisez uniquement des chevilles adaptées à
votre type de mur.
1. Percez 3 trous comme indiqué.
4
La mesure verticale de 275 mm peut varier
en fonction du produit. Vériez toujours les
mesures avant de percer.
2. Insérez les chevilles A
6
.
3. Insérez les vis A
5
, en les laissant dépasser du
mur de 6 mm.
4. Accrochez le chauage au mur.
5. Branchez le cordon d’alimentation dans une
prise murale.
Utilisation
4
Le produit se met automatiquement hors
tension en cas de surchaue.
Réglage de la date et de l’heure
1. Activez l’interrupteur d’alimentation A
4
.
2. Appuyez sur A
q
pour mettre le chauage
sous tension.
3. Appuyez sur A
w
pour mettre l’achage en
marche.
4. Appuyez sur A
t
pour ouvrir le réglage de la
date et de l’heure.
5. Appuyez sur A
t
pendant 3 secondes pour
changer l’heure.
6. Appuyez sur A
e
ou A
y
pour changer les
heures.
7. Appuyez sur A
t
pendant 3 secondes.
8. Appuyez sur A
e
ou A
y
pour changer les
minutes.
9. Appuyez sur A
w
pour conrmer l’heure et
quitter ou attendez 5 secondes.
Réglage manuel de la température
Appuyez sur A
e
ou A
y
pour changer la
température.
Utilisation du verrouillage enfant
Lorsqu’il est activé, le verrouillage enfant
empêche toute utilisation du panneau de
commande.
Pour activer le verrouillage enfant, appuyez
simultanément sur A
e
et A
y
pendant 3
secondes. Le symbole de verrouillage enfant
s’allume sur l’écran A
h
.
Pour désactiver le verrouillage enfant, appuyez
à nouveau simultanément sur A
e
et A
y
pendant 3 secondes. Le symbole de verrouillage
enfant disparaît de l’écran.
Utilisation de la télécommande
4
La télécommande ne peut être utilisée que
lorsque le chauage ne fonctionne pas en
mode programmé.
1. Ouvrez le couvercle à l’arrière de la
télécommande et installez les piles .
A
u
Mettre le chauage en marche ou à l’arrêt
A
t
Réglez le mode éco, le mode confortable ou le
mode antigel
A
o
Réglez le mode fenêtre ouverte
A
p
Réglez l’heure (identique à A
t
sur le panneau
de contrôle)
A
a
+ (identique à A
e
sur le panneau de contrôle)
A
s
- (identique à A
v
sur le panneau de contrôle)
Spécications
Produit Panneau de chauage à
convection
Article numéro HTPL20FWT / HTPL20FBK
Dimensions (L x l x H) 830 x 260 x 520 mm (avec
roues)
830 x 90 x 465 mm
(montage mural)
Poids 7,9 kg
Tension d’entrée AC 220 - 240 V ~ 50 / 60 Hz
Puissance d'entrée
nominale
1800 - 2000 W
Paramètres 1000 W / 2000 W
Température de
protection contre la
surchaue
105 °C
Classement IP IP24
d
Verkorte handleiding
Paneel
convectorkachel
HTPL20FWT /
HTPL20FBK
Zie voor meer informatie de
uitgebreide handleiding online:
ned.is/htpl20fwt | ned.is/htpl20fbk
Bedoeld gebruik
Het product is enkel geschikt voor gebruik
binnenshuis.
Dit product is uitsluitend geschikt voor goed
geïsoleerde plaatsen of voor incidenteel gebruik.
Het kan in natte en vochtige omgevingen
worden gebruikt.
Elke wijziging van het product kan gevolgen
hebben voor veiligheid, garantie en correcte
werking.
Onderdelenlijst [Afbeelding A]
1
Paneel
convectorkachel
2
Afstandsbediening
3
Plug
4
Aan-/ uitschakelaar
5
Schroef voor
wandmontage
6
Anker
7
Voet met wielen
8
Schroef voor
wielmontage
9
Display
q
Aan/Uit knop
w
Modus knop
e
+ knop
r
Programma knop
t
Tijd knop
y
- knop
u
Aan/Uit knop
i
Modus knop
o
Venster open knop
p
Tijd knop
a
+ knop
s
- knop
d
Dag van de week
f
Timer
g
Weergave
verwarmingsinterval
h
Kinderslot
j
Temperatuur
k
Tijd
l
Aan/uit-indicatie van
verwarming
z
Programmeermodus
x
Comfortmodus
c
ECO-modus
v
Antivriesmodus
b
Venster open modus
n
Weergave
verwarming
Veiligheidsvoorschriften
- WAARSCHUWING
• Gebruik het product alleen zoals beschreven
in deze handleiding.
• Gebruik het product niet als een onderdeel
beschadigd of defect is. Vervang een
beschadigd of defect apparaat onmiddellijk.
• Dit product mag voor onderhoud alleen
worden geopend door een erkend technicus
om het risico op elektrische schokken te
verkleinen.
• Koppel het product los van het stopcontact en
van andere apparatuur als er zich problemen
voordoen.
• Laat het product niet vallen en voorkom
stoten.
• Gebruik het product niet in ruimten waar
ontvlambare vloeistoen of gassen worden
gebruikt of opgeslagen.
• Direct zonlicht vermijden.
• Niet in de buurt van andere warmtebronnen
plaatsen.
• Alleen aansluiten op een geaard stopcontact.
• Plaats de kachel niet direct onder een
stopcontact.
• Plaats het product niet direct onder een
stopcontact.
• Het product niet in water onderdompelen.
• Stel het product niet bloot aan waterstralen.
• Het product tijdens gebruik niet bedekken.
• Steek geen voorwerpen in het product.
• Gebruik geen oplosmiddelen om het product
te reinigen.
• Verleng het netsnoer niet.
• Gebruik het product niet op een mobiel
stopcontact.
• Trek niet aan het netsnoer om de kachel uit te
schakelen, maar gebruik altijd de aan/
uit-schakelaar.
• In geval van een storing dient u de kachel uit
te schakelen, de stekker uit het stopcontact te
halen en het door een gekwaliceerde
technicus te laten repareren.
Beweegbaar met wielen [Afbeelding B]
1. Zet de kachel op zijn kop.
2. Pak een voet A
7
en 2 schroeven A
8
.
3. Gebruik een schroevendraaier om de voet op
de kachel te monteren.
4. Herhaal dit voor de andere voet.
5. Zet de kachel rechtop en steek de stekker van
het netsnoer in een geaard stopcontact.
Aan de muur gemonteerde kachel [Afbeelding
C]
- WAARSCHUWING
• Monteer het product minstens 150 mm van de
vloer en minstens 500 mm van het plafond.
• Monteer de kachel niet direct onder een
stopcontact.
• Controleer of de muur het gewicht van het
product kan dragen.
• Gebruik alleen ankers die geschikt zijn voor
uw type muur.
1. Boor 3 gaten, zoals aangegeven.
4
De verticale meting van 275 mm kan per
product variëren. Controleer altijd de
metingen voor het boren.
2. Plaats de ankers A
6
.
3. Plaats de schroeven A
5
, laat ze 6mm uit de
muur steken.
4. Hang de kachel aan de muur.
5. Steek het netsnoer in een stopcontact.
Gebruik
4
Bij oververhitting wordt het product
automatisch uitgeschakeld.
Datum en tijd instellen
1. Schakel de netschakelaar A
4
in.
2. Druk op A
q
om de kachel aan te zetten.
3. Druk op A
w
om het display aan te zetten.
4. Druk op A
t
om de datum en tijdinstelling
te openen.
5. Druk 3 seconden op A
t
om de tijd in te
stellen.
a
Quick start guide
Panel convection
heater
HTPL20FWT /
HTPL20FBK
For more information see the extended
manual online:
ned.is/htpl20fwt | ned.is/htpl20fbk
Intended use
The product is intended for indoor use only.
This product is only suitable for well insulated
spaces or occasional use.
It can be used in wet and damp environments.
Any modication of the product may have
consequences for safety, warranty and proper
functioning.
Parts list [Image A]
1
Panel convection
heater
2
Remote control
3
Plug
4
Power switch
5
Screw for wall mount
6
Anchor
7
Foot with wheels
8
Screw for wheel
mount
9
Display
q
On/o button
w
Mode button
e
+ button
r
Program button
t
Time button
y
- button
u
On/o button
i
Mode button
o
Window open button
p
Time button
a
+ button
s
- button
d
Day of the week
f
Timer
g
Heating interval
display
h
Child lock
j
Temperature
k
Time
l
Heating on/o
indication
z
Programming mode
x
Comfortable mode
c
ECO mode
v
Anti-frost mode
b
Window open mode
n
Heating display
Safety instructions
- WARNING
• Only use the product as described in this
manual.
• Do not use the product if a part is damaged or
defective. Replace a damaged or defective
device immediately.
• This product may only be serviced by a
qualied technician for maintenance to reduce
the risk of electric shock.
• Disconnect the product from the electrical
outlet and other equipment if problems occur.
• Do not drop the product and avoid bumping.
• Do not use the product in rooms where
ammable liquids or gases are used or stored.
• Avoid direct sunlight.
• Do not place near other heat sources.
• Connect to a grounded socket only.
• Do not place the heater directly under a wall
socket.
• Do not locate the product immediately below
a power outlet.
• Do not immerse the product in water.
• Do not subject the product to water jets.
• Do not cover the product when in use.
• Do not insert any objects into the product.
• Do not use solvents to clean the product.
• Do not extend the power cord.
• Do not use the product on a mobile socket.
• Do not pull the power cord to shut down the
heater, always use the on/o switch.
• In case of failure, shut down the heater, unplug
the power cord and have it serviced by a
qualied technician.
Movable with wheels [Image B]
1. Turn the heater upside down.
2. Take a foot A
7
and 2 screws A
8
.
3. Use a screw driver to mount the foot to the
heater.
4. Repeat for the other foot.
5. Turn the heater upright and plug the power
cord in a grounded wall socket.
Wall mounted heater [Image C]
- WARNING
• Mount the product at least 150 mm from the
oor and at least 500 mm from the ceiling.
• Do not mount the product directly under a
wall socket.
• Check whether the wall can hold the weight of
the product.
• Use anchors suitable for your type of wall only.
1. Drill 3 holes, as indicated.
4
The vertical measurement of 275 mm
can deviate per product. Always check
measurements before drilling.
2. Insert the anchors A
6
.
3. Insert the screws A
5
, let them protrude 6mm
from the wall.
4. Hang the heater on the wall.
5. Plug the power cord in a wall socket.
Use
4
The product will switch o automatically when
overheating.
Setting date and time
1. Turn on the power switch A
4
.
2. Press A
q
to turn on the heater.
3. Press A
w
to turn on the display.
4. Press A
t
to open the date and time setting.
5. Press A
t
for 3 seconds to change the time.
6. Press A
e
or A
y
to change the hour.
7. Press A
t
for 3 seconds.
8. Press A
e
or A
y
to change the minutes.
9. Press A
w
to conrm the time and exit or wait
for 5 seconds.
Setting the temperature manually
Press A
e
or A
y
to change the temperature.
Using the child lock
When activated, the child lock prevents
operations on the control panel.
To activate the child lock, press A
e
and A
y
simultaneously for 3 seconds. The child lock
symbol on the display A
h
lights up.
To deactivate the child lock, press A
e
and A
y
again simultaneously for 3 seconds. The child lock
symbol on the display disappears.
Using the remote
4
The remote control can only be used when the
heater is not running in programmed mode.
1. Open the lid on the backside of the remote
and install batteries.
A
u
Switch the heater on and o
A
t
Set Eco Mode, Comfortable Mode, or Anti-Frost
Mode
A
o
Set Window Open Mode
A
p
Set time (same as A
t
on the control panel)
A
a
+ (same as A
e
on the control panel)
A
s
- (same as A
v
on the control panel)
Specications
Product Panel convection heater
Article number HTPL20FWT / HTPL20FBK
Dimensions (l x w x h) 830 x 260 x 520 mm (with
wheels)
830 x 90 x 465 mm (wall
mounted)
Weight 7.9 kg
Input voltage AC 220 - 240 V ~ 50 / 60 Hz
Rated input power 1800 - 2000 W
Setting 1000 W / 2000 W
Overheating protection
temperature
105 °C
IP rating IP24
c
Kurzanleitung
Flächenkonvek-
tionsheizung
HTPL20FWT /
HTPL20FBK
Für weitere Informationen beachten Sie
die erweiterte Anleitung online:
ned.is/htpl20fwt | ned.is/htpl20fbk
Bestimmungsgemäße Verwendung
Das Produkt ist nur zur Verwendung innerhalb
von Gebäuden gedacht.
Dieses Produkt ist nur für gut isolierte Räume
oder für den gelegentlichen Gebrauch geeignet.
Es kann in nassen und feuchten Umgebungen
eingesetzt werden.
Jegliche Modikation des Produkts kann Folgen
für die Sicherheit, Garantie und ordnungsgemäße
Funktionalität haben.
Teileliste [Abbildung A]
1
Flächenkonvek-
tionsheizung
2
Fernbedienung
3
Stecker
4
Ein/Aus-Schalter
5
Schraube für
Wandmontage
6
Dübel
7
Standfüße mit Rädern
8
Schraube für
Radmontage
9
Display
q
Ein/Aus-Schalter
w
Modus-Taste
e
+ Taste
r
Programm-Taste
t
Zeit-Taste
y
- Taste
u
Ein/Aus-Schalter
i
Modus-Taste
o
Fenster geönet
Taste
p
Zeit-Taste
a
+ Taste
s
- Taste
d
Wochentag
f
Timer
g
Heizintervallanzeige
h
Kindersicherung
j
Temperatur
k
Zeit
l
Heizung an/aus
Anzeige
z
Programmiermodus
x
Komfortmodus
c
ECO-Modus
v
Frostwächtermodus
b
Fenster geönet
Modus
n
Heizdisplay
Sicherheitshinweise
- WARNUNG
• Verwenden Sie das Produkt nur wie in dieser
Anleitung beschrieben.
• Verwenden Sie das Produkt nicht, wenn ein
Teil beschädigt ist oder es einen Mangel
aufweist. Ersetzen Sie ein beschädigtes oder
defektes Gerät unverzüglich.
• Dieses Produkt darf nur von einem
ausgebildeten Techniker gewartet werden, um
die Gefahr eines Stromschlags zu reduzieren.
• Trennen Sie das Produkt vom Stromanschluss
und anderer Ausrüstung, falls Probleme
auftreten.
• Lassen Sie das Produkt nicht herunterfallen
und vermeiden Sie Kollisionen.
• Verwenden Sie das Produkt nicht in Räumen,
in denen brennbare Flüssigkeiten oder Gase
verwendet oder gelagert werden.
• Vermeiden Sie direktes Sonnenlicht.
• Nicht in die Nähe von anderen Wärmequellen
aufstellen.
• Nur mit einer geerdeten Steckdose verbinden.
9
10
11
12
13
14
15
16
17
18
19
20
21
1
2
3
5
6
7
8
4
A
6 mm
275 mm
B
C
Panel Convection Heater
Subheader
HTPL20FWT / HTPL20FBK
ned.is/htpl20fwt | ned.is/htpl20fbk
Nedis BV
De Tweeling 28, 5215 MC ’s-Hertogenbosch – The Netherlands 07/19
HTPL20FWT_HTPL20FBK_MAN_COMP_(19292 1422)_v01.indd 1-8 15-7-2019 15:30:03

Zapojte sa do diskusie o tomto výrobku
Tu sa môžete podeliť o to, čo si myslíte o Nedis HTPL20FBK Ohrievač. Ak máte otázku, najprv si pozorne prečítajte návod. Vyžiadanie manuálu je možné vykonať pomocou nášho kontaktného formulára.
odpovedať | Bolo to užitočné (4) (Preložené Googlom)
odpovedať | Bolo to užitočné (0) (Preložené Googlom)
odpovedať | Bolo to užitočné (0) (Preložené Googlom)