
1. Pressione e mantenha B
4
e rode
cuidadosamente B
3
.
2. Liberte B
4
para xar B
3
na devida posição.
3. Mantenha B
1
para ligar o produto a uma
tomada de parede.
4. Use o B
2
para desligar o dispositivo.
Utilizar o aquecedor
1. Pressione A
2
para iniciar a função de
aquecimento.
2. Utilize A
1
e A
5
para controlar a
temperatura.
4
Quando a temperatura ambiente é superior à
temperatura ambiente denida no aquecedor,
o elemento de aquecimento desliga-se, a
ventoinha continua a funcionar e o visor pisca.
4
Quando a temperatura ambiente se encontra
3 graus abaixo da temperatura denida, o
elemento de aquecimento liga-se.
3. Pressione A
2
para desligar a função de
aquecimento.
4. Use o A
7
para desligar o dispositivo.
4
Deixe o produto arrefecer antes de desligar.
5. Puxe o produto em A
8
para desligar o
produto da tomada elétrica.
4
Deixe o produto arrefecer antes de armazenar.
Denir temporizador
1. Pressione A
6
para ativar o temporizador.
2. Prima repetidamente A
6
para denir a
quantidade de horas pretendida (1-12).
4
Para cancelar o temporizador, reinicie o
produto.
4
O produto tem um temporizador predenido
de 12 horas.
Especicações
Produto Aquecedor de encaixe
Número de artigo HTPN10FWT
Dimensões (c x l x a) 90 x 85 x 170 mm
Tensão de entrada CA 220 - 240 V ~ 50/60 Hz
Potência máxima 400 W
Ecrã LED
Temperatura de
funcionamento
15 - 45°C
Temporizador 1 - 12 horas
e
Snabbstartsguide
Eluttagvärmare HTPN10FWT
För ytterligare information, se
den utökade manualen online:
ned.is/htpn10fwt
Avsedd användning
Denna enhet är avsedd som en värmande enhet
för anslutning direkt till ett eluttag.
Denna produkt är endast avsedd för användning
inomhus.
Denna produkt är endast lämpad för välisolerade
utrymmen eller sporadisk användning.
Produkten är inte avsedd för yrkesmässig
användning.
Modiering av produkten kan medföra
konsekvenser för säkerhet, garanti och korrekt
funktion.
Huvuddelar (bild A)
1
Knappen Temperatur ner
2
Kraftknapp
3
Luftutlopp
4
Display
5
Knappen Temperatur upp
6
Timer-knapp
7
Strömbrytare
8
Handtag
9
Kontakt
10
Knapp för kontaktens
vridning
11
Luftintag
Säkerhetsanvisningar
-
VARNING
• Läs anvisningarna före användning.
• Exponera inte produkten till vatten, regn eller
fukt eller hög fukthalt.
• Inspektera produkten före varje användning
med avseende på sprucken eller defekt
stickkontakt eller lösa anslutningar. Använd inte
produkten om den är sliten eller skadad.
• Förvara produkten utom räckhåll för barn.
• Kontakta en kvalicerad tekniker för service/
reparation.
• Lämna inte produkten utan uppsikt när den
arbetar.
• Stäng av produkten när du lämnar rummet eller
går till sängs.
• Låt inte sällskapsdjur eller barn leka för nära
produkten.
• Denna värmare är endast avsedd för ge extra
värme och ska aldrig användas för
uppvärmning av sängkläder, matlagning,
torkning av kläder eller upptining av
rörledningar.
• Värmarens korrekta placering är kritisk.
Värmaren måste hållas minst en meter från
brännbara föremål såsom tidningar, kläder eller
mattor.
• Anslut inte andra elektriska enheter till samma
eluttag som värmaren.
• Håll produkten på avstånd från brännbara
föremål såsom möbler, gardiner och liknande.
• Använd inte produkten i utrymmen där
lättantändliga vätskor eller gaser hanteras eller
förvaras.
• Blockera inte ventilationsöppningar, och
säkerställ tillräckligt fritt utrymme runt
produkten.
• För inte in några föremål i öppningarna.
Använd inte produkten om någon öppning är
blockerad. Håll produkten fri från damm, ludd,
hår etc.
• Stäng av produkten och dra stickkontakten ur
eluttaget när den inte används eller före
underhåll.
• Anslut enheten till endast ett eluttag. Använd
inte förlängningssladdar.
• Barn under 3 års ålder får inte använda
produkten till följd av deras oförmåga att
reagera vid överhettning.
• Täck inte över produkten när den används.
• Använd produkten endast enligt anvisningarna
i denna bruksanvisning.
Installera värmaren (bild B)
-
Använd denna enhet endast i korrekt vertikal
position, anslutet till ett eluttag av typen F
Schuko CEEE 7/3.
4
Stickkontakten kan vridas 90 grader för att
säkerställa upprätt placering.
1. Tryck in och håll B
4
intryck och vrid B
3
försiktigt.
2. Släpp B
4
för att låsa B
3
på plats.
3. Håll i B
1
för att ansluta produkten till ett
eluttag.
4. Använd B
2
för att stänga av enheten.
Att använda värmaren
1. Tryck på A
2
för att aktivera värmarfunktionen.
2. Använd A
1
och A
5
för att kontrollera
temperaturen.
4
När den omgivande temperaturen är högre än
den på värmaren inställda temperaturen stängs
värmeelementet av. Fläkten fortsätter att arbeta
och displayen blinkar.
4
Värmeelementet aktiveras när den omgivande
temperaturen är 3 grader lägre än den inställda
temperaturen.
3. Tryck på A
2
för att stänga av
värmarfunktionen.
4. Använd A
7
för att stänga av enheten.
4
Låt produkten kallna innan den dras ur
eluttaget.
5. Dra i A
8
för att koppla bort produkten från
eluttaget.
4
Låt produkten kallna före förvaring.
Att ställa in timern
1. Tryck på A
6
för att aktivera timern.
2. Tryck upprepade gånger på A
6
för att ställa
önskat antal timmar (1-12).
4
Starta om produkten för att avaktivera
timerfunktionen.
4
Produktens timer har fabriksinställningen 12
timmar.
Specikationer
Produkt Eluttagvärmare
Artikelnummer HTPN10FWT
Dimensioner (l x b x h) 90 x 85 x 170 mm
Inspänning AC 220–240 V ~ 50/60 Hz
Max eekt 400 W
Display LED
Arbetstemperatur 15 - 45°C
Timer 1 - 12 timmar
4. Utilizzare A
7
per spegnere il dispositivo.
4
Lasciar rareddare il prodotto prima di
scollegarlo.
5. Tirare il prodotto da A
8
per scollegarlo dalla
presa di corrente.
4
Lasciar rareddare il prodotto prima di riporlo.
Impostazione del timer
1. Premere A
6
per attivare il timer.
2. Premere A
6
ripetutamente per impostare la
quantità desiderata di ore (1-12).
4
Per annullare il timer, riavviare il prodotto.
4
Il prodotto ha un’impostazione denita del
timer pari a 12 ore.
Speciche
Prodotto Riscaldatore a inserimento
Numero articolo HTPN10FWT
Dimensioni (p x l x a) 90 x 85 x 170 mm
Tensione in ingresso CA 220 - 240 V ~ 50/60 Hz
Potenza massima 400 W
Display LED
Temperatura di
funzionamento
15 - 45°C
Timer 1 - 12 ore
h
Guía de inicio rápido
Calefactor
enchufable
HTPN10FWT
Para más información, consulte
el manual ampliado en línea:
ned.is/htpn10fwt
Uso previsto por el fabricante
Este dispositivo está diseñado como un dispositivo
calefactor para ser enchufado directamente a una
toma de pared.
El producto está diseñado únicamente para uso
en interiores.
Este producto está indicado únicamente en
lugares abrigados o para una utilización puntual.
El producto no está diseñado para un uso
profesional.
Cualquier modicación del producto puede tener
consecuencias para la seguridad, la garantía y el
funcionamiento adecuado.
Partes principales (imagen A)
1
Botón para bajar la
temperatura
2
Botón de encendido
3
Salida de aire
4
Visualización
5
Botón para subir la
temperatura
6
Botón del temporizador
7
Interruptor de alimen-
tación
8
Asa
9
Taco
10
Botón de rotación del
enchufe
11
Entrada de aire
Instrucciones de seguridad
-
ADVERTENCIA
• Lea las instrucciones antes de usarla.
• No exponga el producto al agua, a la lluvia o a
humedad elevada.
• Inspeccionar el producto por si tuviera el
enchufe con grietas o roto o conexiones sueltas
antes de cada uso. No utilizar el producto si
está raído, desgastado o dañado.
• Mantenga el producto fuera del alcance de los
niños.
• Póngase en contacto con un técnico cualicado
para que se encargue del mantenimiento/
reparación.
• No deje el producto desatendido cuando esté
desenchufado.
• Apagar el producto cuando salga de la
habitación o se vaya a dormir.
• No dejar que las mascotas o los niños jueguen
demasiado cerca del producto.
• Este calefactor está concebido solamente para
proporcionar un calor suplementario y nunca
debería utilizarse para calentar ropa de cama,
cocinar comida, secar ropa o descongelar
tuberías.
• Es esencial una colocación apropiada del
calefactor. El calefactor debe mantenerse, como
mínimo, a una distancia de tres pies de
cualquier objeto inamable, por ejemplo,
papeles, ropa o alfombras.
• No enchufar ningún otro dispositivo eléctrico
en la misma toma que la del calefactor.
• Mantenga el producto a cierta distancia de
objetos inamables, como muebles, cortinas o
similar.
• No utilice el producto en estancias donde
hayan o se almacenen líquidos o gases
inamables.
• No bloquee las aberturas de ventilación y
asegúrese de que haya suciente espacio
alrededor del producto.
• No meta objetos en los oricios. No lo use si
hay oricios bloqueados. Manténgalo libre de
polvo, pelos, pelusas, etc.
• Desenchufe y desconecte el producto cuando
no lo utilice o antes de su mantenimiento.
• Enchufar el dispositivo solamente a una toma
de pared. No utilizar cables alargadores.
• Los niños menores de 3 años no deben usar el
producto debido a su incapacidad para
reaccionar al sobrecalentamiento.
• No tape el producto mientras se esté usando.
• Utilice el producto únicamente tal como se
describe en este manual.
Instalar el calefactor (imagen B)
-
Utilizar solamente este dispositivo en la
posición vertical correcta en una toma de pared
tipo F Schuko CEEE 7/3.
4
El enchufe se puede girar 90 grados para
asegurar la posición vertical.
1. Presionar y mantener pulsado B
4
y girar con
cuidado B
3
.
2. Liberar B
4
para bloquear B
3
en su sitio.
3. Sostener B
1
para enchufar el producto a una
toma de pared.
4. Utilizar el B
2
para apagar el dispositivo.
Utilizar el calefactor
1. Pulsar A
2
para iniciar la función de
calefacción.
2. Utilizar A
1
y A
5
para controlar la
temperatura.
4
Laat het product afkoelen voordat u het
apparaat opbergt.
Stel de timer in
1. Druk op A
6
om de timer te activeren.
2. Druk herhaaldelijk op A
6
om het gewenste
aantal uren in te stellen (1-12).
4
Om de timer te annuleren, start het product
opnieuw.
4
Het product heeft een standaard timerinstelling
van 12 uren.
Specicaties
Product Plug-in kachel
Artikelnummer HTPN10FWT
Afmetingen (l x b x h) 90 x 85 x 170 mm
Ingangsspanning Netspanning 220 - 240 V ~
50/60 Hz
Maximaal vermogen 400 W
Display LED
Bedrijfstemperatuur 15 - 45°C
Timer 1 - 12 uur
j
Guida rapida all’avvio
Riscaldatore a
inserimento
HTPN10FWT
Per maggiori informazioni
vedere il manuale esteso online:
ned.is/htpn10fwt
Uso previsto
Questo dispositivo è inteso come dispositivo di
riscaldamento da collegarsi direttamente a una
presa di corrente.
Il prodotto è inteso solo per utilizzo in interni.
Il presente prodotto è adatto solo a ambienti
correttamente isolati o ad un uso occasionale.
Il prodotto non è inteso per utilizzi professionali.
Eventuali modiche al prodotto possono
comportare conseguenze per la sicurezza, la
garanzia e il corretto funzionamento.
Parti principali (immagine A)
1
Pulsante Abbassa tem-
peratura
2
Pulsante di accensione
3
Uscita dell’aria
4
Display
5
Pulsante Aumenta
temperatura
6
Pulsante del timer
7
Interruttore di alimen-
tazione
8
Maniglia
9
Tassello
10
Pulsante Rotazione presa
11
Ingresso dell’aria
Istruzioni di sicurezza
-
ATTENZIONE
• Leggere le istruzioni prima dell’uso.
• Non esporre il prodotto all’acqua, alla pioggia,
all’umidità o all’umidità elevata.
• Prima di ogni uso, controllare che il prodotto
non presenti spine fessurate o rotte né
collegamenti allentati. Non utilizzare il prodotto
se sfrangiato, usurato o danneggiato.
• Tenere il prodotto lontano dalla portata dei
bambini.
• Contattare un tecnico qualicato per la
manutenzione/riparazione.
• Non lasciare il prodotto incustodito quando è
acceso.
• Spegnere il prodotto quando si esce dalla
stanza o si va a dormire.
• Non lasciare che bambini o animali domestici
giochino nelle vicinanze del prodotto.
• Questo prodotto intende esclusivamente
fornire un riscaldamento supplementare e non
deve mai essere utilizzato per riscaldare
lenzuola, cuocere alimenti, asciugare abiti o
scongelare tubature.
• Il corretto posizionamento del riscaldatore è
fondamentale. Il riscaldatore deve essere
mantenuto ad almeno un metro di distanza da
qualsiasi sostanza inammabile, ad es. carta,
abiti o tappeti.
• Non collegare alcun altro dispositivo elettrico
alla stessa presa del riscaldatore.
• Tenere il prodotto a distanza da oggetti
inammabili come il mobilio, le tende e simili.
• Non utilizzare il prodotto in ambienti in cui
sono utilizzati o conservati liquidi o gas
inammabili.
• Non ostruire le aperture di ventilazione e
assicurarsi che vi sia spazio a sucienza intorno
al prodotto.
• Non disporre alcun oggetto sulle aperture. Non
utilizzare con alcuna apertura ostruita. Tenere
libero da polvere, capelli, bre, ecc.
• Spegnere e scollegare il prodotto quando non
viene utilizzato o prima della manutenzione.
• Collegare il dispositivo solo a una presa di
corrente. Non utilizzare prolunghe.
• I bambini di età inferiore ai 3 anni non devono
utilizzare il prodotto a causa della loro
incapacità di reagire al surriscaldamento.
• Non coprire il prodotto durante l’uso.
• Utilizzare il prodotto solo come descritto nel
presente manuale.
Installazione del riscaldatore (immagine
B)
-
Utilizzare questo dispositivo esclusivamente
nella corretta posizione verticale in una presa di
corrente di tipo F Schuko CEEE 7/3.
4
La spina ruota di 90 gradi per consentire il
posizionamento in verticale.
1. Tenere premuto B
4
e ruotare delicatamente
B
3
.
2. Rilasciare B
4
per bloccare in posizione B
3
.
3. Tenere B
1
per inserire il prodotto in una presa
di corrente.
4. Utilizzare B
2
per spegnere il dispositivo.
Utilizzo del riscaldatore
1. Premere A
2
per avviare la funzione di
riscaldamento.
2. Utilizzare A
1
e A
5
per controllare la
temperatura.
4
Quando la temperatura ambiente è superiore
alla temperatura impostata per il riscaldatore,
la resistenza si spegne, la ventola continua a
funzionare e il display lampeggia.
4
Quando la temperatura ambiente è 3 gradi
inferiore alla temperatura impostata, la
resistenza si accende.
3. Premere A
2
per spegnere la funzione di
riscaldamento.
4
Le réglage de la minuterie par défaut du
produit est de 12 heures.
Spécications
Produit Chauage enchable
Article numéro HTPN10FWT
Dimensions (L x l x H) 90 x 85 x 170 mm
Tension d’entrée CA 220 - 240 V ~ 50/60 Hz
Puissance maximale 400 W
Achage LED
Température
fonctionnement
15 - 45°C
Minuterie 1 - 12 heures
d
Verkorte handleiding
Plug-in kachel HTPN10FWT
Zie voor meer informatie de
uitgebreide handleiding online:
ned.is/htpn10fwt
Bedoeld gebruik
Dit apparaat is bedoeld als een kachel die
rechtstreeks op een stopcontact kan worden
aangesloten.
Het product is enkel bedoeld voor gebruik
binnenshuis.
Dit product is uitsluitend geschikt voor goed
geïsoleerde plaatsen of voor incidenteel gebruik.
Het product is niet bedoeld voor professioneel
gebruik.
Elke wijziging van het product kan gevolgen
hebben voor veiligheid, garantie en correcte
werking.
Belangrijkste onderdelen (afbeelding A)
1
Temperatuur omlaag
knop
2
Aan/uit-knop
3
Luchtuitlaat
4
Display
5
Temperatuur omhoog
knop
6
Timer knop
7
Aan-/ uitschakelaar
8
Handvat
9
Plug
10
Stekker rotatie knop
11
Luchtinlaat
Veiligheidsvoorschriften
-
WAARSCHUWING
• Lees de instructies voor gebruik.
• Stel het product niet bloot aan water, regen,
vocht of hoge luchtvochtigheid.
• Controleer het product vóór elk gebruik op
gebarsten of gebroken stekkers of losse
verbindingen. Gebruik het product niet als het
gerafeld, versleten of beschadigd is.
• Houd het product buiten bereik van kinderen.
• Neem contact voor onderhoud/reparatie
contact op met een gekwaliceerde monteur.
• Laat het product niet onbeheerd achter
wanneer het is ingeschakeld.
• Zet het product uit wanneer u de kamer verlaat
of gaat slapen.
• Zorg er voor dat huisdieren of kinderen niet te
dicht bij het product spelen.
• Deze kachel is alleen bedoeld voor extra
verwarming en mag nooit worden gebruikt om
beddengoed te verwarmen, voedsel te koken,
kleding te drogen of leidingen te ontdooien.
• De juiste plaatsing van de kachel is van cruciaal
belang. De kachel moet ten minste een meter
van alles wat brandbaar is, zoals papier, kleding
of tapijten, verwijderd worden gehouden.
• Sluit geen andere elektrische apparaten aan op
hetzelfde stopcontact als de kachel.
• Houd het product op een veilige afstand van
brandbare voorwerpen zoals meubels,
gordijnen en dergelijke.
• Gebruik het product niet in ruimten waar
ontvlambare vloeistoen of gassen worden
gebruikt of opgeslagen.
• Blokkeer de ventilatieopeningen niet en zorg
ervoor dat er voldoende ruimte rond het
product is.
• Steek geen voorwerpen in openingen. Gebruik
het apparaat niet met een geblokkeerde
opening. Houd het apparaat vrij van stof,
pluizig haar enz.
• Schakel het product uit en trek de stekker uit
het stopcontact als het niet in gebruik is of bij
onderhoud.
• Steek het apparaat alleen in een
wandstopcontact. Gebruik geen
verlengsnoeren.
• Kinderen jonger dan 3 mogen het product niet
gebruiken omdat ze niet op oververhitting
kunnen reageren.
• Het product tijdens gebruik niet bedekken.
• Gebruik het product alleen zoals beschreven in
deze handleiding.
Installeer de kachel (afbeelding B)
-
Gebruik dit apparaat alleen in de juiste verticale
positie in een wandstopcontact van het type F
Schuko CEEE 7/3.
4
De stekker draait 90 graden om een rechtop
staande positie te garanderen.
1. Houd B
4
ingedrukt en draai B
3
zachtjes.
2. Laat B
4
los om B
3
op de plaats te
vergrendelen.
3. Houd B
1
vast om het product in een
wandstopcontact te steken.
4. Gebruik de B
2
om het apparaat uit te zetten.
Gebruik de kachel
1. Druk op A
2
om de verwarmingsfunctie te
starten.
2. Druk op A
1
en A
5
om de temperatuur te
regelen.
4
Wanneer de omgevingstemperatuur hoger is
dan de ingestelde temperatuur van de kachel,
wordt het verwarmingselement uitgeschakeld,
de ventilator blijft werken en het display
knippert.
4
Wanneer de omgevingstemperatuur 3 graden
onder de ingestelde temperatuur ligt, wordt
het verwarmingselement ingeschakeld.
3. Druk op A
2
om de verwarmingsfunctie uit
te zetten.
4. Gebruik de A
7
om het apparaat uit te zetten.
4
Laat het product afkoelen voordat u de stekker
uit het stopcontact haalt.
5. Trek aan het product bij A
8
om de stekker van
het product uit het wandstopcontact te halen.
b
Guide de démarrage rapide
Chauage
enchable
HTPN10FWT
Pour plus d'informations, consultez
le manuel détaillé en ligne :
ned.is/htpn10fwt
Utilisation prévue
Cet appareil est conçu comme un appareil de
chauage à brancher directement dans une prise
murale.
Le produit est prévu pour un usage intérieur
uniquement.
Ce produit ne peut être utilisé que dans des locaux
bien isolés ou de manière occasionnelle.
Le produit n’est pas destiné à un usage
professionnel.
Toute modication du produit peut avoir des
conséquences sur la sécurité, la garantie et le bon
fonctionnement.
Pièces principales (image A)
1
Bouton de diminution de
la température
2
Bouton d’alimentation
3
Sortie d’air
4
Achage
5
Bouton d’augmentation
de la température
6
Bouton de minuterie
7
Interrupteur
8
Poignée
9
Fiche
10
Bouton rotatif à che
11
Entrée d'air
Consignes de sécurité
-
AVERTISSEMENT
• Lisez les instructions avant utilisation.
• Ne pas exposer le produit à l'eau, à la pluie, à la
moiteur ou à une humidité élevée.
• Avant chaque utilisation, inspectez le produit à
la recherche de ches ssurées ou cassées ou
de connexions desserrées. En cas d’elochage,
d’usure ou de dommages, n'utilisez pas le
produit.
• Gardez le produit hors de portée des enfants.
• Contactez un technicien qualié pour entretien
/ réparation.
• Ne pas laisser le produit sans surveillance
lorsqu'il est sous tension.
• Mettez le produit hors tension lorsque vous
quittez la pièce ou allez vous coucher.
• Ne pas laisser d’animaux domestiques ou
d’enfants jouer trop près du produit.
• Ce chauage est uniquement destiné à fournir
de la chaleur supplémentaire et ne doit jamais
être utilisé pour réchauer la literie, faire cuire
des aliments, faire sécher des vêtements ou
dégeler des tuyaux.
• Le positionnement correct du chauage est
essentiel. Le chauage doit être maintenu à au
moins trois pieds de tout objet inammable,
par ex. des papiers, des vêtements ou des
carpettes.
• Ne branchez aucun autre appareil électrique
dans la même prise que le radiateur.
• Garder le produit à distance d'objets
inammables tels que des meubles, des
rideaux, etc.
• Ne pas utiliser le produit dans des pièces où des
liquides ou des gaz inammables sont utilisés
ou stockés.
• Ne bloquez pas les ouvertures de ventilation et
assurez-vous qu’il y ait susamment d’espace
autour du produit.
• Ne mettre aucun objet dans les ouvertures. Ne
pas utiliser avec une ouverture bloquée. Gardez
le produit exempt de poussière, peluches,
cheveux, etc.
• Mettez hors tension et débranchez le produit
lorsque vous ne l'utilisez pas ou avant toute
maintenance.
• Ne branchez l’appareil que sur une prise
murale. Ne pas utiliser de rallonges.
• Les enfants âgés de moins de 3 ans ne doivent
pas utiliser le produit en raison de leur
incapacité à réagir à une surchaue.
• Ne pas couvrir le produit lorsqu’il est en cours
d’utilisation.
• Utilisez le produit uniquement comme décrit
dans le présent manuel.
Installation du chauage (image B)
-
Utilisez cet appareil uniquement dans la
position verticale correcte dans une prise
murale Schuko CEEE 7/3 de type F.
4
La che tourne à 90 degrés pour assurer le
positionnement vertical.
1. Appuyez et maintenez B
4
et tournez B
3
en
douceur.
2. Relâchez B
4
pour verrouiller B
3
en place.
3. Tenez B
1
pour brancher le produit sur une
prise murale.
4. Utilisez l’B
2
pour mettre l’appareil hors
tension.
Utilisation du chauage
1. Appuyez sur A
2
pour démarrer la fonction de
chauage.
2. Utilisez A
1
et A
5
pour contrôler la
température.
4
Lorsque la température ambiante est
supérieure à la température réglée sur le
chauage, l'élément chauant se désactive, le
ventilateur continue de tourner et l'achage
clignote.
4
Lorsque la température ambiante est 3 degrés
en dessous de la température réglée, l’élément
chauant s’active.
3. Appuyez sur A
2
pour désactiver la fonction
de chauage.
4. Utilisez l’A
7
pour mettre l’appareil hors
tension.
4
Laissez le produit refroidir avant de le
débrancher.
5. Tirez le produit sur A
8
pour débrancher le
produit de la prise murale.
4
Laissez le produit refroidir avant de le ranger.
Réglage de la minuterie
1. Appuyez sur A
6
pour activer la minuterie.
2. Appuyez à plusieurs reprises sur A
6
pour
régler le nombre d'heures souhaité (1-12).
4
Pour annuler la minuterie, redémarrez le
produit.
a
Quick start guide
Plug-in heater HTPN10FWT
For more information see the extended
manual online: ned.is/htpn10fwt
Intended use
This device is intended as a heating device to be
plugged directly into a wall outlet.
The product is intended for indoor use only.
This product is only suitable for well insulated
spaces or occasional use.
The product is not intended for professional use.
Any modication of the product may have
consequences for safety, warranty and proper
functioning.
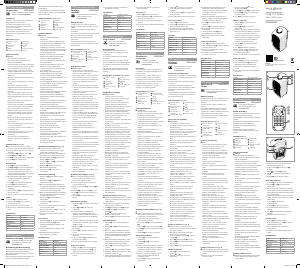
Main parts (image A)
1
Temperature down
button
2
Power button
3
Air outlet
4
Display
5
Temperature up button
6
Timer button
7
Power switch
8
Handle
9
Plug
10
Plug rotation button
11
Air inlet
Safety instructions
-
WARNING
• Read the instructions before use.
• Do not expose the product to water, rain,
moisture or high humidity.
• Inspect the product for cracked or broken plugs
or loose connections before each use. If frayed,
worn or damaged, do not use the product.
• Keep the product out of reach from children.
• Contact a qualied technician for service/repair.
• Do not leave the product unattended when
switched on.
• Turn o the product when you leave the room
or go to sleep.
• Do not let pets or children play too close to the
product.
• This heater is only meant to provide
supplemental heat and should never be used
to warm bedding, cook food, dry clothing or
thaw pipes.
• Proper placement of the heater is critical. The
heater must be kept at least three feet away
from anything ammable, e.g. papers, clothing
or rugs.
• Do not plug any other electrical devices into
the same outlet as the heater.
• Keep the product at a distance from ammable
objects such as furniture, curtains and similar.
• Do not use the product in rooms where
ammable liquids or gases are used or stored.
• Do not block ventilation openings and make
sure that there is enough space around the
product.
• Do not put any objects into openings. Do not
use with any opening blocked. Keep free of
dust, lint hair etc.
• Switch o and unplug the product when not in
use or before maintenance.
• Only plug the device into a wall outlet. Do not
use extension cords.
• Children under the age of 3 are not to use the
product due to their inability to react to
overheating.
• Do not cover the product when in use.
• Only use the product as described in this
manual.
Install the heater (image B)
-
Only use this device in the correct vertical
position in a type F Schuko CEEE 7/3 wall outlet.
4
The plug rotates 90 degrees to ensure upright
placement.
1. Press and hold B
4
and gently rotate B
3
.
2. Release B
4
to lock B
3
in place.
3. Hold B
1
to plug the product into a wall outlet.
4. Use the B
2
to turn o the device.
Use the heater
1. Press A
2
to start the heating function.
2. Use A
1
and A
5
to control the temperature.
4
When the ambient temperature is higher
than the set temperature of the heater, the
heating element switches o, the fan continues
working and the display ashes.
4
When the ambient temperature is 3 degrees
below the set temperature, the heating
element switches on.
3. Press A
2
to switch o the heating function.
4. Use the A
7
to turn o the device.
4
Allow the product to cool down before
unplugging.
5. Pull the product at A
8
to unplug the product
from the wall outlet.
4
Allow the product to cool down before storage.
Set timer
1. Press the A
6
to activate the timer.
2. Repeatedly press A
6
to set the desired
amount of hours (1-12).
4
To cancel the timer, restart the product.
4
The product has a default timer setting of 12
hours.
Specications
Product Plug-in heater
Article number HTPN10FWT
Dimensions (l x w x h) 90 x 85 x 170 mm
Input voltage AC 220 - 240 V ~ 50/60 Hz
Maximum power 400 W
Display LED
Operating temperature 15 - 45°C
Timer 1 - 12 hours
c
Kurzanleitung
Steckdosen-Heizung HTPN10FWT
Für weitere Informationen beachten
Sie die erweiterte Anleitung online:
ned.is/htpn10fwt
Bestimmungsgemäße Verwendung
Dieses Gerät dient als Heizgerät, das direkt in eine
Wandsteckdose eingesteckt werden kann.
Das Produkt ist nur zur Verwendung innerhalb von
Gebäuden gedacht.
Dieses Produkt ist nur für gut isolierte Räume oder
für den gelegentlichen Gebrauch geeignet.
Das Produkt ist nicht für den professionellen
Einsatz gedacht.
Jegliche Modikation des Produkts kann Folgen
für die Sicherheit, Garantie und ordnungsgemäße
Funktionalität haben.
Hauptbestandteile (Abbildung A)
1
Temperatur niedri-
ger-Knopf
2
Ein/Aus-Taste
3
Luftauslass
4
Anzeige
5
Temperatur höher-Knopf
6
Timer-Taste
7
Ein/Aus-Schalter
8
Gri
9
Stecker
10
Steckerdrehknopf
11
Lufteinlass
Sicherheitshinweise
-
WARNUNG
• Lesen Sie vor der Verwendung die
Anweisungen.
• Setzen Sie das Produkt nicht Wasser, Regen,
Feuchtigkeit oder hoher Luftfeuchtigkeit aus.
• Überprüfen Sie das Produkt vor jeder
Verwendung auf gerissene oder gebrochene
Stecker oder lockere Verbindungen. Verwenden
Sie das Produkt bei Ausfransungen, Verschleiß
oder Beschädigungen nicht.
• Halten Sie das Produkt stets von Kindern fern.
• Nehmen Sie Kontakt zu einem geschulten
Techniker zur Wartung/Reparatur auf.
• Lassen Sie das Produkt nicht unbeaufsichtigt,
wenn es in Betrieb ist.
• Schalten Sie das Produkt aus, wenn Sie den
Raum verlassen oder schlafen gehen.
• Lassen Sie keine Haustiere oder Kinder zu nah
an das Produkt heran.
• Diese Heizung ist nur dazu vorgesehen,
zusätzliche Wärme zu erzeugen und darf
niemals verwendet werden, um Betten
vorzuwärmen, Lebensmittel aufzuwärmen oder
Leitungen aufzutauen.
• Eine ordnungsgemäße Aufstellung der Heizung
ist wesentlich. Die Heizung muss mindestens
drei Fuß von allen entzündlichen
Gegenständen wie Papier, Kleidung oder
Teppichen entfernt sein.
• Stecken Sie keine anderen elektrischen Gerät in
dieselbe Steckdose wie die Heizung.
• Halten Sie das Produkt von entzündlichen
Gegenständen wie Möbeln, Vorhängen oder
ähnlichem fern.
• Verwenden Sie das Produkt nicht in Räumen, in
denen brennbare Flüssigkeiten oder Gase
verwendet oder gelagert werden.
• Blockieren Sie keine Belüftungsschlitze und
sorgen Sie dafür, dass das Produkt ausreichend
Freiraum hat.
• Führen Sie keine Objekte in die Önungen ein.
Nicht mit einer blockierten Önung
verwenden. Frei von Staub, Fusseln, Haaren
usw. halten.
• Bei Nichtgebrauch oder vor Wartungsarbeiten
muss das Produkt immer abgeschaltet und der
Netzstecker gezogen werden.
• Stecken Sie das Gerät nur in eine
Wandsteckdose. Verwenden Sie kein
Verlängerungskabel.
• Kinder unter 3 Jahren dürfen das Produkt nicht
verwenden, da sie noch nicht auf eine
Überhitzung reagieren können.
• Decken Sie das Produkt nicht ab, während es in
Verwendung ist.
• Verwenden Sie das Produkt nur wie in dieser
Anleitung beschrieben.
Installation der Heizung (Abbildung B)
-
Verwenden Sie dieses Gerät nur in der
korrekten vertikalen Position an einer TypF
Schuko CEEE 7/3 Wandsteckdose.
4
Der Stecker lässt sich um 90 Grad drehen, um
die aufrechte Positionierung sicherzustellen.
1. Drücken und halten Sie B
4
gedrückt und
drehen Sie B
3
vorsichtig.
2. Lassen Sie B
4
los, um B
3
in der aktuellen
Position festzustellen.
3. Halten Sie B
1
, um das Produkt in eine
Wandsteckdose einzustecken.
4. Verwenden Sie B
2
, um das Gerät
auszuschalten.
Verwenden der Heizung
1. Drücken Sie A
2
, um den Heizvorgang zu
beginnen.
2. Verwenden Sie A
1
und A
5
, um die
Temperatur zu steuern.
4
Wenn die Umgebungstemperatur höher als
die eingestellte Temperatur an der Heizung ist,
schaltet sich das Heizelement aus, der Lüfter
arbeitet weiter und das Display blinkt.
4
Wenn die Umgebungstemperatur 3 Grad unter
die eingestellte Temperatur fällt, schaltet sich
das Heizelement wieder an.
3. Drücken Sie A
2
, um die Heizfunktion
auszuschalten.
4. Verwenden Sie A
7
, um das Gerät
auszuschalten.
4
Lassen Sie das Produkt abkühlen, bevor Sie es
aus der Steckdose ziehen.
5. Ziehen Sie das Produkt an A
8
, um es aus der
Wandsteckdose zu ziehen.
4
Lassen Sie das Produkt vor der Lagerung
abkühlen.
Timer einstellen
1. Drücken Sie A
6
, um den Timer zu aktivieren.
2. Drücken Sie wiederholt A
6
, um die
gewünschte Anzahl Betriebsstunden (1-12)
einzustellen.
4
Um den Timer abzubrechen, starten Sie das
Produkt neu.
4
Das Produkt hat einen eingestellten
Standardtimer von 12 Stunden.
Spezikationen
Produkt Steckdosen-Heizung
Artikelnummer HTPN10FWT
Größe (L x B x H) 90 x 85 x 170 mm
Eingangsspannung AC 220 - 240 V ~ 50/60 Hz
Maximale Leistung 400 W
Anzeige LED
Betriebstemperatur 15 - 45°C
Timer 1 - 12 Stunden
4
Cuando la temperatura ambiente sea más
elevada que la temperatura jada en el
calefactor, el elemento calefactor se apagará,
el ventilador continuará funcionando y el
visualizador parpadeará.
4
Cuando la temperatura ambiente sea de 3
grados por debajo de la temperatura jada, se
encenderá el elemento calefactor.
3. Pulsar A
2
para apagar la función de
calefacción.
4. Utilizar el A
7
para apagar el dispositivo.
4
Dejar que el producto se enfríe antes de
desenchufarlo.
5. Tirar del producto desde A
8
para
desenchufarlo de la toma de pared.
4
Dejar que el producto se enfríe antes de
almacenarlo.
Establecer el temporizador
1. Pulsar A
6
para activar el temporizador.
2. Pulsar repetidamente A
6
para jar la cantidad
deseada de horas (1-12).
4
Para cancelar el temporizador, volver a
encender el producto.
4
El producto tiene un ajuste del temporizador
por defecto de 12 horas.
Especicaciones
Producto Calefactor enchufable
Número de artículo HTPN10FWT
Dimensiones (L x An x Al) 90 x 85 x 170 mm
Tensión de entrada CA 220 - 240 V ~ 50/60 Hz
Potencia máxima 400 W
Visualización LED
Temperatura de
funcionamiento
15 - 45°C
Temporizador 1 - 12 horas
i
Guia de iniciação rápida
Aquecedor de
encaixe
HTPN10FWT
Para mais informações, consulte a
versão alargada do manual on-line:
ned.is/htpn10fwt
Utilização prevista
Este dispositivo destina-se a ser um dispositivo de
aquecimento a ligar diretamente a uma tomada
de parede.
O produto destina-se apenas a utilização em
interiores.
Este produto é adequado apenas para espaços
bem isolados espaços ou utilização ocasional.
O produto não se destina a utilização prossional.
Qualquer alteração do produto pode ter
consequências em termos de segurança, garantia
e funcionamento adequado.
Peças principais (imagem A)
1
Botão de descida de
temperatura
2
Botão de ligar/desligar
3
Entrada de ar
4
Ecrã
5
Botão de subida de
temperatura
6
Botão temporizador
7
Interruptor de alimen-
tação
8
Pega
9
Ficha
10
Botão de rotação do
obturador
11
Entrada de ar
Instruções de segurança
-
AVISO
• Leia as instruções antes de utilizar o produto.
• Não exponha o produto a água, chuva,
humidade ou humidade elevada.
• Inspecione o produto para ver se a cha está
rachada ou quebrada ou se há ligações soltas
antes de cada utilização. Não utilize o produto
caso esteja gasto ou danicado.
• Mantenha o produto fora do alcance das
crianças.
• Contacte um técnico qualicado para
manutenção/reparação.
• Não deixe o produto sem vigilância quando
ligado.
• Desligue o produto quando sair do quarto ou
for dormir.
• Não deixe que animais de estimação ou
crianças brinquem demasiado perto do
produto.
• Este aquecedor destina-se apenas a fornecer
calor adicional e nunca deve ser utilizado para
aquecer roupa de cama, cozinhar, secar roupa
ou descongelar tubos.
• A colocação adequada do aquecedor é
fundamental. O aquecedor deve ser mantido a,
pelo menos, um metro de distância de
qualquer objeto inamável, por exemplo,
papéis, roupas ou tapetes.
• Não ligue quaisquer outros dispositivos
elétricos à mesma tomada que o aquecedor.
• Mantenha o produto afastado de objetos
inamáveis, como móveis, cortinas e outros
semelhantes.
• Não utilize o produto em salas onde sejam
utilizados ou armazenados líquidos ou gases
inamáveis.
• Não bloqueie as aberturas de ventilação e
certique-se de que existe espaço suciente à
volta do produto.
• Não coloque objetos nas aberturas. Não utilize
caso uma abertura esteja bloqueada. Mantenha
livre de poeira, pelos, cabelos, etc.
• Desligue e retire o cabo do produto quando
este não estiver a ser utilizado ou antes de
efetuar qualquer manutenção.
• Ligue o aparelho apenas a uma tomada de
parede. Não utilize extensões.
• As crianças com idade inferior a 3 não devem
utilizar o produto devido à sua incapacidade de
reação ao sobreaquecimento.
• Não cubra o produto quando está a ser
utilizado.
• Utilize o produto apenas conforme descrito
neste manual.
Instalar o aquecedor (imagem B)
-
Utilize este aparelho apenas na posição vertical
correta numa tomada de parede tipo F Schuko
CEEE 7/3.
4
A cha roda a 90 graus para garantir a
colocação vertical.
4
5
6
7
8
9
q
w
1
4
2
3
A
C
Plug-In Heater
With 400W power
HTPN10FWT
ned.is/htpn10fwt
Nedis BV
De Tweeling 28, 5215 MC ’s-Hertogenbosch
The Netherlands 08/19
HTPN10FWT_MAN_COMP_(19469)_v04.indd 1-9 20-8-2019 07:36:21

Zapojte sa do diskusie o tomto výrobku
Tu sa môžete podeliť o to, čo si myslíte o Nedis HTPN10FWT Ohrievač. Ak máte otázku, najprv si pozorne prečítajte návod. Vyžiadanie manuálu je možné vykonať pomocou nášho kontaktného formulára.