1
(MAX)
5 x 1 sec 500 g
5 x 1 sec 500 g
30 sec 50 g
60 sec 250 g
45 sec 250 g2
30 sec 200 g2
2-3 min 500 g
360 ml
350 ml
4 pcs
1
1
1
2
P/2
P
1
30 sec 300 g1
60-180 sec
60-180 sec
1
30 sec 200 g
30 sec 500 g
400 g
30 sec 500 g
1
30 sec2 pcs
1
1
30 sec 200 g1
1 min1 L
1 min1 L
1 min1 L
3 min
600 ml
P
P x 9
6 x
30 sec 40 g
30 sec 70 g
30 sec 40 g
30 sec 50 g
2
2
2
2
2
2
2
2
30 sec 500 g1
5 sec 100 gP
30 sec 500 g1
2
43
5
76
9
8
10
11
9
12
P
0
1
2
P
0
1
2
Register your product and get support at
HR7830
www.philips.com/welcome
Specifications are subject to change without notice
© 2012 Koninklijke Philips Electronics N.V.
All rights reserved.
HR7830_UM_V1.0
3140 035 31991
English
1 Important
Read this user manual carefully before you use the appliance, and save the user manual for
future reference.
Danger
• Do not immerse the motor unit in water nor rinse it under the tap.
Warning
•
Neveruseyourngersoranobject(forexample,aspatula)topushingredientsinto
thefeedingtubewhiletheapplianceisrunning.Onlyusethepusher.
• Beforeyouconnecttheappliancetothepower,makesurethatthevoltageindicated
onthebottomoftheappliancecorrespondstothelocalpowervoltage.
• Never connect this appliance to a timer switch, to avoid a hazardous situation.
• Ifthepowercord,theplug,orotherpartsaredamaged,donotusetheappliance.
• Ifthepowercordisdamaged,youmusthaveitreplacedbyPhilips,aservicecenter
authorizedbyPhilips,orsimilarlyqualiedpersonstoavoidahazard.
• Thisapplianceisnotintendedforusebypersons(includingchildren)withreduced
physical,sensoryormentalcapabilities,orlackofexperienceandknowledge,unless
theyhavebeengivensupervisionorinstructionconcerninguseoftheappliancebya
person responsible for their safety.
• For their safety, do not allow children to play with the appliance.
• Never let the appliance run unattended.
• Iffoodstickstothewalloftheblenderjarorbowl,switchofftheapplianceandunplug
it. Then use a spatula to remove the food from the wall.
• Be careful when you handle or clean the discs, the blade unit of the food processor, and
the blade unit of the blender and the mini chopper. The blade units and the inserts are
very sharp.
• Donottouchtheblades,especiallywhentheapplianceispluggedin.Thebladesare
very sharp.
• Ifthebladesgetstuck,unplugtheappliancebeforeyouremovetheingredientsthat
block the blades.
Caution
•
Neverswitchofftheappliancebyturningtheblenderjar,thebowl,ortheirlids.Always
switchofftheappliancebyturningthespeedselectorto0.
• Unplugtheapplianceimmediatelyafteruse.
• Alwaysunplugtheappliancebeforeyoureachintotheblenderjarwithyourngersor
anobject(forexample,aspatula).
• Waituntilthemovingpartsstoprunningbeforeyouremovethelidofthebowlorjar.
• Donotexceedthemaximumlevelindicationonthejarorthebowl.
• Thoroughlycleanthepartsthatcomeintocontactwithfoodbeforeyouusethe
applianceforthersttime.
• Beforeyouremove,cleanorchangetheaccessories,switchoffandunplugthe
appliance.
• NeveruseanyaccessoriesorpartsfromothermanufacturersorthatPhilipsdoesnot
specicallyrecommend.Ifyouusesuchaccessoriesorparts,yourguaranteebecomes
invalid.
• This appliance is intended for household use only.
• Donotexceedthequantitiesandprocessingtimeindicatedintheusermanual.
• Lethotingredientscooldown(<80ºC)beforeprocessingthem.
• Alwayslettheappliancecooldowntoroomtemperatureaftereachbatchthatyou
process.
• Certainingredientsmaycausediscolorationsonthesurfaceoftheparts.Thisdoesnot
haveanegativeeffectontheparts.Thediscolorationsusuallydisappearaftersometime.
Note
•
Noiselevel=83dB[A]
Electromagnetic elds (EMF)
ThisPhilipsappliancecomplieswithallstandardsregardingelectromagneticelds(EMF).If
handledproperlyandaccordingtotheinstructionsinthisusermanual,theapplianceissafe
tousebasedonscienticevidenceavailabletoday.
Recycling
Yourproductisdesignedandmanufacturedwithhighqualitymaterialsandcomponents,
which can be recycled and reused.
When you see the crossed-out wheel bin symbol attached to a product, it means the
productiscoveredbytheEuropeanDirective2002/96/EC:
Neverdisposeofyourproductwithotherhouseholdwaste.Pleaseinformyourselfabout
the local rules on the separate collection of electrical and electronic products. The correct
disposalofyouroldproducthelpspreventpotentiallynegativeconsequencesonthe
environment and human health.
2 Introduction
CongratulationsonyourpurchaseandwelcometoPhilips!Tofullybenetfromthesupport
thatPhilipsoffers,registeryourproductatwww.philips.com/welcome.
Thisapplianceisequippedwithabuilt-insafetylock.Youcanonlyswitchontheappliance
afteryoucorrectlyassemblethefollowingpartsonthemotorunit:
• the food processor bowl and its lid, or
• theblenderjaranditslid,or
• the mini chopper.
If these parts are assembled correctly, the built-in safety lock is unlocked.
Forrecipes,gotowww.philips.com/kitchen
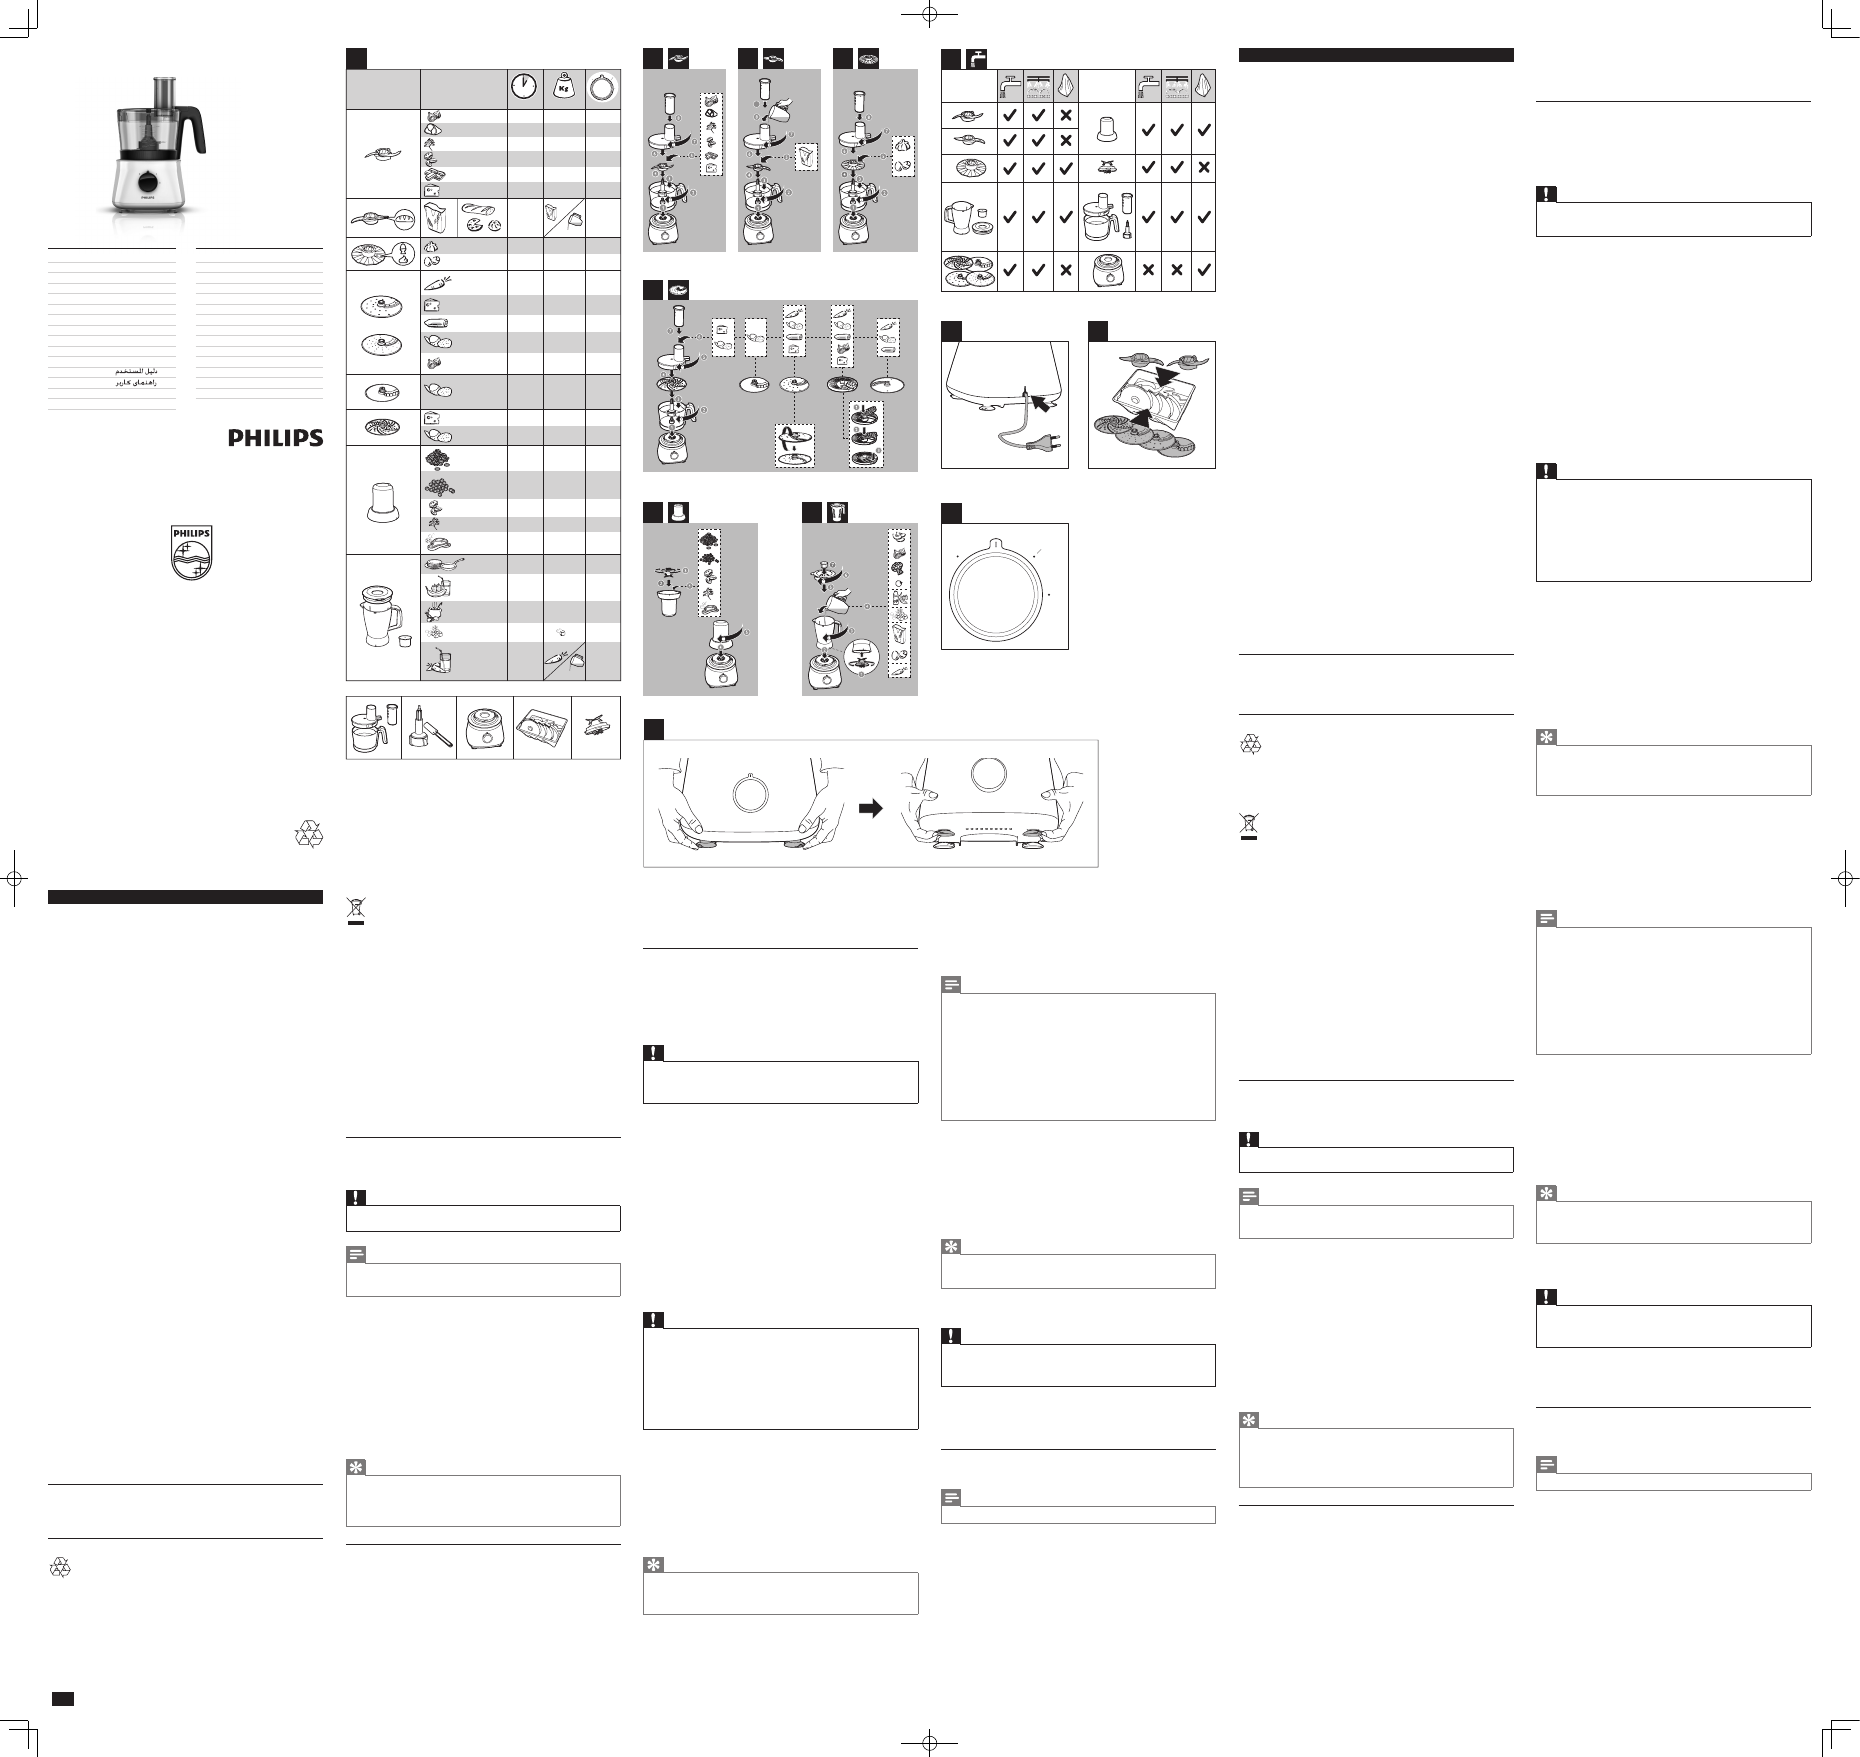
3 Food processor
Blade unit
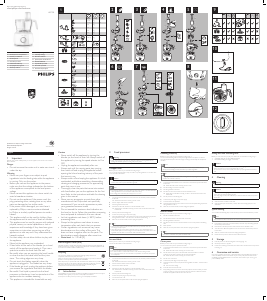
Beforeyoustart,makesurethatyouassembleaccordingtoFig.2.
Youcanusethebladeunittochop,mix,blend,orpureeingredients.
Caution
• Donotusethebladeunittochophardingredients,likecoffeebeans,turmeric,nutmeg,and
icecubes,asthismaycausethebladetogetblunt.
Note
• Donotlettheapplianceruntoolongwhenyouchop(hard)cheeseorchocolate.Otherwise
theseingredientsbecometoohot,starttomelt,andturnlumpy.
• Precutlargepiecesoffoodintopiecesofapprox.3x3x3cm.
1 Turnthebowlclockwisetoxitonthemotorunit,andthenputtheshaftinthebowl.
» Whenthebowlisxedcorrectly,youhearaclick.
2 Take the blade unit out of the protective cover.
3 Putthebladeunitontheshaft.
4 Puttheingredientsinthebowl.
5 Putthelidonthebowl,andthenturnthelidclockwisetoxit.
» Whenthelidisassembledcorrectly,youhearaclickandthelidisxedtothe
bowl handle.
6 Putthepusherintothefeedingtube.
7 Connectthepowerplugtothepowersupply.
8 Select the speed that matches the color of the accessory - speed 1.
9 Afteruse,turnthespeedselectorto0,andthenunplugtheappliance.
Tip
• When you chop onions, turn the speed selector to P a few times to prevent the onions from
becomingtoonelychopped.
• How to remove food that sticks to the blade or to the inside of the bowl? 1. Switch off the
appliance,andthenunplugit.2.Removethelidfromthebowl.3.Removetheingredients
from the blade or from the side of the bowl with a spatula.
Kneading accessory
Beforeyoustart,makesurethatyouassembleaccordingtoFig.3.
Youcanusethekneadingaccessorytokneadyeastdoughforbreadandpizzas.Youneedto
adjusttheamountofliquidtoformthedoughaccordingtothehumidityandtemperature
condition.
1 Turnthebowlclockwisetoxitonthemotorunit,andthenputtheshaftinthebowl.
» Whenthebowlisxedcorrectly,youhearaclick.
2 Putthekneadingaccessoryontheshaft.
3 Puttheingredientsinthebowl.
4 Putthelidonthebowl,andthenturnthelidclockwisetoxit.
» Whenthelidisassembledcorrectly,youhearaclickandthelidisxedtothe
bowl handle.
5 Connectthepowerplugtothepowersupply.
6 Select the speed that matches the color of the accessory - speed 1.
• Dependingontherecipe,pourliquidingredientintothefeedingtubewhilethe
device is turned on.
7 Afteruse,turnthespeedselectorto0,andthenunplugtheappliance.
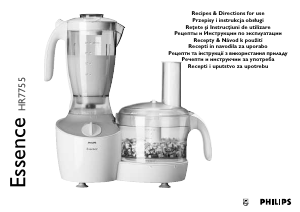
Discs
Beforeyoustart,makesurethatyoupickyourdesireddiscfromfollowingandassemble
accordingtoFig.4andFig.5:
• Emulsifyingdisc
• Reversibleslicing/shreddingdisc(ne)
• Reversibleslicing/shreddingdisc(coarse)
• French fry disc
• Granulatingdisc
Caution
• Becarefulwhenyouhandletheslicingbladeofdisc.Ithasaverysharpcuttingedge.
• Neverusethedisctoprocesshardingredients,likeicecubes.
• Donotexerttoomuchpressureonthepusherwhenyoupressingredientsintothefeed
tube.
1 Turnthebowlclockwisetoxitonthemotorunit,andthenputtheshaftinthebowl.
» Whenthebowlisxedcorrectly,youhearaclick.
2 Putthediscontheshaft.
3 Putthelidonthebowl,andthenturnthelidclockwisetoxit.
» Whenthelidisassembledcorrectly,youhearaclickandthelidisxedtothe
bowl handle.
4 Puttheingredientsintothefeedingtubewiththepusher.Fillthefeedingtubeevenlyfor
thebestresults.Whenyouhavetoprocessalargeamountofingredients,processsmall
batches and empty the bowl between batches.
5 Connectthepowerplugtothepowersupply.
6 Checkthepreparationtime,themaximumamountandthespeedsettingrequiredfor
theingredientsinTable1.Selectthespeedthatmatchesthecoloroftheaccessory.
7 Afteruse,turnthespeedselectorto0,andthenunplugtheappliance.
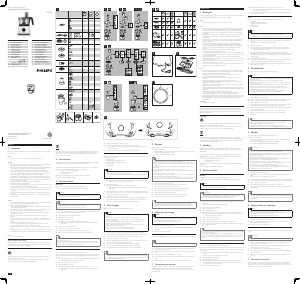
4 Mini chopper
Beforeyoustart,makesureyouassembleaccordingtoFig.6.
Caution
• Donotusetheminichoppertochophardingredients,likenutmeg,Chineserocksugar,or
ice cubes.
• Never use the mini chopper for more than 30 seconds without interruption.
• Assemblethesealingringontothebladeunitbeforeyouattachthebladeunittothemini
chopper,toavoidleakage.
• Alwaysprocesscloves,staranise,andaniseedtogether.Ifprocessedseparately,these
ingredientsmayattacktheplasticmaterialsoftheappliance.
• The mini chopper beaker may become discolored when you use the mill to process
ingredients,likecloves,anise,andcinnamon.
• Donotusetheminichoppertoprocessliquidslikefruitjuice.
• Lethotingredientscooldown(<80ºC)beforeprocessingthem.
1 Puttheingredientsintheminichopperbeakerwithinthemaximumindication.
2 Turnthebladeunitanticlockwiseontheminichopperbeakeruntilitisxedproperly.
3 Turn the mini chopper clockwise onto the motor unit until you hear a click.
4 Connectthepowerplugtothepowersupply.
5 Select the speed that matches the color of the accessory - speed 2. Let it run for about
10-30secondsuntiltheingredientsareneenough.
6 Afteruse,turnthespeedselectorto0,andthenunplugtheappliance.
7 Turn the mini chopper anticlockwise to take it off from the motor unit.
8 Turn the blade unit clockwise to take it off from the mini chopper beaker.
Tip
• You can use the mini chopper to chop coffee beans, peppercorns, nuts, herbs etc. Use speed
2andprocessfor30sec.Donotexceedthemaximumlevelindicatedontheminichopper.
• Forbestresultswhenprocessingbeef,pleaseuserefrigeratedbeefcubes(2x2x2cm).Use
maxof100gbeefcubesatspeedPfor5sec.
5 Blender
Beforeyoustart,makesureyouassembleaccordingtoFig.7.
Theblenderisintendedfor:
• Blendinguids,likedairyproducts,sauces,fruitjuices,soups,mixeddrinks,andshakes,
• Mixingsoftingredients,likepancakebatter,
• Pureeingcookedingredients,likebabyfood.
Note
• Donotexerttoomuchpressureonthehandleoftheblenderjar.
• Neveropenthelidtoputyourhandoranyobjectinthejarwhiletheblenderisrunning.
• Alwaysassemblethesealingringontothebladeunitbeforeyouattachthebladeunittothe
blenderjar.
• Toaddliquidingredientsduringprocessing,pourthemintotheblenderjarthroughthe
feedinghole.
• Precutsolidingredientsintosmallpiecesbeforeyouprocessthem.
• Ifyouwanttopreparealargequantity,processsmallbatchesofingredientsinsteadofalarge
quantityatonce.
• Usecookedingredientswhenyoublendasoup.
• Toavoidspillage:Whenyouprocessaliquidthatishotortendstofoam(forexample,milk),
donotputmorethan1literofliquidintheblenderjar.
• Ifyouarenotsatisedwiththeresult,switchofftheapplianceandstirtheingredientswitha
spatula.Removesomeofthecontentstoprocessasmallerquantityoraddsomeliquid.
1 Turnthebladeunitontheblenderjar.
2 Placetheblenderjaronthemotorunitandturnitclockwisetoxit.
» Whenthejarisxedcorrectly,youhearaclick.
3 Puttheingredientsintheblenderjarwithinthemaximumlevelindication.
4 Placethelidontheblenderjar,andthenturnitclockwisetoxit.
5 Connectthepowerplugtothepowersupply.
6 Select the speed that matches the color of the accessory - speed 2.
7 Afteruse,turnthespeedselectorto0,andunplugtheappliance.
Tip
• Howtoremovetheingredientsthatsticktothesideoftheblenderjar?1.Switchoff
theappliance,andthenunplugit.2.Openthelid,andthenuseaspatulatoremovethe
ingredientsfromthesideofthejar.3.Keepthespatulaatleast2cmfromtheblade.
6 Cleaning and storage
Caution
• Beforeyoucleantheappliance,unplugit.
• Makesurethatthecuttingedgesoftheblades,discs,andtheinsertsdonotcomeinto
contactwithhardobjects.Thismaycausethebladetogetblunt.
• Thecuttingedgesaresharp.Becarefulwhenyouclean.
1 Cleanthemotorunitwithamoistcloth.
2 Cleantheotherpartsinhotwater(<60ºC)withsomewashing-upliquidorina
dishwasher.
3 Store the product in a dry place.
Quick cleaning
Youcanfollowthefollowingstepstocleanthefoodprocessorbowlandblenderjareasier.
Note
• Make sure that the blade is assembled in the bowl if you clean the food processor bowl.
1 Pourlukewarmwater(notmorethan0.5liters)andsomewashing-upliquidintothe
foodprocessorbowlorblenderjar.
2 Placethelidonthefoodprocessorbowlorblenderjar,andthenturnitclockwiseto
xit.
3 Turn the speed selector to Puntilthebowlorjarisclean.
4 Lettheappliancerunfor30secondsoruntilthefoodprocessorbowlorblenderjar
is clean.
5 Detachtheblenderjarorfoodprocessorbowlandrinseitwithcleanwater.
7 Guarantee and service
If you have a problem, need service, or need information, see www.philips.com/support or
contactthePhilipsConsumerCareCenterinyourcountry.Thephonenumberisinthe
worldwideguaranteeleaet.IfthereisnoConsumerCareCenterinyourcountry,gotoyour
localPhilipsdealer.
1/4
EN User manual
NL Gebruiksaanwijzing
FR Mode d’emploi
DE Benutzerhandbuch
ES Manual del usuario
IT Manuale utente
PL Instrukcja obsługi
SV Användarhandbok
NO Brukerhåndbok
DA Brugervejledning
FI Käyttöopas
AR
FA
EL
Εγχειρίδιο χρήσης
TR Kullanım kılavuzu
PT Manual do utilizador
KK Қолданушының нұсқасы
UK Посібник користувача
CS Příručka pro uživatele
RU Руководство пользователя
RO Manual de utilizare
SL Uporabniški priročnik
SK Príručka užívateľa
ET Kasutusjuhend
LV Lietotāja rokasgrāmata
LT Vartotojo vadovas
HR Korisnički priručnik
HU Felhasználói kézikönyv
BG Ръководство за потребителя
Nederlands
1 Belangrijk
Leesdezegebruiksaanwijzingzorgvuldigdoorvoordatuhetapparaatgaatgebruiken.Bewaar
degebruiksaanwijzingomdezeindiennodigtekunnenraadplegen.
Gevaar
• Dompel de motorunit niet in water en spoel deze ook niet af.
Let op
•
Gebruiknooituwvingersofeenvoorwerp(bijvoorbeeldeenspatel)omingrediënten
doordevultrechterteduwenterwijlhetapparaatwerkt.Gebruikalleendestamper.
• Controleervoordatuhetapparaataansluitopnetspanningofhetvoltagedataan
deonderkantvanhetapparaatwordtaangegevenovereenkomtmetdeplaatselijke
netspanning.
•
Sluitditapparaatnooitaanopeentijdschakelaaromgevaarlijkesituatiestevermijden.
• Gebruik het apparaat niet indien het netsnoer, de stekker of andere onderdelen
beschadigdzijn.
• Indienhetnetsnoerbeschadigdis,moethetwordenvervangendoorPhilips,eendoor
Philipsgeautoriseerdservicecentrumofpersonenmetvergelijkbarekwalicatiesom
gevaartevoorkomen.
• Ditapparaatisnietbedoeldvoorgebruikdoorpersonen(waaronderkinderen)
metverminderdelichamelijke,zintuiglijkeofgeestelijkevermogens,ofdiegebrekaan
ervaringofkennishebben,tenzijiemanddieverantwoordelijkisvoorhunveiligheid
toezichtophenhoudtofhenheeftuitgelegdhoehetapparaatdientteworden
gebruikt.
•
Laatkinderennietmethetapparaatspelenvoorhuneigenveiligheid.
• Laat het apparaat nooit zonder toezicht werken.
•
Schakelhetapparaatuitenhaaldestekkeruithetstopcontactalseringrediëntenaan
dewandvandeblenderkanofkomblijvenkleven.Verwijderdeingrediëntenvervolgens
van de wand met een spatel.
•
Weesvoorzichtigwanneerudeschijven,demesunitvandekeukenmachine,de
mesunit van de blender en de minihakmolen beetpakt of schoonmaakt. De mesunits en
deinzetschijvenzijnzeerscherp.
• Raakdemessennietaan,vooralnietwanneerdestekkervanhetapparaatnoginhet
stopcontactzit.Demessenzijnzeerscherp.
• Alsdemessenvastlopen,haaldaneerstdestekkeruithetstopcontactvoordatude
ingrediëntendiedemessenblokkerenverwijdert.
Let op
• Schakel het apparaat nooit uit door de blenderkan, de kom of de deksels te draaien.
Schakelhetapparaataltijduitdoordesnelheidskeuzeknopnaardestand0 te draaien.
•
Haalnagebruikaltijddirectdestekkeruithetstopcontact.
• Haalaltijddestekkeruithetstopcontactvoordatuuwvingersofeenvoorwerp
(bijvoorbeeldeenspatel)indeblenderkansteekt.
• Wachttotdebewegendedelenstilstaanvoordatuhetdekselvandekomofkan
verwijdert.
•
Overschrijdhetaangegevenmaximumniveauopdekanofdekomniet.
• Maakdeonderdelendieincontactkomenmetvoedselgoedschoonvoordatuhet
apparaatvoordeeerstekeergebruikt.
• Schakel,voorudeaccessoiresverwijdert,schoonmaaktofverwisselt,hetapparaatuit
en haal de stekker uit het stopcontact.
•
Gebruiknooitaccessoiresofonderdelenvananderefabrikantenofdienietspeciek
zijnaanbevolendoorPhilips.Alsudergelijkeaccessoiresofonderdelengebruikt,vervalt
degarantie.
• Ditapparaatisuitsluitendbedoeldvoorhuishoudelijkgebruik.
• Overschrijddehoeveelhedenenbewerkingstijdindegebruiksaanwijzingniet.
• Laatheteingrediëntenafkoelen(<80°C)voordatudezegaatverwerken.
• Laat het apparaat afkoelen tot kamertemperatuur na iedere portie die u hebt verwerkt.
•
Bepaaldeingrediëntenkunnenverkleuringenopdeonderdelenveroorzaken.Ditheeft
geennegatiefeffectopdeonderdelen.Deverkleuringenverdwijnennaeentijdje
meestal vanzelf.
Opmerking
•
Geluidsniveau=83dB[A]
Elektromagnetische velden (EMV)
DitPhilips-apparaatvoldoetaanallerichtlijnenmetbetrekkingtotelektromagnetische
velden(EMV).Mitshetapparaatopdejuistewijzeenvolgensdeinstructiesindeze
gebruiksaanwijzingwordtgebruikt,ishetveiligtegebruikenvolgenshetnubeschikbare
wetenschappelijkebewijs.
Recycling
Uwproductisvervaardigdvankwalitatiefhoogwaardigematerialenenonderdelendie
gerecycledenopnieuwgebruiktkunnenworden.
Wanneer een product is voorzien van een symbool van een afvalcontainer met een kruis
erdoorheen,valthetproductonderdeEuropeserichtlijn2002/96/EG:
Gooihetproductnooitwegmetanderhuishoudelijkafval.Informeeruoverdelokale
regelsinzakegescheidenafvalophalingvanelektrischeenelektronischetoestellen.Eengoede
afvalverwerkingvanuwoudeproductdraagtbijtothetvoorkomenvanmogelijkeschade
voorhetmilieuendevolksgezondheid.
2 Inleiding
GefeliciteerdmetuwaankoopenwelkombijPhilips!Registreeruwproductopwww.
philips.com/welcomeomoptimaalgebruiktekunnenmakenvandedoorPhilipsgeboden
ondersteuning.
Ditapparaatisvoorzienvaneeningebouwdebeveiliging.Ukunthetapparaatalleen
inschakelennadatudevolgendeonderdelenopdejuistemanieropdemotorunithebt
bevestigd:
• de keukenmachinekom en het deksel of
• de blenderkan en het deksel of
• de minihakmolen.
Alsdezeonderdelenopdejuistemanierzijnbevestigd,wordtdeingebouwdebeveiliging
ontgrendeld.
Ga voor recepten naar www.philips.com/kitchen
3 Keukenmachine
Mesunit
Controleervoorubegintofuallesinelkaarzetvolgensg.2.
Ukuntdemesunitgebruikenomingrediëntentehakken,mixen,mengenofpureren.
Let op
• Gebruikdemesunitnietomhardeingrediëntenzoalskofebonen,kurkuma,nootmuskaatof
ijsblokjestehakken.Hierdoorkanhetmesbotworden.
Opmerking
• Laathetapparaatniettelangwerkenwanneeru(harde)kaasofchocoladehakt.Deze
ingrediëntenwordenandersteheet,waardoorzegaansmeltenenklonteren.
• Snijdgrotestukkenvoedselvantevoreninstukjesvancirca3x3x3cm.
1 Draaidekomrechtsomomdezeopdemotorunittebevestigenenplaatsdandeas
in de kom.
» Alsdekomcorrectisgeplaatst,hoortueenklik.
2 Haal de mesunit uit de beschermhoes.
3 Plaatsdemesunitopdeas.
4 Doedeingrediëntenindekom.
5 Plaatshetdekselopdekomendraaihetdekselrechtsomomhetvasttezetten.
» Wanneerhetdekselcorrectisgeplaatst,hoortueenklik.Hetdekselisdanaan
hethandvatvandekombevestigd.
6 Plaatsdestamperindevultrechter.
7 Steek de stekker in het stopcontact.
8 Kiesdesnelheiddiebijdekleurvanhetaccessoirepast-snelheid1.
9 Draainagebruikdesnelheidskeuzeknopnaar0enhaalvervolgensdestekkervanhet
apparaat uit het stopcontact.
Tip
• Alsuuienhakt,draaidandesnelheidskeuzeknopeenpaarkeernaarP om te voorkomen dat
deuientejnwordengehakt.
• Hoeverwijderikdeingrediëntendieaanhetmesofaandebinnenkantvandekomblijven
kleven?1.Schakelhetapparaatuitenhaaldestekkeruithetstopcontact.2.Neemhetdeksel
vandekom.3.Verwijderdeingrediëntenmeteenspatelvanhetmesenvandezijkantvan
de kom.
Kneedaccessoire
Controleervoorubegintofuallesinelkaarzetvolgensg.3.
Ukunthetkneedaccessoiregebruikenomgistdeegvoorbroodenpizza'stekneden.Umoet
dehoeveelheidvloeistofaanpassenomhetdeegtevormenaandehandvandevochtigheid
en temperatuur.
1 Draaidekomrechtsomomdezeopdemotorunittebevestigenenplaatsdandeas
in de kom.
» Alsdekomcorrectisgeplaatst,hoortueenklik.
2 Plaatshetkneedaccessoireopdeas.
3 Doedeingrediëntenindekom.
4 Plaatshetdekselopdekomendraaihetdekselrechtsomomhetvasttezetten.
» Wanneerhetdekselcorrectisgeplaatst,hoortueenklik.Hetdekselisdanaan
hethandvatvandekombevestigd.
5 Steek de stekker in het stopcontact.
6 Kiesdesnelheiddiebijdekleurvanhetaccessoirepast-snelheid1.
•
Gietvloeibareingrediëntenindevultrechterterwijlhetapparaatisingeschakeld.
Ditisafhankelijkvanhetrecept.
7 Draainagebruikdesnelheidskeuzeknopnaar0enhaalvervolgensdestekkervanhet
apparaat uit het stopcontact.
Discs
Kiesvoorubegintdegewensteschijfenbevestigdievolgensg.4en5:
• Mengschijf
• Omgekeerdsnijden/raspschijf(jn)
• Omgekeerdsnijden/raspschijf(grof)
• Schijfvoorfrites
• Granuleerschijf
Let op
• Weesvoorzichtigalsuhetmesvandeschijfgebruikt.Hetheefteenzeerscherpesnijkant.
• Gebruikdeschijfnooitomhardeingrediëntenzoalsijsblokjesteverwerken.
• Oefennietteveeldrukuitopdestamperwanneerudeingrediëntenindevultrechterduwt.
1 Draaidekomrechtsomomdezeopdemotorunittebevestigenenplaatsdandeas
in de kom.
» Alsdekomcorrectisgeplaatst,hoortueenklik.
2 Plaatsdeschijfopdeas.
3 Plaatshetdekselopdekomendraaihetdekselrechtsomomhetvasttezetten.
» Wanneerhetdekselcorrectisgeplaatst,hoortueenklik.Hetdekselisdanaan
hethandvatvandekombevestigd.
4 Doedeingrediëntenmetdestamperindevultrechter.Plaatsdeingrediënten
gelijkmatigindevultrechtervoorhetbesteresultaat.Wanneerueengrotehoeveelheid
ingrediëntenwiltverwerken,verwerkdankleineportiesenmaakdekomtussentijds
regelmatigleeg.
5 Steek de stekker in het stopcontact.
6 ControleerinTabel1devereistebereidingstijd,maximalehoeveelheidensnelheidvoor
deingrediënten.Kiesdesnelheiddiebijdekleurvanhetaccessoirepast.
7 Draainagebruikdesnelheidskeuzeknopnaar0enhaalvervolgensdestekkervanhet
apparaat uit het stopcontact.
4 Minihakmolen
Zorgervoordatuvoorubegintallesinelkaarzetvolgensg.6.
Let op
• Gebruikdeminihakmolennietomhardeingrediëntenzoalsnootmuskaat,Chineserotssuiker
enijsblokjestehakken.
• Laatdeminihakmolennooitlangerdan30secondenonafgebrokenwerken.
• Bevestigdeafdichtringopdemesunitvoordatudemesunitaandeminihakmolenbevestigt
om lekken te voorkomen.
• Verwerkkruidnagels,steranijsenanijszaadaltijdsamen.Alsdezeingrediëntenongemengd
worden verwerkt, kunnen ze de kunststof onderdelen van het apparaat aantasten.
• Debekervandeminihakmolenkanverkleurenindiendemaalmolenwordtgebruiktom
ingrediëntenzoalskruidnagels,anijsenkaneelteverwerken.
• Gebruik de minihakmolen niet om vloeistoffen zoals vruchtensap te verwerken.
• Laatheteingrediëntenafkoelen(<80°C)voordatudezegaatverwerken.
1 Doedeingrediëntenindebekervandeminihakmolenenoverschrijddaarbijde
maximumindicatieopdekomniet.
2 Draaidemesunitlinksomopdebekervandeminihakmolentotdatdezegoedvastzit.
3 Draai de minihakmolen rechtsom op de motorunit totdat u een klik hoort.
4 Steek de stekker in het stopcontact.
5 Kiesdesnelheiddiebijdekleurvanhetaccessoirepast-snelheid2. Laat het apparaat
ongeveer10-30secondenwerkentotdatdeingrediëntenjngenoegzijn.
6 Draainagebruikdesnelheidskeuzeknopnaar0enhaalvervolgensdestekkervanhet
apparaat uit het stopcontact.
7 Draaideminihakmolenlinksomomdezevandemotorunitteverwijderen.
8 Draai de mesunit rechtsom om deze van de beker van de minihakmolen te
verwijderen.
Tip
• Ukuntdeminihakmolengebruikenomkofebonen,peperkorrels,noten,kruidenenz.
tehakken.Gebruiksnelheid2enlaathetapparaat30sec.werken.Overschrijdhet
maximumniveauaangegevenopdeminihakmolenniet.
• Voorhetbesteresultaatbijhetverwerkenvanrundvleesgebruiktugekoelde
rundvleesblokjes(2x2x2cm).Gebruikmax.100grundvleesblokjesvoor5sec.opsnelheidP.
5 Blender
Zorgervoordatuvoorubegintallesinelkaarzetvolgensg.7.
Deblenderisbedoeldvoor:
• hetmengenvanvloeistoffenzoalszuivelproducten,sauzen,vruchtensappen,soepen,
drankjesenmilkshakes;
• hetmengenvanzachteingrediëntenzoalspannenkoekbeslag;
• hetpurerenvangekookteingrediëntenzoalsbabyvoeding.
Opmerking
• Oefennietteveeldrukuitophethandvatvandeblenderkan.
• Steeknooituwhandofeenvoorwerpindekanterwijldeblenderwerkt.
• Bevestigdeafdichtringaltijdopdemesunitvoordatudemesunitaandeblenderkanbevestigt.
• Alsutijdensdebewerkingvloeibareingrediëntenwilttoevoegen,gietdezedaninde
blenderkanviadevulopening.
• Snijdvasteingrediënteninkleinestukjesvoordatuzeverwerkt.
• Wanneerueengrotehoeveelheidvoedselwiltbereiden,doedannietalleingrediëntenin
één keer in de kom, maar verwerk steeds kleine hoeveelheden.
• Gebruikgareingrediëntenwanneerusoepindeblenderverwerkt.
• Voorkommorsen:alsueenvloeistofverwerktdieheetisofsnelgaatschuimen(bijvoorbeeld
melk),doedannietmeerdan1litervloeistofindeblenderkan.
• Alsuniettevredenbentmethetresultaat,schakeldanhetapparaatuitenroerde
ingrediëntenmeteenspatel.Gieteendeelvandeingrediëntenuitdekanomeenkleinere
hoeveelheidteverwerkenofvoegwatvloeistoftoe.
1 Draai de mesunit op de blenderkan.
2 Plaatsdeblenderkanopdemotorunitendraaidekanrechtsomomdezevastte
zetten.
» Alsdekancorrectisgeplaatst,hoortueenklik.
3 Doedeingrediëntenindeblenderkanenoverschrijddaarbijdemaximumindicatieniet.
4 Plaatshetdekselopdeblenderkanendraaihetdekselrechtsomomhetvasttezetten.
5 Steek de stekker in het stopcontact.
6 Kiesdesnelheiddiebijdekleurvanhetaccessoirepast-snelheid2.
7 Draainagebruikdesnelheidskeuzeknopnaar0 en haal de stekker van het apparaat uit
het stopcontact.
Tip
• Hoeverwijderikingrediëntendieaandezijkantvandeblenderkankleven?1.Schakelhet
apparaatuitenhaaldestekkeruithetstopcontact.2.Openhetdekselengebruikeenspatel
omdeingrediëntenvandezijkantvandekanteverwijderen.3.Houddespateloptenminste
2cmvanhetmes.
6 Schoonmaken en opbergen
Let op
• Haal de stekker uit het stopcontact voordat u het apparaat schoonmaakt.
• Voorkomdatdesnijkantenvandemessen,schijveneninzetschijvenincontactkomenmet
harde voorwerpen. Hierdoor kan het mes bot worden.
• Desnijkantenzijnscherp.Weesvoorzichtigbijhetschoonmaken.
1 Maakdemotorunitschoonmeteenvochtigedoek.
2 Maakdeandereonderdelenschooninwarmwater(<60ºC)meteenbeetje
afwasmiddel of in de vaatwasmachine.
3 Berghetproductopeendrogeplaatsop.
Snel schoonmaken
Omdekeukenmachinekomenblenderkangemakkelijkerschoontemakengaatualsvolgt
te werk.
Opmerking
• Controleerofhetmesindekomisbevestigdalsudekeukenmachinekomschoonmaakt.
1 Gietlauwwarmwater(nietmeerdan0,5liter)enwatafwasmiddelindekomvande
keukenmachine of in de blenderkan.
2 Plaatshetdekselopdekomvandekeukenmachineofdeblenderkanendraaihet
deksel rechtsom om het vast te zetten.
3 Zet de snelheidskeuzeknop op P totdat de kom of kan schoon is.
4 Laat het apparaat 30 seconden werken of totdat de kom van de keukenmachine of de
blenderkan schoon is.
5 Maak de kom van de keukenmachine of de blenderkan los en spoel deze met schoon
water uit.
7 Garantie en service
Alsueenprobleemhebtofvraaghebtofservicenodighebt,gaatunaarwww.philips.com/
supportofneemtucontactopmethetPhilipsConsumerCareCenterinuwland.Het
telefoonnummervindtuinhet'worldwideguarantee'-vouwblad.AlsergeenConsumerCare
Centreinuwlandis,gadannaaruwPhilips-dealer.


Zapojte sa do diskusie o tomto výrobku
Tu sa môžete podeliť o to, čo si myslíte o Philips HR7830 Viva Collection Kuchynský robot. Ak máte otázku, najprv si pozorne prečítajte návod. Vyžiadanie manuálu je možné vykonať pomocou nášho kontaktného formulára.