
EN Instruction manual
NL Gebruiksaanwijzing
FR Mode d’emploi
DE Bedienungsanleitung
ES Manual de usuario
PT Manual de utilizador
IT Manuale utente
SV Bruksanvisning
CS Návod na použití
PL Instrukcja obsługi
SK Návod na použitie
Espresso Machine
01.249412.01.001
RU Руководство по эксплуатации
2
3
4
6
7
8
9
12
11
5
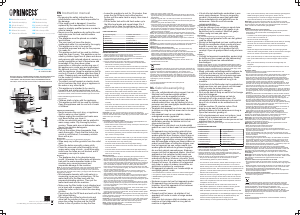
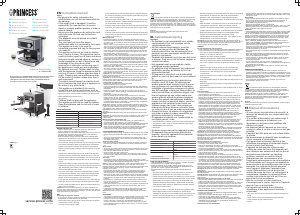
PARTS DESCRIPTION / ONDERDELENBESCHRIJVING / DESCRIPTION DES PIÈCES
/ TEILEBESCHREIBUNG / DESCRIPCIÓN DE LAS PIEZAS / DESCRIÇÃO DOS
COMPONENTES / DESCRIZIONE DELLE PARTI / BESKRIVNING AV DELAR /
OPIS CZĘŚCI / POPIS SOUČÁSTÍ / POPIS SÚČASTÍ / ОПИСАНИЕ ЗАПЧАСТИ
1
10
13 16
17 18
14
15
© Princess 2020 | Jules Verneweg 87
5015 BH Tilburg | The Netherlands | www.princesshome.eu
ENInstruction manual
SAFETY
• By ignoring the safety instructions the
manufacturer cannot be held responsible for
the damage.
• If the supply cord is damaged, it must be
replaced by the manufacturer, its service
agent or similarly qualified persons in order to
avoid a hazard.
• Never move the appliance by pulling the cord
and make sure the cord cannot become
entangled.
• The appliance must be placed on a stable,
level surface.
• The user must not leave the device
unattended while it is connected to the supply.
• This appliance is only to be used for
household purposes and only for the purpose
it is made for.
• This appliance shall not be used by children
aged less than 8 years. This appliance can be
used by children aged from 8 years and above
and persons with reduced physical, sensory or
mental capabilities or lack of experience and
knowledge if they have been given
supervision or instruction concerning use of
the appliance in a safe way and understand
the hazards involved. Children shall not play
with the appliance. Keep the appliance and its
cord out of reach of children aged less than 8
years. Cleaning and user maintenance shall
not be made by children unless older than 8
and supervised.
• To protect yourself against an electric shock,
do not immerse the cord, plug or appliance in
the water or any other liquid.
• This appliance is intended to be used in
household and similar applications such as:
– Staff kitchen areas in shops, offices and other working environments.
– By clients in hotels, motels and other residential type environments.
– Bed and breakfast type environments.
– Farm houses.
• Children shall not play with the appliance.
• This appliance shall not be used by children.
Keep the appliance and its cord out of reach
of children.
Cleaning and maintenance
• Never immerse the cord, plug, or appliance
itself in water or other liquids.
• Always unplug the machine and make sure
cool down before you clean it.
• All the non-electrical parts can be washed in
warm soapy water. Dry thoroughly before
reusing. These parts are not dishwasher safe.
Never use abrasive detergents.
Steam/hot water nozzle
• Pull out the rubber tube downwards, then
wash thoroughly. Check that the hole in the
nozzle is not blocked, if necessary unblock
them with a pin.
Boiler outlet
At lease twice a year carry out the following procedure:
• Wipe away any coffee grounds from the outlet
area.
• Clean the boiler area with a damp cloth.
• Clean the removed outlet thoroughly in hot
soapy water using a brush , rinse thoroughly,
make sure the holes are not blocked, and if
necessary use a pin to clean.
Descaling
• The appliance has to be descaled every
month, otherwise the coffee taste will become
bad and the scale deposited inside in the
machine may cause permanent and
irreparable damage to the machine.
Note: In case of using solid descaler, make sure the descaler dissolves
into cold water fully before pouring into the water tank. Never use a
descaler based on mineral acids such as sulphuric acid, hydrochloric
acid, sulphamic acid and acetic acid(e.g. vinegar).These descalers may
damage your machine.
• Mix adequate descaler with cold water in a
measuring jug as per its instructions. Fill the
water tank up to the Max level with the
prepared descaling solution. Then put the
water tank back into the machine.
• Make sure the filter holder is not attached and
put a bowl with a capacity of at least 1500ml
under the boiler outlet to collect the descaling
solution.
• Press down the On/Off knob and wait until the
light stops blinking.
• Press down the coffee function knob and
allow half the solution to flow out, seriatim
press the coffee function and the On/Off
button to the off position to stop the flow.
• Leave the machine to rest for 15 minutes, then
press the On/Off knob and coffee function
button until the water tank is empty, then rinse it
thoroughly.
• Fill the water tank with cold fresh water up to
the Max level again and repeat steps 2 to 5
without rest to rinse the appliance for twice.
Note:Always rinse the machine by letting it empty at least two full water
tanks.
PARTS DESCRIPTION
1. Cup warming tray 10. Steam control knob
2. Tank lid 11. Cup stand
3. Water tank 12. Drip tray
4. On/off knob 13. Filter holder I
5. Thermometer 14. Filter for 2 cup dose
6. Coffee function knob 15. Filter for 1 cup dose
7. Steam function knob 16. Filter holder II
8. Indication lights 17. Filter for 1 capsule
9. Steam/hot water nozzle 18. Measuring spoon with tamper
BEFORE THE FIRST USE
• Take the appliance andaccessoriesoutthebox.Removethe
stickers,protective foilorplasticfrom thedevice.
• Place the device on a flat stable surface and ensure a minimum of 10
cm. free space around the device. This device is not suitable for
installation in a cabinet or for outside use.
• Flush the machine through with clean water in the following steps:
– Make sure the all buttons are in the off position and that the steam
water knob is closed by turning clockwise.
– Lift out the tank, draw up the lid and fill with cold water up to the MAX
level marked. Alternatively draw up the lid and fill the tank whilst in
position on the espresso machine. We recommend using filtered water
as it produces better coffee and reduces limescale, never use fizzy
water.
– Refit the tank, make sure that it is correctly located and apply light
pressure if necessary to ensure the valve at the bottom of the tank
connects with the water inlet of the machine. It is normal for water to
remain in the compartment under the tank, this can be done using a
sponge.
– Attach the filter holder to the machine by positioning it under the boiler
outlet and turning to the right, Respectively place suitable container
underneath the boiler outlet and the steam/hot water nozzle.
– Plug in the mains supply, Press down the On/Off knob then the power
light will be illuminated, the coffee light will blink until it reaches the
right temperature, then press the coffee function knob, the machine
will be flushed, Press the coffee function knob after a while to turn off
manually.
– Press down the steam function knob, the steam function light will blink,
when the light stops blinking turn the steam control knob and the
steam nozzle will be flushed. Press the steam function knob again to
stop the machine.
Important: You can not brew espresso if you have not flushed the
machine at first, the flushing cycle causes the boiler to fill with water. If you
have not used the machine for a few days, you have to flush it with fresh
water before you use it again.
USE
Preheating the espresso machine
• To ensure your espresso coffee is brewed at the right temperature it is
essential that the coffee appliance is preheated.
– Check that the steam control knob is firmly closed (turn clockwise) and
that there is water in the tank.
– Put a jug under the steam nozzle.
– Fit the desired filter into the filter holder (without coffee) and attach to
the machine by positioning it under the boiler outlet and turning to the
right, ensure is it firmly located.
– Position two cups under the filter holder, if you use the same cup that
the coffee will be served in it will be preheated. Alternatively the cups
can be preheated on the cups warming tray.
– Press the On/Off knob and wait until the light stops blinking.
– Press down the coffee function knob and wait until two cups of water
runs into the bowl.
– Press the steam function knob and wait until the light stops blinking.
– Turn the steam control knob anti-clockwise and allow a little amount of
water to run into the jug.
Making espresso
• Preheat the appliance as above ‘Preheating the espresso machine’.
• To make one or two cups of espresso: use filter holder I. Use the smaller
filter for making one cup and the larger filter for two cups.
• Add the coffee using the measuring spoon provided one full spoon per
cup, level the surface then lightly press with the tamper of the measuring
spoon, wipe off any coffee around the rim. When buying ground coffee
sure it is suitable for espresso machines. Never press the coffee too
firmly as the coffee will come out slowly and the cream will be of a dark
color, however, if it is pressed too lightly, the coffee will come out too fast
and the cream will be a light color.
• To use a coffee capsule: use filter holder II. Open the bottom of the
capsule filter, place a coffee capsule in it, cover and press tightly. It is
also possible to use a Nespresso®* capsule.
• Attach the filter holder into the boiler outlet, turn it to the right to lock into
position. Put one or two cups underneath, if making one cup of coffee,
center your cup in the middle. Ensure the on/off knob is pressed down
then the power light will blink, wait until the light stops blinking then press
down the coffee function knob to make espresso.
• When you’ve enough coffee, not too much otherwise it will be too weak
(optimum dosage is 30ml per cup) press the coffee function knob again.
If you are not making any more coffee, press the on/off button again to
turn of the appliance.
• Remove the filter holder by turning to the left. There will be water on the
filter when you remove it, this is normal.
• To remove the used coffee from the filter holder, please lift the plastic
pressing block to press the edge of filter, then tip the filter holder upside
down and tap out the grounds.
Important: You can not start to make espresso until the ready light stops
blinking because it means the water temperature is not high enough when
the ready light is stil blinking.
Important: To avoid water leakages from the rim of the filter holder and to
ensure optimum performance, it is necessary to clear any ground coffee
from around the boiler outlet. Take care as the area may be hot.
Note: * Brand of a third party that is not affiliated with Princess.
Frothing milk for cappuccino
• Prepare the espresso as previously described.
• Make sure there is water in the tank.
• Press the on/off knob for steam, the steam light will blink, wait until the
light stops blinking, this indicates that the boiler has reached the correct
temperature.
• Partly fill a jug with milk - the milk may increase up to three times in
volume so select a suitably sized jug. Cold semi skimmed milk gives the
best results.
• Position the jug under the steam nozzle.
• Place the nozzle into the milk about 30mm deep and turn the steam
control knob in an anti clockwise direction, the milk will begin to increase
in volume and appear frothy. When the volume of the milk has doubled,
fully immerse the nozzle and continue heating the milk. Once the desired
temperature is reached(60° is optimum), stop the steam by turning the
steam function knob clockwise.
Note: When operation in steam mode and with the steam function knob
turned off, some water may drop from the boiler outlet or the attached filter
holder. This water collects in the drip tray. Alternatively you can place a
cup under the boiler outlet or the attached filter holder.
Important: Never operate the steam nozzle for longer than 2 minutes at
one time.
Important: Never allow the milk to boil as this will spoil the flavour of the
coffee.
Important: To prepare more than one cup of cappuccino, first make all the
espresso coffees, then at the end prepare the frothed milk for all the
cappuccinos
Making espresso after frothing milk
• If you’re making espresso after frothing milk, you need to drain any
overheated water that could burn your coffee as following.
• Place a container with at least 30mm depth of cold water underneath the
steam nozzle, immerge the nozzle into the cold water at least 10mm
depth. Ensuring the appliance is in the off position then turn the steam
control knob anti-clockwise until there is no steam coming out the nozzle
anymore. Now you will be able to make espresso again.
Automatically power-off function
• The espresso machine will automatically power off when there is no
operation within 25 minutes.
ENVIRONMENT
This appliance should not be put into the domestic garbage at the
end of its durability, but must be offered at a central point for the recycling
of electric and electronic domestic appliances. This symbol on the
appliance, instruction manual and packaging puts your attention to this
important issue. The materials used in this appliance can be recycled. By
recycling of used domestic appliances you contribute an important push to
the protection of our environment. Ask your local authorities for information
regarding the point of recollection.
Support
You can find all available information and spare parts at
www.princesshome.eu!
NLGebruiksaanwijzing
VEILIGHEID
• Als u de veiligheidsinstructies negeert, kan de
fabrikant niet verantwoordelijk worden
gehouden voor de mogelijke schade.
• Als het netsnoer beschadigd is, moet het
worden vervangen door de fabrikant, de
onderhoudsmonteur van de fabrikant of door
personen met een soortgelijke kwalificatie om
gevaar te voorkomen.
• Verplaats het apparaat nooit door aan het snoer
te trekken en zorg dat het snoer niet in de war
kan raken.
• Het apparaat moet op een stabiele, vlakke
ondergrond worden geplaatst.
• De gebruiker mag het apparaat niet onbeheerd
achterlaten wanneer de stekker zich in het
stopcontact bevindt.
• Dit apparaat is uitsluitend voor huishoudelijk
gebruik en voor het doel waar het voor bestemd
is.
• Dit apparaat mag niet worden gebruikt door
kinderen jonger dan 8 jaar. Dit apparaat kan
worden gebruikt door kinderen vanaf 8 jaar en
door personen met verminderde lichamelijke,
zintuiglijke of geestelijke vermogens of gebrek
aan de benodigde ervaring en kennis indien ze
onder toezicht staan of instructies krijgen over
hoe het apparaat op een veilige manier kan
worden gebruikt alsook de gevaren begrijpen
die met het gebruik samenhangen. Kinderen
mogen niet met het apparaat spelen. Houd het
apparaat en het netsnoer buiten bereik van
kinderen jonger dan 8 jaar. Laat reiniging en
onderhoud niet door kinderen uitvoeren, tenzij
ze ouder zijn dan 8 jaar en onder toezicht staan.
• Dompel het snoer, de stekker of het apparaat
niet onder in water of andere vloeistoffen om
elektrische schokken te voorkomen.
• Dit apparaat is bedoeld voor huishoudelijk en
soortgelijk gebruik, zoals:
– Personeelskeukens in winkels, kantoren en andere werkomgevingen.
– Door gasten in hotels, motels en andere residentiële omgevingen.
– Bed&Breakfast-type omgevingen.
– Boerderijen.
• Kinderen mogen niet met het apparaat spelen.
• Dit apparaat mag niet worden gebruikt door
kinderen. Houd het apparaat en het netsnoer
buiten bereik van kinderen.
Reiniging en onderhoud
• Dompel nooit het snoer, de stekker of het
apparaat zelf onder in water of enige andere
vloeistof.
• Haal voor het reinigen altijd de stekker van de
machine uit het stopcontact en zorg dat de
machine is afgekoeld.
• U kunt alle niet-elektrische onderdelen in een
warm sopje afwassen. Droog ze zorgvuldig
voordat u de machine weer gaat gebruiken.
Deze onderdelen zijn niet geschikt voor de
vaatwasser. Gebruik nooit schurende
reinigingsmiddelen.
Spuitmond voor stoom/heet water
• Trek de rubberen buis omlaag en spoel deze
grondig door. Controleer of het gaatje in de
spuitmond niet is verstopt. Maak het gaatje
indien nodig met een pen open.
Boileruitlaat
Voer minimaal tweemaal per jaar de volgende procedure uit:
• Veeg eventueel gemalen koffie van het gebied
rond de uitlaat.
• Reinig het boilergebied met een vochtige doek.
• Reinig de verwijderde uitlaat grondig met een
borstel in warm sop, spoel deze zorgvuldig
schoon en controleer of de gaatjes niet zijn
verstopt. Open de gaatjes indien nodig met een
pen.
Ontkalken
• Ontkalk het apparaat maandelijks, anders krijgt
de koffie een nare smaak en kan kalkaanslag
de machine blijvend en onherstelbaar
beschadigen.
Let op: Zorg bij gebruik van een vast ontkalkingsmiddel dat dit middel
volledig in koud water is opgelost voordat u het in het waterreservoir giet.
Gebruik nooit een ontkalkingsmiddel op basis van minerale zuren zoals
zwavelzuur, zoutzuur, amidosulfonzuur en azijnzuur (zoals azijn). Deze
ontkalkingsmiddelen kunnen de machine beschadigen.
• Meng voldoende ontkalkingsmiddel volgens de
instructies met koud water in een maatbeker.
Vul het waterreservoir tot het maximumniveau
met de bereide ontkalkingsoplossing. Plaats
vervolgens het waterreservoir terug in de
machine.
• Controleer of de filterhouder niet is geplaatst en
plaats een kom met een inhoud van minimaal
1500ml onder de boileruitlaat om de
ontkalkingsoplossing op te vangen.
• Druk op de aan/uit-knop en wacht tot het lampje
stopt met knipperen.
• Druk op de koffiefunctieknop en laat de
oplossing half uit de machine lopen. Zet
vervolgens de koffiefunctieknop en de aan/uit-
knop in de uit-stand om de waterstroom te
stoppen.
• Laat de machine 15 minuten rusten. Druk
daarna op de aan/uit-knop en de
koffiefunctieknop tot het waterreservoir leeg is.
Spoel het reservoir grondig uit.
• Vul het waterreservoir weer met schoon, koud
water tot het maximumniveau en herhaal
stappen 2 t/m 5 tweemaal zonder pauze om het
apparaat door te spoelen.
Let op:Spoel de machine altijd via het legen van minimaal twee volle
waterreservoirs.
ONDERDELENBESCHRIJVING
1. Kopverwarmer 10. Stoomregelknop
2. Reservoirdeksel 11. Kopjesstandaard
3. Waterreservoir 12. Lekbak
4. Aan/uit-knop 13. Filterhouder I
5. Thermometer 14. Filter voor 2 kopjes
6. Koffiefunctieknop 15. Filter voor 1 kopje
7. Stoomfunctieknop 16. Filterhouder II
8. Indicatielampjes 17. Filter voor 1 capsule
9. Stoom-/heetwaterpijpje 18. Maatschepje met tamper
VOOR HET EERSTE GEBRUIK
• Haal het apparaat en de accessoires uit de doos.Verwijder de stickers,
de beschermfolie of het plastic van het apparaat.
• Plaats het apparaat op een vlakke, stabiele ondergrond. Zorg voor
minimaal 10 cm vrije ruimte rondom het apparaat. Dit apparaat is niet
geschikt voor inbouw of gebruik buitenshuis.
• Spoel de machine in de volgende stappen door met schoon water:
– Zorg ervoor dat alle knoppen in de uit-stand staan en dat de
stoomwaterknop gesloten is (linksom draaien).
– Til het reservoir uit de machine, doe het deksel omhoog en vul het
reservoir tot de MAX-aanduiding met koud water. U kunt ook het
deksel omhoog doen en het reservoir vullen zonder het reservoir uit de
espressomachine te halen. Het wordt aanbevolen om gefilterd water te
gebruiken, omdat dit betere koffie oplevert en kalkaanslag vermindert.
Gebruik nooit bruisend water.
– Plaats het reservoir op de juiste plek terug en oefen zo nodig lichte
druk uit om ervoor te zorgen dat het ventiel onder aan het reservoir
aansluit op de watertoevoer van de machine. Het is normaal dat er
water in het compartiment onder het reservoir blijft staan. Dit kunt u
verwijderen met een spons.
– Bevestig de filterhouder aan de machine door deze onder de
boileruitlaat te plaatsen en rechtsom te draaien. Zet een geschikt
bakje onder de boileruitlaat en de stoom-/heetwaterpijp.
– Steek de stekker in het stopcontact en druk op de aan/uit-knop. Het
voedingslampje gaat branden en het koffielampje knippert tot de juiste
temperatuur is bereikt. Druk daarna op de koffiefunctieknop. De
machine wordt doorgespoeld. Druk na enige tijd op de
koffiefunctieknop om het apparaat handmatig uit te schakelen.
– Druk op de stoomfunctieknop. Het stoomfunctielampje gaat knipperen.
Nadat het lampje is gestopt met knipperen, draait u aan de
stoomregelknop en wordt het stoompijpje doorgespoeld. Druk opnieuw
op de stoomfunctieknop om de machine te stoppen.
Belangrijk: U kunt geen espresso maken als u de machine niet eerst
heeft doorgespoeld. Door het spoelen vult de boiler zich met water. Spoel
als u de machine aan paar dagen niet heeft gebruikt deze met schoon
water voordat u de machine weer gaat gebruiken.
GEBRUIK
De espressomachine voorverwarmen
• Om ervoor te zorgen dat uw espressokoffie op de juiste temperatuur
wordt gezet, is het essentieel dat het koffieapparaat wordt
voorverwarmd.
– Controleer of de stoomregelknop goed gesloten is (rechtsom draaien)
en of er water in het reservoir zit.
– Zet een kan onder het stoompijpje.
– Plaats het gewenste filter in de filterhouder (zonder koffie) en bevestig
de houder aan de machine door deze onder de boileruitlaat te
plaatsen en rechtsom te draaien. Zorg ervoor dat de houder goed
vastzit.
– Plaats twee kopjes onder de filterhouder. Als u het kopje gebruikt
waarin de koffie wordt geserveerd, wordt het voorverwarmd. De kopjes
kunnen ook worden voorverwarmd op de kopverwarmer.
– Druk op de aan/uit-knop en wacht tot het lampje stopt met knipperen.
– Druk op de koffiefunctieknop en laat twee koppen water in de kan
lopen.
– Druk op de stoomfunctieknop en wacht tot het lampje stopt met
knipperen.
– Draai de stoomregelknop linksom en laat een beetje water in de kan
lopen.
Espresso maken
• Verwarm het apparaat voor zoals hierboven beschreven in 'De
espressomachine voorverwarmen'.
• Een of twee kopjes espresso maken: gebruik filterhouder I. Gebruik het
kleinere filter voor één kopje en het grotere filter voor twee kopjes.
• Voeg de koffie toe met behulp van het meegeleverde maatschepje.
Gebruik een vol schepje per kopje. Egaliseer het oppervlak en druk de
koffie vervolgens licht aan met de tamper van het maatschepje. Veeg
eventuele koffie rond de rand weg. Gebruikt u gemalen koffie?
Controleer dan eerst of deze geschikt is voor espressomachines. Druk
de koffie nooit te stevig aan. De koffie komt er dan langzaam uit en de
crema krijgt een donkere kleur. Als u de koffie te licht aandrukt, komt de
koffie er te snel uit en krijgt de crema een lichte kleur.
• Een koffiecapsule gebruiken: gebruik filterhouder II. Open de onderkant
van het capsulefilter, plaats er een koffiecapsule in, dek deze af en druk
de capsule goed aan. Het is ook mogelijk om Nespresso®*-capsules te
gebruiken.
• Bevestig de filterhouder in de boileruitlaat en draai de houder rechtsom
om deze te vergrendelen. Zet er een of twee kopjes onder. Zet het kopje
in het midden als je er één gebruikt. Druk op de aan/uit-knop. Het
voedingslampje knippert. Wacht tot het lampje stopt met knipperen en
druk dan op de koffiefunctieknop om espresso te maken.
• Als u genoeg koffie hebt, drukt u opnieuw op de koffiefunctieknop.
Gebruik niet te veel koffie, anders wordt deze te slap (optimale dosering
is 30 ml per kopje). Als u geen koffie meer zet, drukt u opnieuw op de
aan/uit-knop om het apparaat uit te schakelen.
• Verwijder de filterhouder door deze linksom te draaien. Er zal water op
het filter staan als je het verwijdert. Dit is normaal.
• Als u de gebruikte koffie uit de filterhouder wilt verwijderen, tilt u het
plastic blokje op om de rand van het filter te drukken. Draai de
filterhouder vervolgens ondersteboven en tik het koffiedik eruit.
Belangrijk: U kunt pas beginnen met het maken van espresso als het
lampje voor gereed stopt met knipperen. Als dit lampje nog knippert,
betekent dit dat de watertemperatuur niet hoog genoeg is.
Belangrijk: Veeg eventuele restanten die zijn achtergebleven rondom de
boileruitlaat weg, om te voorkomen dat er water uit de rand van de
filterhouder lekt en om een optimale werking te garanderen. Wees
voorzichtig: het apparaat kan heet zijn.
Opmerking: * Een merk van derden dat niet is gelieerd aan Princess.
Melk opschuimen voor cappuccino
• Maak de espresso zoals eerder beschreven.
• Zorg ervoor dat er water in het reservoir zit.
• Druk op de aan/uit-knop voor stoom. Het stoomlampje begint te
knipperen. Wacht tot het lampje stopt met knipperen. De boiler heeft nu
de juiste temperatuur bereikt.
• Vul een kan gedeeltelijk met melk. De melk kan tot drie keer zo hoog
komen, dus kies een kan die groot genoeg is. Koude halfvolle melk levert
de beste resultaten.
• Zet de kan onder het stoompijpje.
• Laat het pijpje tot ongeveer 30 mm diep in de melk zakken en draai de
stoomregelknop linksom. De melk begint omhoog te komen en ziet er
schuimig uit. Wanneer de melk in volume is verdubbeld, steekt u het
pijpje er helemaal in en gaat u verder met het verwarmen van de melk.
Zodra de gewenste temperatuur is bereikt (60 ℃ is optimaal), stopt u de
stoom door de stoomfunctieknop rechtsom te draaien.
Opmerking: Bij gebruik in de stoomstand en met uitgeschakelde
stoomfunctieknop kan er wat water uit de boileruitlaat of de bevestigde
filterhouder druppelen. Dit water verzamelt zich in de lekbak. U kunt ook
een kopje onder de boileruitlaat of de bevestigde filterhouder zetten.
Belangrijk: gebruik het stoompijpje nooit langer dan 2 minuten zonder
onderbreking.
Belangrijk: laat de melk nooit koken; dit bederft de smaak van de koffie.
Belangrijk: als u meer dan één kop cappuccino wilt maken, maakt u eerst
alle espresso's. Bereid daarna de opgeschuimde melk voor alle
cappuccino's.
Espresso maken na het opschuimen van de melk
• Als u espresso maakt na het opschuimen van melk, moet u eventueel
oververhit water dat uw koffie zou kunnen verbranden als volgt weg laten
lopen.
• Plaats een bakje met een laagje koud water van minimaal 30mm onder
het stoompijpje en steek het pijpje minimaal 10mm in het koude water.
Zorg ervoor dat het apparaat is uitgeschakeld en draai de
stoomregelknop linksom totdat er geen stoom meer uit het pijpje komt.
Nu kunt u weer espresso maken.
Functie voor automatisch uitschakelen
• De espressomachine wordt automatisch uitgeschakeld wanneer deze
25minuten niet in gebruik is.
MILIEU
Dit apparaat mag aan het einde van de levensduur niet bij het
normale huisafval worden gedeponeerd, maar moet bij een speciaal
inzamelpunt voor hergebruik van elektrische en elektronische apparaten
worden aangeboden. Het symbool op het apparaat, in de
gebruiksaanwijzing en op de verpakking attendeert u hierop. De in het
apparaat gebruikte materialen kunnen worden gerecycled. Met het
recyclen van gebruikte huishoudelijke apparaten levert u een belangrijke
bijdrage aan de bescherming van ons milieu. Informeer bij uw lokale
overheid naar het inzamelpunt.
Support
U kunt alle beschikbare informatie en reserveonderdelen vinden op
www.princesshome.eu!

Zapojte sa do diskusie o tomto výrobku
Tu sa môžete podeliť o to, čo si myslíte o Princess 249412 Presovač. Ak máte otázku, najprv si pozorne prečítajte návod. Vyžiadanie manuálu je možné vykonať pomocou nášho kontaktného formulára.
odpovedať | Bolo to užitočné (6) (Preložené Googlom)
odpovedať | Bolo to užitočné (4) (Preložené Googlom)
odpovedať | Bolo to užitočné (0) (Preložené Googlom)
odpovedať | Bolo to užitočné (0) (Preložené Googlom)