
VS3915
EN | Instruction manual
NL | Gebruiksaanwijzing
FR | Mode d’emploi
DE | Bedienungsanleitung
ES | Manual de usuario
PT | Manual de utilizador
IT | Manuele utente
SV | Bruksanvisning
PL | Instrukcja obsługi
CS | Návod na použití
SK | Návod na použitie
RU | Руководство по
эксплуатации
6
PARTS DESCRIPTION / ONDERDELENBESCHRIJVING / DESCRIPTION DES PIÈCES / TEILEBESCHREIBUNG /
DESCRIPCIÓN DE LAS PIEZAS / DESCRIÇÃO DOS COMPONENTES / DESCRIZIONE DELLE PARTI /
BESKRIVNING AV DELAR / OPIS CZĘŚCI / POPIS SOUČÁSTÍ / POPIS SÚČASTÍ / ПИСАНИЕ ЗАПЧАСТИ
1
2
3
5
87
4
WWW.TRISTAR.EU
Tristar Europe B.V. | Jules Verneweg 87
5015 BH Tilburg | The Netherlands
ENInstruction manual
SAFETY
• By ignoring the safety instructions the
manufacturer can not be hold responsible for
the damage.
• If the supply cord is damaged, it must be
replaced by the manufacturer, its service
agent or similarly qualified persons in order to
avoid a hazard.
• Never move the appliance by pulling the cord
and make sure the cord can not become
entangled.
• The appliance must be placed on a stable,
level surface.
• The user must not leave the device
unattended while it is connected to the supply.
• This appliance is only to be used for
household purposes and only for the purpose
it is made for.
• This appliance shall not be used by children
aged less than 8 years. This appliance can be
used by children aged from 8 years and above
and persons with reduced physical, sensory or
mental capabilities or lack of experience and
knowledge if they have been given
supervision or instruction concerning use of
the appliance in a safe way and understand
the hazards involved. Children shall not play
with the appliance. Keep the appliance and its
cord out of reach of children aged less than 8
years. Cleaning and user maintenance shall
not be made by children unless older than 8
and supervised.
• To protect yourself against an electric shock,
do not immerse the cord, plug or appliance in
the water or any other liquid.
• This appliance is intended to be used in
household and similar applications such as:
– Staff kitchen areas in shops, offices and other working environments.
– By clients in hotels, motels and other residential type environments.
– Bed and breakfast type environments.
– Farm houses.
• To protect yourself against an electric shock,
do not immerse the cord, plug or appliance in
the water or any other liquid.
• Surface are liable to get hot during use.
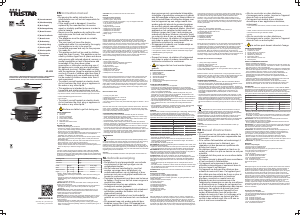
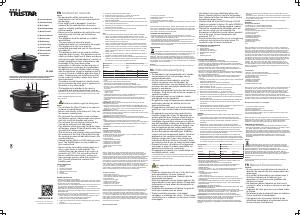
PARTS DESCRIPTION
1. Lid handle
2. Glass lid
3. Ceramic cooking pot
4. Slow cooker handle
5. Power selector switch
6. Plug with cord
7. Stainless steel exterior base
8. Pilot light
BEFORE THE FIRST USE
• Remove all packaging of the device.
• Check if the voltage of the appliance corresponds to the main voltage
of your home. Rated voltage: AC220-240V 50Hz. The socket must be
at least 16A or 10 A slow-protected.
• Place the device on a flat stable surface and ensure a minimum of 10
cm. free space around the device. This device is not suitable for
installation in a cabinet or for outside use.
• Wash before using the device for the first time all loose parts in warm
soapy water. Rinse and dry thoroughly below. These parts are also
dishwasher safe.
• The heating element on the inner side of the base becomes very hot.
Never touch this, you can get very serious burns.
• During operation of the machine steam arises which is very hot,
always use the handles and oven mitts when the steaming bowls, rice
bowl, the drip tray or base are being touched.
USE
The slow cooker has three power settings: LOW, HIGH and WARM.
Use the recommended guidelines offered in the recipe being used to
determine cooking time and power setting. Dishes can be prepared well
in advance of mealtime and cooking time regulated so that food is ready
to serve at a convenient time.
Cooking Time Recommended power setting
6-8 hours Low
4-6 hours High
Food Weight Time (low) Time (high)
Beef 2.0 - 2.5 kg 8 hours 6 hours
Whole chicken 2.0 - 3.0 kg 6 hours 4 hours
Pork 1.0 - 1.5 kg 6 hours 4 hours
Tabel1: Slow cooker cooking table
• Prepare recipe according to instructions. Place food into cooking pot
and cover.
• Plug slow cooker into electrical outlet and select LOW, HIGH or
WARM setting. Slow cooking will commence. Power on indicator will
illuminate.
• Always cook with the lid on.
IMPORTANT! Do not remove the lid often when cooking as this will
prolong the cooking time.
• Serving. Turn the slow cooker to WARM setting for a short period of
time prior to serving or turn to the OFF position to unplug the
appliance.
IMPORTANT! Slow cooker will operate until switched OFF. Do not
overcook food. Monitor cooking and ensure to switch OFF the slow
cooker when the food is cooked properly.
• Using pot holders, remove the cover.
CAUTION: When removing cover, grasp the designed area on the lid
and lift to allow steam to escape before setting cover aside. To avoid
burns, always hold cover so that escaping steam flows away from
hands and face.
• Grasp cooking pot by handles and remove it from the body.
• Tableside serving. If serving directly from the cooking pot, always
place a trivet or protective padding under the pot before placing it on a
table or countertop.
CAUTION: The pot will be hot and can cause burns.
RECIPES
Portuguese Garlic Chicken
1 medium onion, finely sliced
6 cloves of garlic, finely sliced
2 medium tomatoes cut into quarters ⅓ cup of chopped roast ham
½ cup of raisins (Golden Raisins)
1.7 kg chicken ½ cup of Port
½ cup of Brandy
1 teaspoon of Dijon mustard
2 teaspoons of tomato puree
1.5 teaspoons of corn starch
2 tablespoons of cold water
1 teaspoon of red wine vinegar
parsley sprigs
salt
Mix the onion slices, garlic, tomatoes ham and raisins. Remove the
chicken giblets and put aside for use another time; rinse the inside and
outside of the chicken and dry. Secure the wings and tie up the thighs.
Place the chicken on the onion mixture. Mix the Port, Brandy, mustard and
tomato puree and pour over the chicken. Cover and slow cook on low
(LOW) until the meat on the thighs is tender (7 to 8 hours) Carefully place
the chicken on an oven tray and sear for about 5 minutes. Put the chicken
on a hot plate. Skim the fat from the cooking liquid and mix in the corn
starch solution. Select the high setting (HIGH), cover and simmer, stirring
2 or 3 times until the sauce thickens (about 10 -15 minutes). Add the
vinegar and season according to taste. To serve, garnish the chicken with
some parsley and quartered tomatoes. Cut the chicken and add a little
sauce. The remaining sauce can be served in a sauce boat.
Cranberry Chicken
1 finely sliced small onion
1 cup of fresh or frozen (unthawed) cranberries
1 kg of skinless deboned chicken thighs
¼ cup of ketchup
2 teaspoons of raw sugar
1 teaspoon dry mustard
2 teaspoons of cider vinegar
1.5 teaspoons corn starch
2 tablespoons of cold water Salt
Mix the onions and the cranberries in the slow cooker. Rinse and dry the
chicken thighs and place them into the cooker. In a small bowl mix the
ketchup, sugar, mustard and vinegar and place this mixture onto the
chicken. Cover and simmer on low (LOW) until the chicken is tender (6 ½
-7 ½ hours). Carefully place the chicken on to a serving dish. Mix the corn
starch with the water and stir this into the cooking liquid. Turn the heat to
high (HIGH), cover with the lid and simmer, stirring 2 or 3 times until the
sauce thickens (about 10 -15 minutes). Season according to taste. Pour
the sauce over the chicken.
Beef and Potato Stew
1-1.25 kg very lean beef
2 tablespoons of bacon fat or other fat
2 large diced onions
5 large potatoes chopped into eighths
4 or 5 large carrots cut into 5cm pieces Salt and pepper to season 1 can of
tomato soup
Sear the meat in the fat or bacon grease. Add the diced onions. Place the
meat, onions, vegetables, seasoning and can of tomato soup, along with
some water, into the slow cooker. Simmer for 7 hours on low (LOW). Add
more water if necessary. Serve with bread.
CLEANING AND MAINTENANCE
• Remove the plug from the socket and allow all parts to cool down.
• Clean the steaming bowls, rice bowl, cover and drip tray in warm soapy
water. These parts are also dishwasher safe.
• Do not immerse the base in water or other liquid. Place the base not in
the dishwasher, but clean it with a damp cloth.
• Clean the outside with a damp cloth. Never use harsh and abrasive
cleaners, steel wool or a scouring pad as this will damage the device. Do
not immerse in water or other liquid.
• The unit should be regularly decalcified. Pour about 0.7 liters of vinegar
in the base and place the first steaming bowl with the lid on the base.
Turn on the device and leave it enabled for about 20 minutes. Then rinse
the parts thoroughly and fill the tank with water, switch it on and let it
stand for about 10 minutes. Then rinse the loose parts and the base
thoroughly with clean water and make them dry.
ENVIRONMENT
This appliance should not be put into the domestic garbage at the
end of its durability, but must be offered at a central point for the recycling
of electric and electronic domestic appliances. This symbol on the
appliance, instruction manual and packaging puts your attention to this
important issue. The materials used in this appliance can be recycled. By
recycling of used domestic appliances you contribute an important push to
the protection of our environment. Ask your local authorities for information
regarding the point of recollection.
Support
You can find all available information and spare parts at www.tristar.eu!
NLGebruiksaanwijzing
VEILIGHEID
• De fabrikant is niet aansprakelijk voor schade
voortvloeiend uit het niet opvolgen van de
veiligheidsinstructies.
• Als het netsnoer beschadigd is, moet het
worden vervangen door de fabrikant, de
onderhoudsmonteur van de fabrikant of door
personen met een soortgelijke kwalificatie om
gevaar te voorkomen.
• Verplaats het apparaat nooit door aan het snoer
te trekken. Zorg ervoor dat het snoer nergens in
verstrikt kan raken.
• Het apparaat moet op een stabiele, vlakke
ondergrond worden geplaatst.
• De gebruiker mag het apparaat niet onbeheerd
achterlaten wanneer de stekker zich in het
stopcontact bevindt.
• Dit apparaat is uitsluitend voor huishoudelijk
gebruik en voor het doel waar het voor bestemd
is.
• Dit apparaat mag niet worden gebruikt door
kinderen jonger dan 8 jaar. Dit apparaat kan
worden gebruikt door kinderen vanaf 8 jaar en
door personen met verminderde lichamelijke,
zintuiglijke of geestelijke vermogens of gebrek
aan de benodigde ervaring en kennis indien ze
onder toezicht staan of instructies krijgen over
hoe het apparaat op een veilige manier kan
worden gebruikt alsook de gevaren begrijpen
die met het gebruik samenhangen. Kinderen
mogen niet met het apparaat spelen. Houd het
apparaat en het netsnoer buiten bereik van
kinderen jonger dan 8 jaar. Laat reiniging en
onderhoud niet door kinderen uitvoeren, tenzij
ze ouder zijn dan 8 jaar en onder toezicht staan.
• Dompel het snoer, de stekker of het apparaat
niet onder in water of andere vloeistoffen om
elektrische schokken te voorkomen.
• Dit apparaat is bedoeld voor huishoudelijk en
soortgelijk gebruik, zoals:
– Personeelskeukens in winkels, kantoren en andere werkomgevingen.
– Door gasten in hotels, motels en andere residentiële omgevingen.
– Bed&Breakfast-type omgevingen.
– Boerderijen.
• Dompel het snoer, de stekker of het apparaat
niet onder in water of andere vloeistoffen om
elektrische schokken te voorkomen.
• Het oppervlak kan heet worden tijdens
gebruik.
BESCHRIJVING VAN DE ONDERDELEN
1. Dekselhandgreep
2. Glazen deksel
3. Keramische kookpot
4. Slowcooker-handgreep
5. Aan/uit-schakelaar
6. Stekker met snoer
7. Onderstel met roestvrijstalen buitenzijde
8. Controlelampje
VOOR HET EERSTE GEBRUIK
• Verwijder alle verpakking van het apparaat.
• Controleer of het voltage dat wordt aangegeven op het apparaat,
overeenkomt met de plaatselijke netspanning voordat u het apparaat
aansluit. Voltage 220V-240V 50Hz. De contactdoos moet met ten minste
16 A of 10 A traag beveiligd zijn.
• Plaats het apparaat op een vlakke, stabiele ondergrond. Zorg voor
minimaal 10 cm vrije ruimte rondom het apparaat. Dit apparaat is niet
geschikt voor inbouw of gebruik buitenshuis.
• Reinig voor het eerste gebruik van het apparaat alle losse onderdelen in
warm sop. Vervolgens grondig afspoelen en afdrogen. Deze onderdelen
zijn tevens vaatwasserbestendig.
• Het verwarmingselement aan de binnenzijde van de basis wordt zeer
heet. Raak dit nooit aan, u kunt hierbij zeer ernstige brandwonden
oplopen.
• Als het apparaat in werking is, ontstaat zeer hete stoom. Gebruik altijd
de handgrepen en draag ovenwanten als u de stoomschalen, de
rijstschaal, de lekbak of de basis moet aanraken.
GEBRUIK
De slowcooker heeft drie vermogensinstellingen: LOW [laag], HIGH [hoog]
en WARM [warm]. Gebruik de aanwijzingen in het recept om de
bereidingstijd en de vermogensinstelling te bepalen. Gerechten kunnen
ruim voor etenstijd worden voorbereid en de bereidingstijd kan zo worden
ingesteld, dat het eten op de juiste tijd klaar is om te worden geserveerd.
Bereidingstijd Aanbevolen vermogensinstelling
6-8 uur Laag
4-6 uur Hoog
Voedsel Gewicht Tijd (laag) Tijd (hoog)
Rundvlees 2,0 - 2,5 kg 8 uur 6 uur
Hele kip 2,0 - 3,0 kg 6 uur 4 uur
Varkenslees 1,0 - 1,5 kg 6 uur 4 uur
Tabel1: Bereidingstafel voor de slowcooker
• Bereid het recept volgens de instructies voor. Leg het voedsel in de
binnenpan en plaats de deksel.
• Steek de stekker van de slow cooker in het stopcontact en kies de
instelling LOW, HIGH of WARM. Het slowcooken begint. De indicator
voor voeding aan brandt.
• Kook altijd met de deksel op de pan.
BELANGRIJK! Verwijder de deksel tijdens het bereiden niet te vaak, want
dit verlengt de bereidingstijd.
• Opdienen. Zet de slowcooker een korte tijd voor het serveren op WARM
of zet het apparaat op OFF [uit] en haal de stekker uit het stopcontact.
BELANGRIJK! De slowcooker blijft werken tot hij wordt uitgeschakeld.
Zorg dat het voedsel niet te gaar wordt. Houd de bereiding in de gaten en
schakel de slowcooker uit als het voedsel correct is bereid.
• Gebruik pannenlappen bij het verwijderen van de deksel.
VOORZICHTIG: Pak bij het verwijderen van de deksel deze bij de
handgreep vast en til hem op om de stoom te laten ontsnappen voordat u
hem opzij legt. Houd om brandwonden te voorkomen de deksel altijd zo
vast, dat de ontsnappende stoom zich van de handen en het gezicht af
beweegt.
• Pak de binnenpan bij de handgrepen vast en verwijder deze van het
onderstel.
• Aan tafel serveren. Plaats als u direct vanuit de binnenpan serveert altijd
een onderzetter of een beschermende mat onder de pot voordat u deze
op een tafel of aanrecht zet.
VOORZICHTIG: De pan is heet en kan brandwonden veroorzaken.
RECEPTEN
Portugese knoflookkip
1 middelgrote ui, in dunne plakjes gesneden
6 tenen knoflook, in dunne plakjes gesneden
2 middelgrote tomaten in kwarten gesneden, 75 gram gebraden ham, in
stukjes gesneden
75 gram rozijnen (blanke rozijnen)
1,7 kg kip 120 ml port
120 ml brandewijn
1 theelepel dijonmosterd
2 theelepels tomatenpuree
1,5 theelepel maizena
2 eetlepels koud water
1 theelepel rode wijnazijn
toefjes peterselie
zout
Meng de plakjes uit, knoflook, tomaten, ham en rozijnen. Verwijder de
inwendige organen uit de kip en leg deze opzij om ze aan andere keer te
gebruiken; spoel de binnenzijde en buitenzijde van de kip en maak hem
droog. Zet de vleugels vast en bindt de dijen vast. Plaat de kip op het
uimengsel. Meng de port, de brandewijn, de mosterd en de tomatenpuree
en giet dit over de kip. Dek dit af en slowcook op de lage stand (LOW) tot
het vlees op de dijen mals is (7 tot 8 uur). Plaats de kip voorzichtig op een
ovenplaat en schroei hem in ongeveer 5 minuten dicht. Plaats de kip op
een warm bord. Schep het vet van het kookvocht en meng het vocht met
de maizena. Kies de hoge stand (HIGH), plaats de deksel en laat
pruttelen, roer 2 of 3 keer tot de saus dikker wordt (ongeveer 10-15
minuten). Voeg de azijn en de kruiden naar smaak toe. Bestrooi de kip
voor het opdienen met een beetje peterselie en de tomatenkwarten. Snij
de kip en voeg een beetje saus toe. De overige saus kan in een juskom
worden geserveerd.
Cranberrykip
1 kleine ui, in dunne plakjes gesneden
100 gram verse of bevroren (niet ontdooide) cranberry's
1 kg kippendijen zonder huid en bot
60 ml tomatenketchup
2 theelepel ruwe suiker
1 theelepel mosterdzaad
2 theelepels ciderazijn
1,5 theelepel maizena
2 eetlepels koud water Zout
Meng de uien en de cranberry's in de slowcooker. Spoel de kippendijen af
en maak ze droog. Plaats ze in de cooker. Meng in een kleine kom de
tomatenketchup, de suiker, het mosterdzaad en de ciderazijn en leg dit
mengsel op de kip. Plaats de deksel en laat op de lage stand (LOW)
sudderen tot de kip mals is (6½ -7½ uur). Leg de kip voorzichtig op een
serveerschaal. Meng de maizena met het water en tot dit door het
kookvocht. Zet de warmte op de hoge stand (HIGH), dek af met de deksel
en laat pruttelen, roer 2 of 3 keer tot de saus dikker wordt (ongeveer 10-15
minuten). Voeg kruiden naar smaak toe. Giet de saus over de kip.
Stoofpot met rundvlees en aardappel
1-1,25 kg zeer mager rundvlees
2 eetlepels spekvet of ander vet
2 grote uien, gesnipperd
5 grote aardappelen in acht stukken gesneden
4 of 5 grote wortels in stukken van 5cm gesneden Zout en peper naar
smaak 1 blik tomatensoep
Braad het vlees in het vet of spekvet aan. Voeg de gesneden uiten toe.
Plaats het vlees, de uien, groenten, kruiden en blik tomatensoep met een
beetje water in de slowcooker. Laat 7 uur op de lage stand (LOW)
sudderen. Voeg indien nodig meer water toe. Serveer met brood.
REINIGING EN ONDERHOUD
• Haal de stekker uit het stopcontact en laat alle onderdelen afkoelen.
• Reinig de stoomschalen, de rijstschaal, de deksel en de lekbak in warm
sop. Deze onderdelen zijn tevens vaatwasserbestendig.
• Dompel de basis niet onder in water of andere vloeistoffen. De basis is
niet geschikt voor de afwasmachine. Reinig deze met een vochtige doek.
• Reinig de buitenkant met een vochtige doek. Gebruik nooit agressieve of
schurende reinigingsmiddelen, staalwol of een schuurspons; dit
beschadigt het apparaat. Niet onderdompelen in water of andere
vloeistoffen.
• Het apparaat moet regelmatig worden ontkalkt. Giet ongeveer 0,7 liter
azijn in de basis en plaats de eerste stoomschaal met de deksel op de
basis. Schakel het apparaat in en laat het ongeveer 20 minuten werken.
Spoel daarna de onderdelen grondig en vul het reservoir met water.
Schakel het apparaat hierna ongeveer 10 minuten in. Spoel vervolgens
de losse onderdelen en de basis grondig met schoon water en droog ze
af.
MILIEU
Dit apparaat mag aan het einde van de levensduur niet bij het
normale huisafval worden gedeponeerd, maar moet bij een speciaal
inzamelpunt voor hergebruik van elektrische en elektronische apparaten
worden aangeboden. Het symbool op het apparaat, in de
gebruiksaanwijzing en op de verpakking attendeert u hierop. De in het
apparaat gebruikte materialen kunnen worden gerecycled. Met het
recyclen van gebruikte huishoudelijke apparaten levert u een belangrijke
bijdrage aan de bescherming van ons milieu. Informeer bij uw lokale
overheid naar het inzamelpunt.
Support
U kunt alle beschikbare informatie en reserveonderdelen vinden op
www.tristar.eu!
FRManuel d'instructions
SÉCURITÉ
• Si vous ignorez les instructions de sécurité, le
fabricant ne saurait être tenu responsable des
dommages.
• Si le cordon d'alimentation est endommagé, il
doit être remplacé par le fabricant, son
réparateur ou des personnes qualifiées afin
d'éviter tout risque.
• Ne déplacez jamais l'appareil en tirant sur le
cordon et veillez à ce que ce dernier ne soit pas
entortillé.
• L'appareil doit être posé sur une surface stable
et nivelée.
• Ne laissez jamais le dispositif sans surveillance
s'il est connecté à l'alimentation.
• Cet appareil est uniquement destiné à des
utilisations domestiques et seulement dans le
but pour lequel il est fabriqué.
• Cet appareil ne doit pas être utilisé par des
enfants de moins de 8 ans. Cet appareil peut
être utilisé par des enfants de 8 ans ou plus et
des personnes présentant un handicap
physique, sensoriel ou mental voire ne
disposant pas des connaissances et de
l'expérience nécessaires en cas de surveillance
ou d'instructions sur l'usage de cet appareil en
toute sécurité et de compréhension des risques
impliqués. Les enfants ne doivent pas jouer
avec l'appareil. Maintenez l'appareil et son
cordon d'alimentation hors de portée des
enfants de moins de 8 ans. Le nettoyage et la
maintenance utilisateur ne doivent pas être
confiés à des enfants sauf s'ils ont 8 ans ou
plus et sont sous surveillance.
• Afin de vous éviter un choc électrique,
n'immergez pas le cordon, la prise ou l'appareil
dans de l'eau ou autre liquide.
• Cet appareil est destiné à une utilisation
domestique et aux applications similaires,
notamment:
– Coin cuisine des commerces, bureaux et autres environnements de
travail.
– Hôtels, motels et autres environnements de type résidentiel.
– Environnements de type chambre d’hôtes.
– Fermes.
• Afin de vous éviter un choc électrique,
n'immergez pas le cordon, la prise ou l'appareil
dans de l'eau ou autre liquide .
• La surface peut devenir chaude à l'usage.
DESCRIPTION DES PIÈCES
1. Poignée de couvercle
2. Couvercle en verre
3. Pot de cuisson en céramique
4. Poignée de cuiseur lent
5. Sélecteur de puissance
6. Fiche avec cordon
7. Base extérieure en acier inox
8. Témoin pilote
AVANT LA PREMIÈRE UTILISATION
• Retirez l’emballage de l'appareil.
• Vérifiez si la tension de l'appareil correspond à la tension du secteur de
votre domicile. Tension nominale: 220-240V CA 50Hz. La prise doit être
d’au moins 16A ou 10A et à fusible lent.
• Mettez l'appareil sur une surface stable plate et assurez un dégagement
tout autour de l'appareil d'au moins 10 cm. Cet appareil ne convient pas
à une installation dans une armoire ou à un usage à l'extérieur.
• Avant la première utilisation, lavez toutes les pièces détachables de
l'appareil dans de l'eau chaude savonneuse. Rincez et séchez
soigneusement en dessous. Ces pièces sont également lavables en
lave-vaisselles.
• L'élément chauffant du côté intérieur de la base devient très chaud. Ne
touchez jamais. Vous risquez des brûlures très graves.
• Durant le fonctionnement de la machine, de la vapeur très chaude
s'échappe. Utilisez toujours les poignées et des gants de cuisine pour
toucher les bols vapeur, la cuve à riz, le bac de collecte ou la base.
UTILISATION
Le cuiseur lent offre trois réglages de puissance : LOW, HIGH et WARM.
Respectez les recommandations de la recette choisie afin de déterminer le
temps de cuisson et le réglage de puissance. Les plats peuvent être
préparés bien avant l'heure du repas et le temps de cuisson être réglé de
sort que les aliments soient prêts pour le service à une heure pratique.
Temps de cuisson Réglage de puissance recommandé
6-8 heures Bas
4-6 heures Élevé
Aliment Poids Temps (bas) Temps (haut)
Bœuf 2,0 - 2,5 kg 8 heures 6 heures
Poulet entier 2,0 - 3,0 kg 6 heures 4 heures
Porc 1,0 - 1,5 kg 6 heures 4 heures
Tabel1: Table de cuisson de cuiseur lent
• Préparez la recette selon les instructions. Placez les aliments dans le pot
de cuisson et couvrez.
• Branchez le cuiseur lent sur la prise électrique et réglez sur LOW, HIGH
ou WARM. La cuisson lente commence. Le témoin de marche s'allume.
• Cuisez toujours avec le couvercle en place.
IMPORTANT ! Ne retirez pas souvent le couvercle pendant la cuisson.
Vous prolongez alors le temps de cuisson.
• Service. Réglez le cuiseur lent sur WARM brièvement avant le service
ou sur OFF pour débrancher l'appareil.
IMPORTANT ! Le cuiseur lent fonctionne jusqu'à son arrêt. Ne cuisez pas
trop les aliments. Suivez la cuisson et assurez-vous d'éteindre le cuiseur
lent une fois les aliments correctement cuits.
• Pour utiliser des supports de pot, retirez le couvercle.
ATTENTION: En retirant le couvercle, saisissez la zone indiquée sur le
couvercle et levez pour laisser la vapeur s'échapper avant d'écarter le
couvercle. Pour éviter les brûlures, tenez toujours le couvercle de sorte
que la vapeur ne soit pas dirigée sur les mains et le visage.
• Saisissez le pot de cuisson par les poignées et retirez-le du bloc.
• Service à table. Pour servir directement du pot de cuisson, placez
toujours un trépied ou une protection sous le pot avant de la placer sur la
table ou le plan de travail.
ATTENTION: Le pot est chaud et peut occasionner des brûlures.
RECETTES
Poulet à l'ail portugais
1 oignon moyen en rondelles fines
6 gousses d'ail en rondelles fines
2 tomates moyennes en quartiers 75 gr de jambon rôti haché
75 gr de raisins secs (Raisins dorés)
1,7 kg de poulet 120 ml de porto
120 ml de cognac
1 cuil. à café de moutarde de Dijon
2 cuil. à café de purée de tomate
1,5 cuil. à café de fécule de maïs
2 cuil. à café d'eau froide
1 cuil. à café de vinaigre de vin rouge
branches de persil
sel
Mélangez l'oignon, l'ail, les tomates, le jambon et les raisins secs. Retirez
les abats du poulet et réservez pour usage ultérieur. Rincez l'intérieur et
l'extérieur du poulet et séchez. Fixez les ailes et attachez les cuisses.
Placez le poulet dans le mélange d'oignons. Mélangez le porto, le cognac,
la moutarde et la purée de tomate et versez sur le poulet. Couvrez et
cuisez lentement au minimum (LOW) pour que la viande sur les cuisses
soit tendre (7 à 8 heures). Placez soigneusement le poulet sur une plaque
de four et grillez environ 5 minutes. Placez le poulet sur un plat chaud.
Dégraissez les jus de cuisson et mélangez-y la solution de fécule de maïs.
Sélectionnez le réglage maximum (HIGH), couvrez et laissez mijoter en
remuant 2 ou 3 fois pour que la sauce épaississe (environ 10 -15
minutes). Ajoutez le vinaigre et assaisonnez selon vos goûts. Pour servir,
garnissez le poulet d'un peu de persil et de quartiers de tomates. Coupez
le poulet et ajoutez un peu de sauce. Le reste de la sauce peut être servi
dans une saucière.
Poulet aux canneberges
1 petit oignon en rondelles fines
100 gr de canneberges fraîches ou surgelées (sans décongeler)
1 kg de cuisses de poulet désossé sans peau
60 ml de ketchup
2 cuil. à café de sucre brut
1 cuil. à café de moutarde sèche
2 cuil. à café de vinaigre de cidre
1,5 cuil. à café de fécule de maïs
2 cuil. à café d'eau froide Sel


Zapojte sa do diskusie o tomto výrobku
Tu sa môžete podeliť o to, čo si myslíte o Tristar VS-3915 Pomalý hrniec. Ak máte otázku, najprv si pozorne prečítajte návod. Vyžiadanie manuálu je možné vykonať pomocou nášho kontaktného formulára.
odpovedať | Bolo to užitočné (0) (Preložené Googlom)
odpovedať | Bolo to užitočné (0) (Preložené Googlom)
odpovedať | Bolo to užitočné (0) Čítaj viac (Preložené Googlom)
Bolo to užitočné (0) (Preložené Googlom)
odpovedať | Bolo to užitočné (0) (Preložené Googlom)