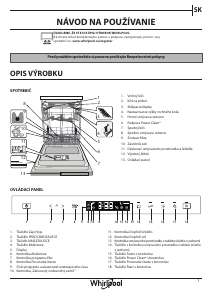
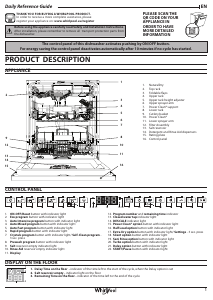
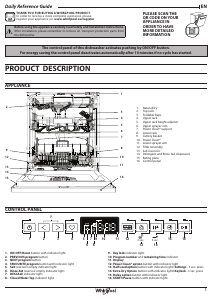
Návod Whirlpool WH7IA115B2M3TUS0 Umývačka riadu
Potrebujete príručku pre svoj Whirlpool WH7IA115B2M3TUS0 Umývačka riadu? Nižšie si môžete bezplatne prezrieť a stiahnuť príručku vo formáte PDF v slovenskom jazyku. Tento produkt má momentálne 12 často kladené otázky, 0 komentárov a má 0 hlasov. Ak toto nie je manuál, ktorý chcete, kontaktujte nás.
Je váš výrobok pokazený a nepodarilo sa vám problém odstrániť pomocou pokynov v návode? Prejdite na portál Repair Café, kde nájdete bezplatné servisné služby.
Návod
Loading…

Loading…
Hodnotenie
Dajte nám vedieť svoj názor na Whirlpool WH7IA115B2M3TUS0 Umývačka riadu a ohodnoťte výrobok. Chcete sa podeliť o svoje skúsenosti s týmto výrobkom alebo sa niečo spýtať? Napíšte komentár v spodnej časti stránky.Viac o tomto návode
Chápeme, že je pekné mať k svojmu Whirlpool WH7IA115B2M3TUS0 Umývačka riadu papierovú príručku. Návod si môžete kedykoľvek stiahnuť z našej webovej stránky a vytlačiť si ho sami. Ak chcete mať originálnu príručku, odporúčame vám kontaktovať Whirlpool. Mohli by byť schopní poskytnúť originálny návod. Hľadáte príručku k svojmu Whirlpool WH7IA115B2M3TUS0 Umývačka riadu v inom jazyku? Vyberte si preferovaný jazyk na našej domovskej stránke a vyhľadajte číslo modelu, aby ste zistili, či ho máme k dispozícii.
Technické údaje
| Značka | Whirlpool |
| Model | WH7IA115B2M3TUS0 |
| Kategória | Umývačky riadu |
| Typ súboru | |
| Veľkosť súboru | 167.47 MB |
Všetky príručky pre Whirlpool Umývačky riadu
Ďalšie príručky od Umývačky riadu
Často kladené otázky o Whirlpool WH7IA115B2M3TUS0 Umývačka riadu
Náš tím podpory vyhľadáva užitočné informácie o výrobkoch a odpovede na často kladené otázky. Ak nájdete v našich často kladených otázkach nejakú nezrovnalosť, dajte nám o tom vedieť pomocou nášho kontaktného formulára.
Po dokončení cyklu v umývačke riadu nie je priečinok na tabletu otvorený. Ako je to možné? Overená
Tento problém je často spôsobený riadmi, ktoré priečinok blokujú. Pred zapnutím umývačky to skontrolujte.
Bolo to užitočné (8368) Čítaj viacUmývačka už neohrieva vodu, prečo je to tak? Overená
Je pravdepodobné, že je vykurovací článok poškodený. Nechajte to vymeniť. V prípade pochybností kontaktujte výrobcu.
Bolo to užitočné (8162) Čítaj viacMôžem v umývačke riadu používať bežnú soľ? Overená
Nie, bežná soľ môže obsahovať látky, ktoré môžu spôsobiť poškodenie spotrebiča.
Bolo to užitočné (3470) Čítaj viacMusím riad pred vložením do umývačky riadu opláchnuť? Overená
Opláchnutie riadu nie je potrebné, je však potrebné odstrániť všetky veľké, tvrdé a mastné zvyšky. Tie by mohli časom upchať odtok.
Bolo to užitočné (1428) Čítaj viacMôžem otvoriť umývačku riadu, keď je v prevádzke? Overená
Väčšina umývačiek riadu je vybavená zastavením vody, vďaka čomu sa program zastaví okamžite po otvorení dvierok, čo znamená, že z nich nebude vytekať voda. U niektorých modelov to môže časom spôsobiť problémy. Pri zabudovaných umývačkách riadu je možné, že časté otváranie umývačky riadu za chodu môže spôsobiť poškodenie susedných skriniek vodou z dôvodu unikajúcej pary.
Bolo to užitočné (1212) Čítaj viacMám umývačku riadu po ukončení chodu otvoriť, aby bol riad rýchlejší? Overená
Závisí to od typu umývačky riadu a umiestnenia umývačky riadu. Niektoré umývačky riadu sú vybavené funkciou, ktorá po ukončení umývacieho programu suší riad. V takom prípade nebude mať otvorenie umývačky žiadnu pridanú hodnotu. Pri zabudovaných umývačkách riadu je možné, že časté otváranie umývačky riadu za chodu môže spôsobiť poškodenie susedných skriniek vodou z dôvodu unikajúcej pary.
Bolo to užitočné (973) Čítaj viacČo znamená „šiesty zmysel“? Overená
Spotrebiče Whirlpool, ktoré sú vybavené technológiou 6th Sense, majú senzory, ktoré zaisťujú optimálnu prevádzku stroja. Napríklad v sušičkách tieto snímače merajú vlhkosť zostávajúcu v práčke a zastavia stroj, keď je všetko úplne suché.
Bolo to užitočné (899) Čítaj viacPo dokončení cyklu umývačka riadu je plastový riad stále mokrý, zvyšok však nie. Prečo? Overená
Plast je zlý vodič tepla, ktorý umožňuje výrobkom rýchle ochladenie. Vlhkosť, ktorá na ňom zostane, sa potom odparuje oveľa menej ako napríklad na keramike alebo kove.
Bolo to užitočné (870) Čítaj viacMôžem pripojiť umývačku riadu k predlžovaciemu káblu? Overená
Spotrebiče, ktoré vyžadujú veľké množstvo energie, napríklad umývačka riadu, nemožno pripojiť ku všetkým predlžovacím káblom. Zistite, aká je spotreba energie umývačky riadu, ktorá je uvedená vo wattoch. Skontrolujte, či to predlžovací kábel zvládne. Existujú predlžovacie káble s hrubšími káblami, ktoré sú vyrobené na manipuláciu s väčšími spotrebičmi.
Bolo to užitočné (815) Čítaj viacMôžem vložiť panvice s teflónom do umývačky riadu? Overená
Áno môžeš. Panvica sa však bude opotrebovávať rýchlejšie, ako keď sa čistí ručne. Pri ručnom čistení panvice s teflónom nikdy nepoužívajte drôtenku, ale mäkkú špongiu alebo handričku.
Bolo to užitočné (813) Čítaj viacJe problém mať škrabance na kovu na vnútornej strane umývačky riadu? Overená
Vnútro väčšiny umývačiek riadu je vyrobené z nehrdzavejúcej ocele a nie sú ovplyvnené poškriabaním.
Bolo to užitočné (810) Čítaj viacMôžem do umývačky vložiť drevené predmety, ako sú stierky alebo doštičky? Overená
Nie. Drevené predmety sa môžu v umývačke riadu poškodiť alebo zdeformovať. Uvoľnené drevené vlákna môžu tiež poškodiť umývačku riadu. Drevené dosky na krájanie sú často vyrobené z lepidla, ktoré sa môže uvoľniť po niekoľkonásobnom použití v umývačke riadu.
Bolo to užitočné (810) Čítaj viac


Zapojte sa do diskusie o tomto výrobku
Tu sa môžete podeliť o to, čo si myslíte o Whirlpool WH7IA115B2M3TUS0 Umývačka riadu. Ak máte otázku, najprv si pozorne prečítajte návod. Vyžiadanie manuálu je možné vykonať pomocou nášho kontaktného formulára.